SMore# – HowTo
This page provides material on how to use the SMore# and its various functions. The text is structured along typical “how-to” questions, providing the answers through instructive steps.
Although this page is in English, you can show translated versions in several languages – look for the button with the language flags!
You will find additional info in the FaQ page!
Logging in
Why: Logging into SMore# is key to controlling your car with any command or retrieve information.
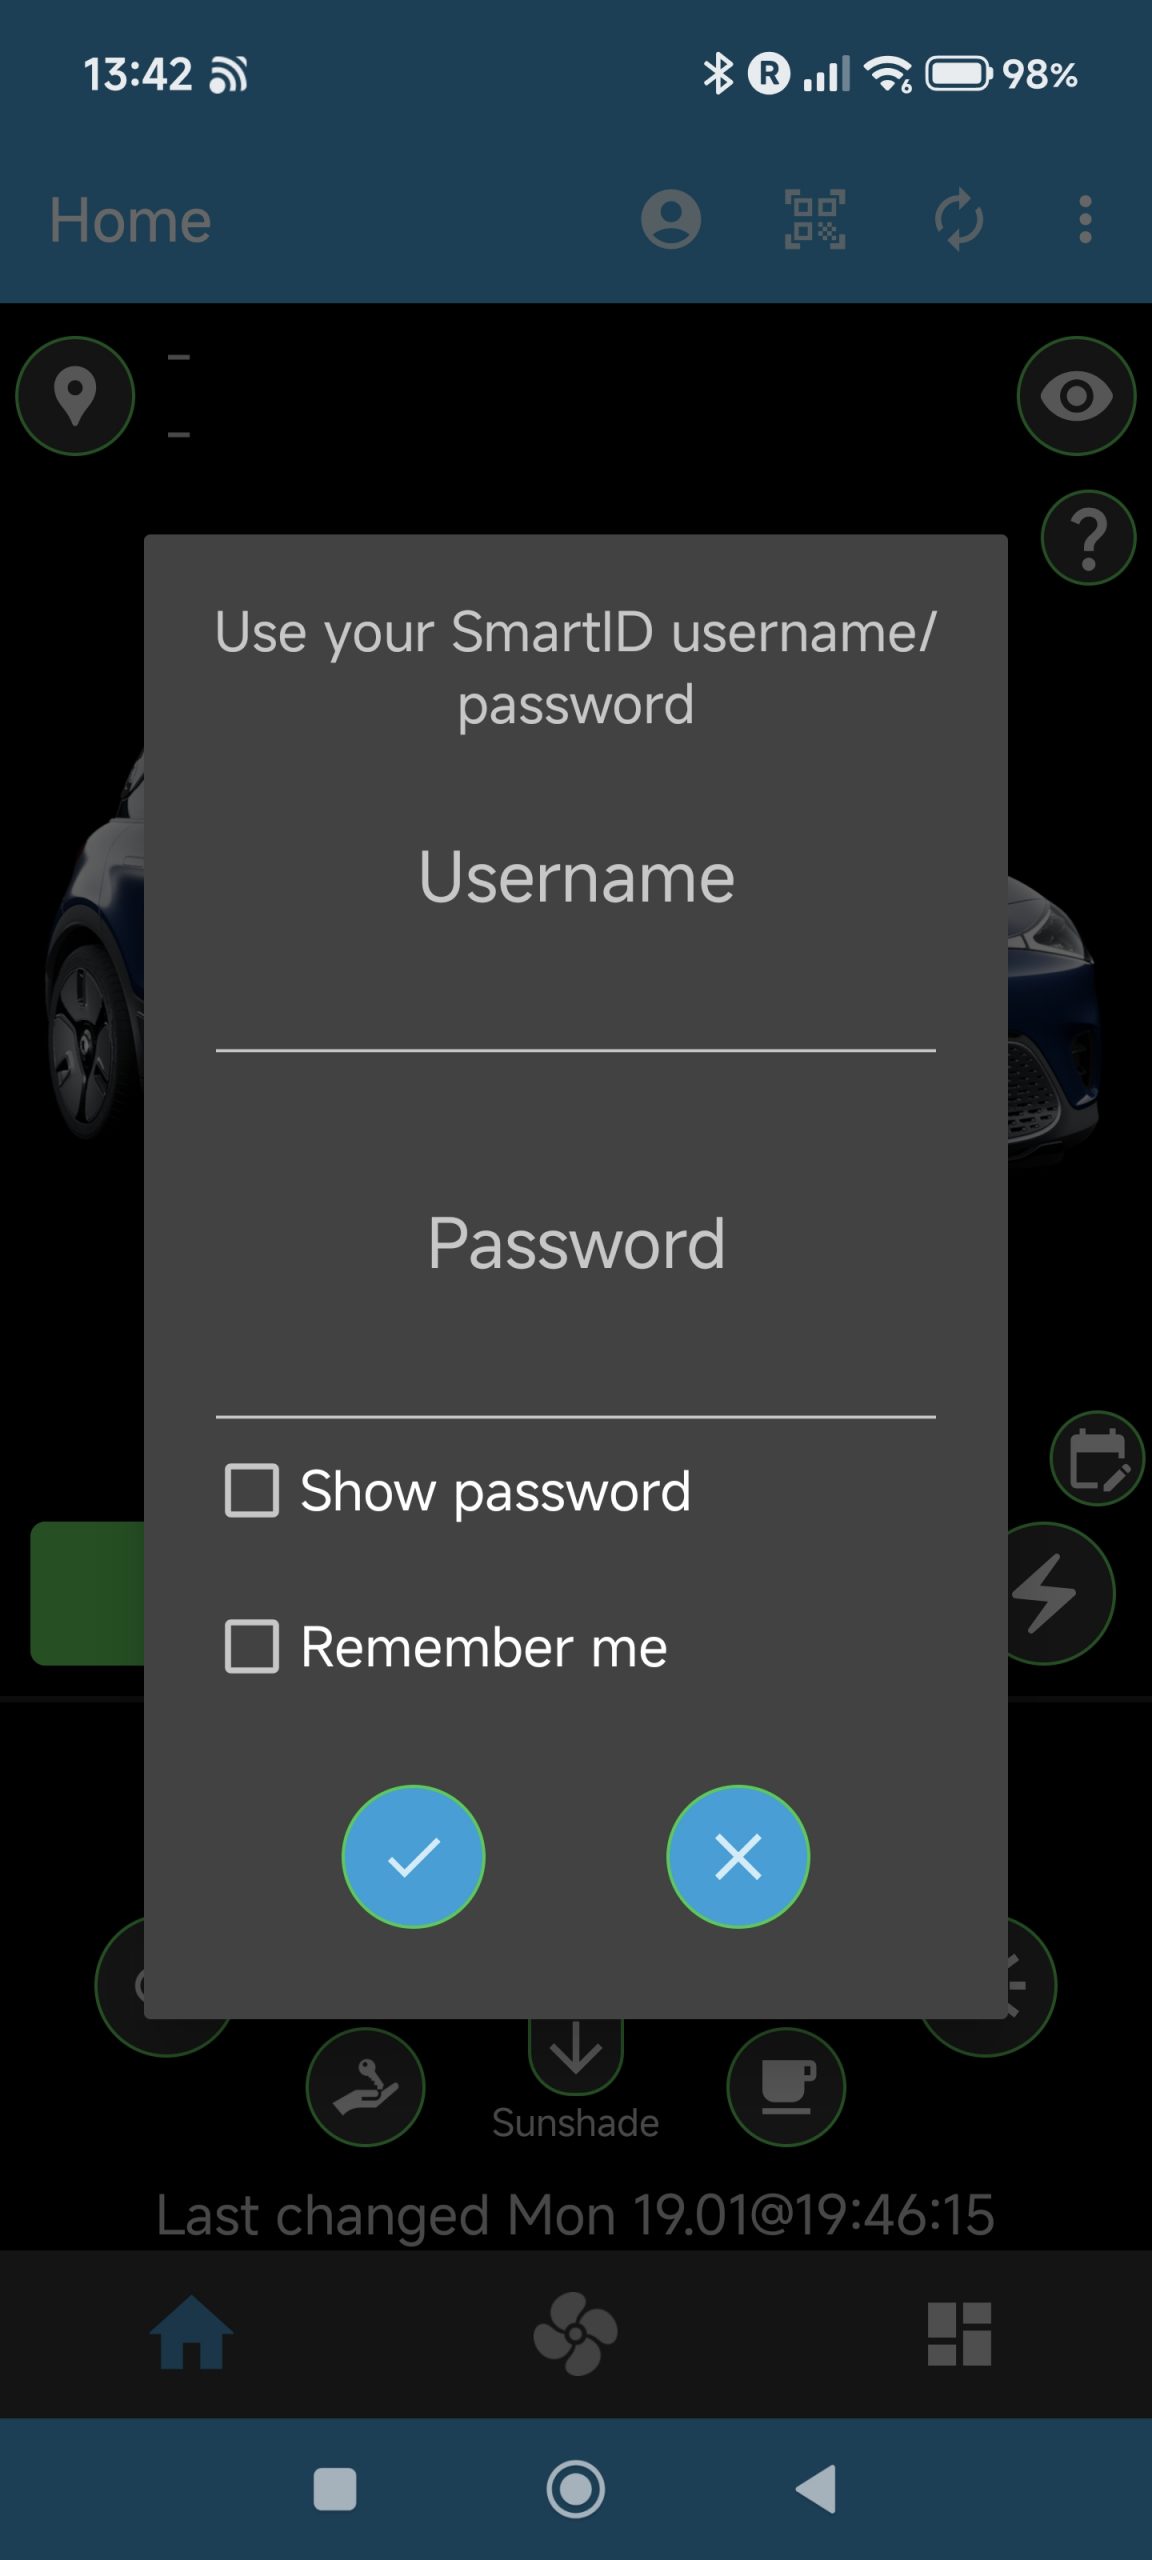
How: Click on the person symbol in the menu bar, as shown below:
A dialog box will appear, as shown below, to input your Smart ID user name and password.
You can select Show Password to unhide the password while typing it.
SMore’ can remember your credentials by clicking Remember Me – your credentials are stored in the hardware-based secure storage of your mobile phone and cannot be accessed outside SMore# at all!
After pressing the OK button, the login will start and a dialog will appear that shows all your Smart cars under your account (even just one). Here, select the one to use and the login will complete.
After the login is complete, you should see your car figure on the main app screen.
NOTE: when you are behind a VPN, SMore# will likely have problems logging in since many VPNs block a crucial step in the login – easiest is to switch to mobile data for the login and then go back.
Why: Your car needs to be logged into your Smart account to work, e.g., for online services.
How: Press on the QR symbol in the menu bar of SMore#, as shown below:
The app will start a QR code reader, i.e., it will open the camera, as shown below: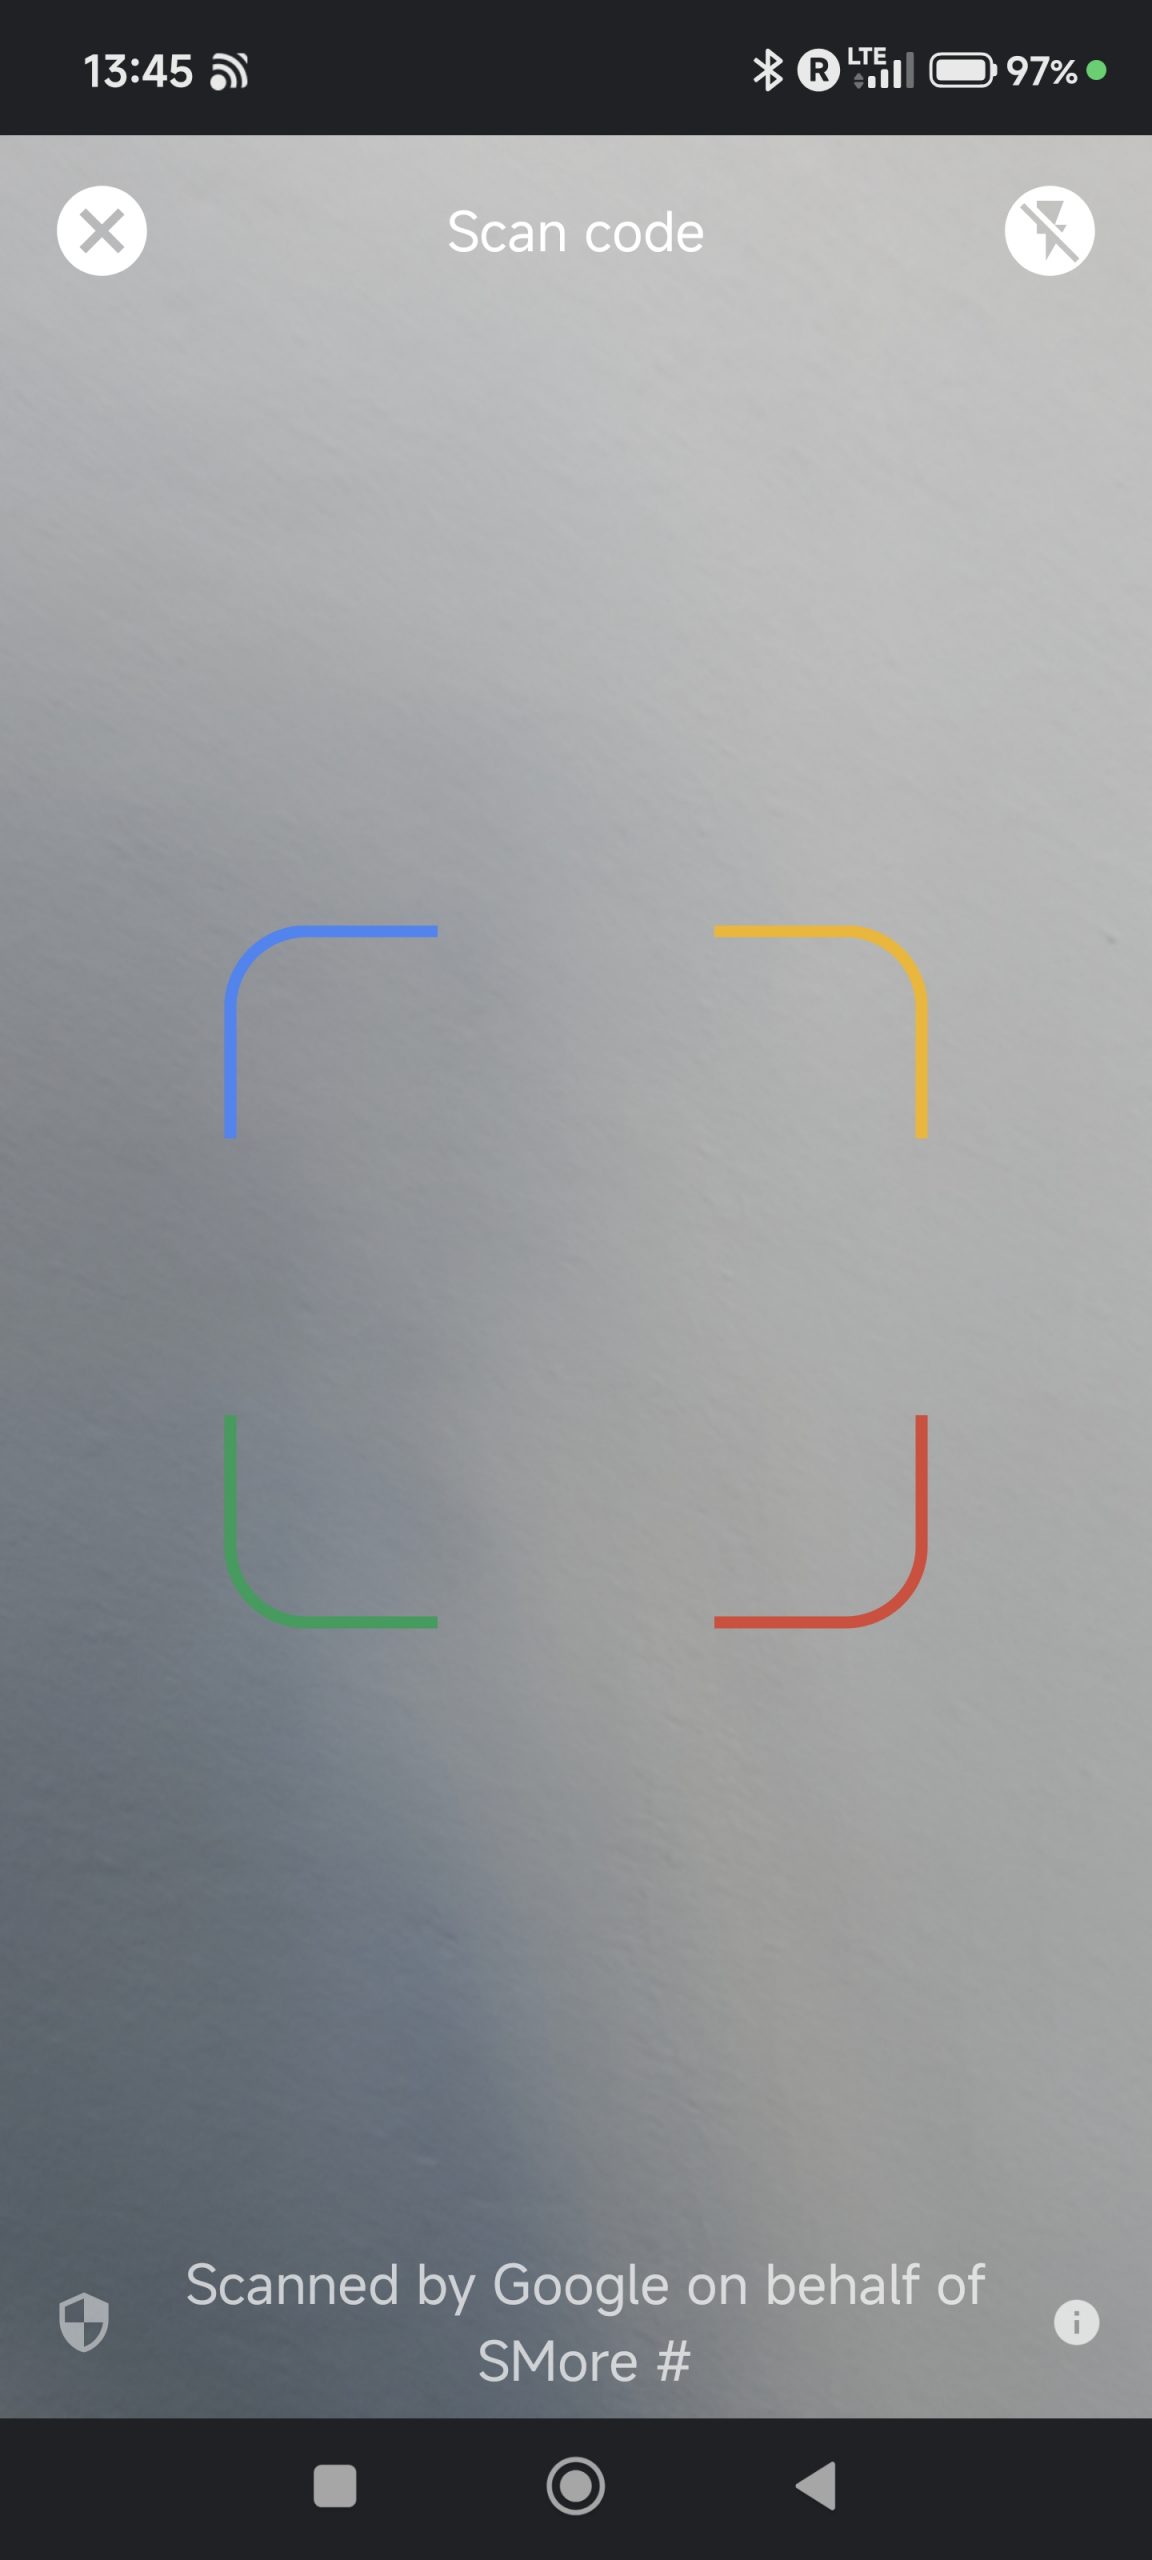
In the car, choose Login in the menu when clicking on the small (grey) person icon at the top right.
Point the QR reader at the QR code shown now (this QR will only appear while parked).
The app now returns to the app screen and the car should now log into your account. This is shown by the small person icon in the car menu turning black.
Why: SMore# supports one or more cars under your SmartID, e.g., when having more than one Smart in your family or your company.
How: During logging into the app or through long pressing on the car image (in the home tab of the SMore# app) after logging in, a screen will appear that shows all your cars in your SmartID account, as seen below: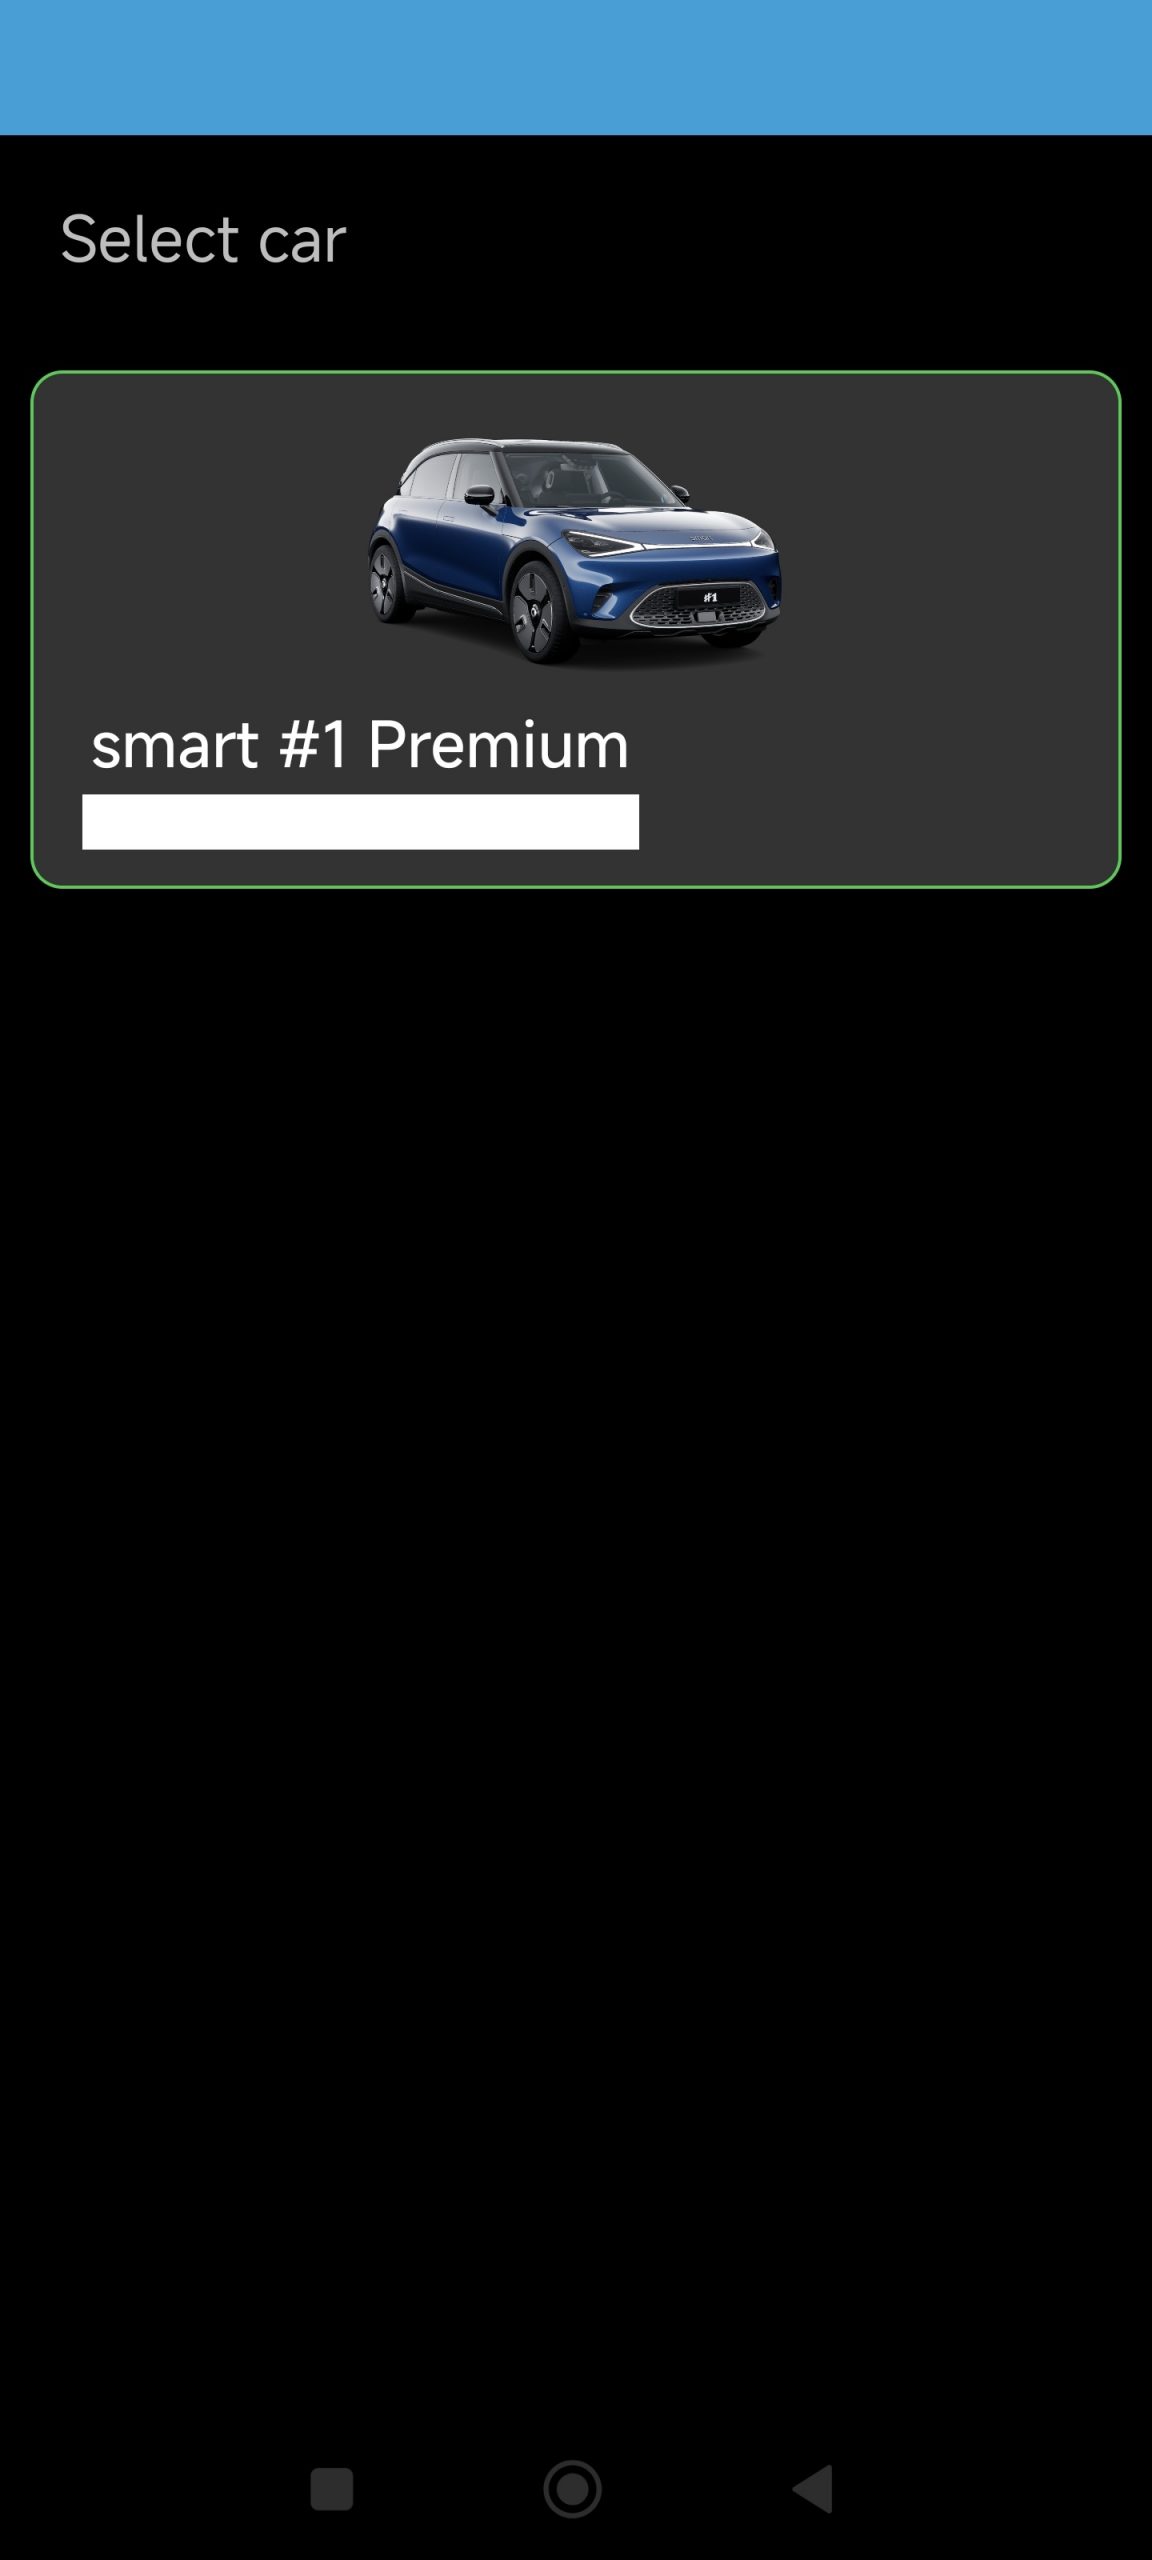
Apart from the car image, you will see the car model (e.g., smart#1 Premium) and the VIN (hidden here in the image). If you have more than one car, the list will be longer. Select the car you want to control through clicking on it; the screen will disappear and the car image in the SMore# Home tab should show the selected car now.
Locking, Honking, and similar
Why: SMore# offers the possibility to lock or unlock your car.
How: Go to the main screen of the SMore# app and long press on the lock button, shown below:
After pressing, the button will rotate to show the execution of the command. SMore# will then read the current status from the car – in case the car was unlocked successfully, the lock button will turn orange.
Note: A short press on the button will not execute the command but show a small description of the button’s function – this is to prevent accidental execution!
Also, the car should lock after about one minute again, if no door/trunk is opened!
Why: SMore# offers the possibility to lock or unlock the trunk of your car.
How: Go to the main screen of the SMore# app and long press on the lock trunk button, shown below: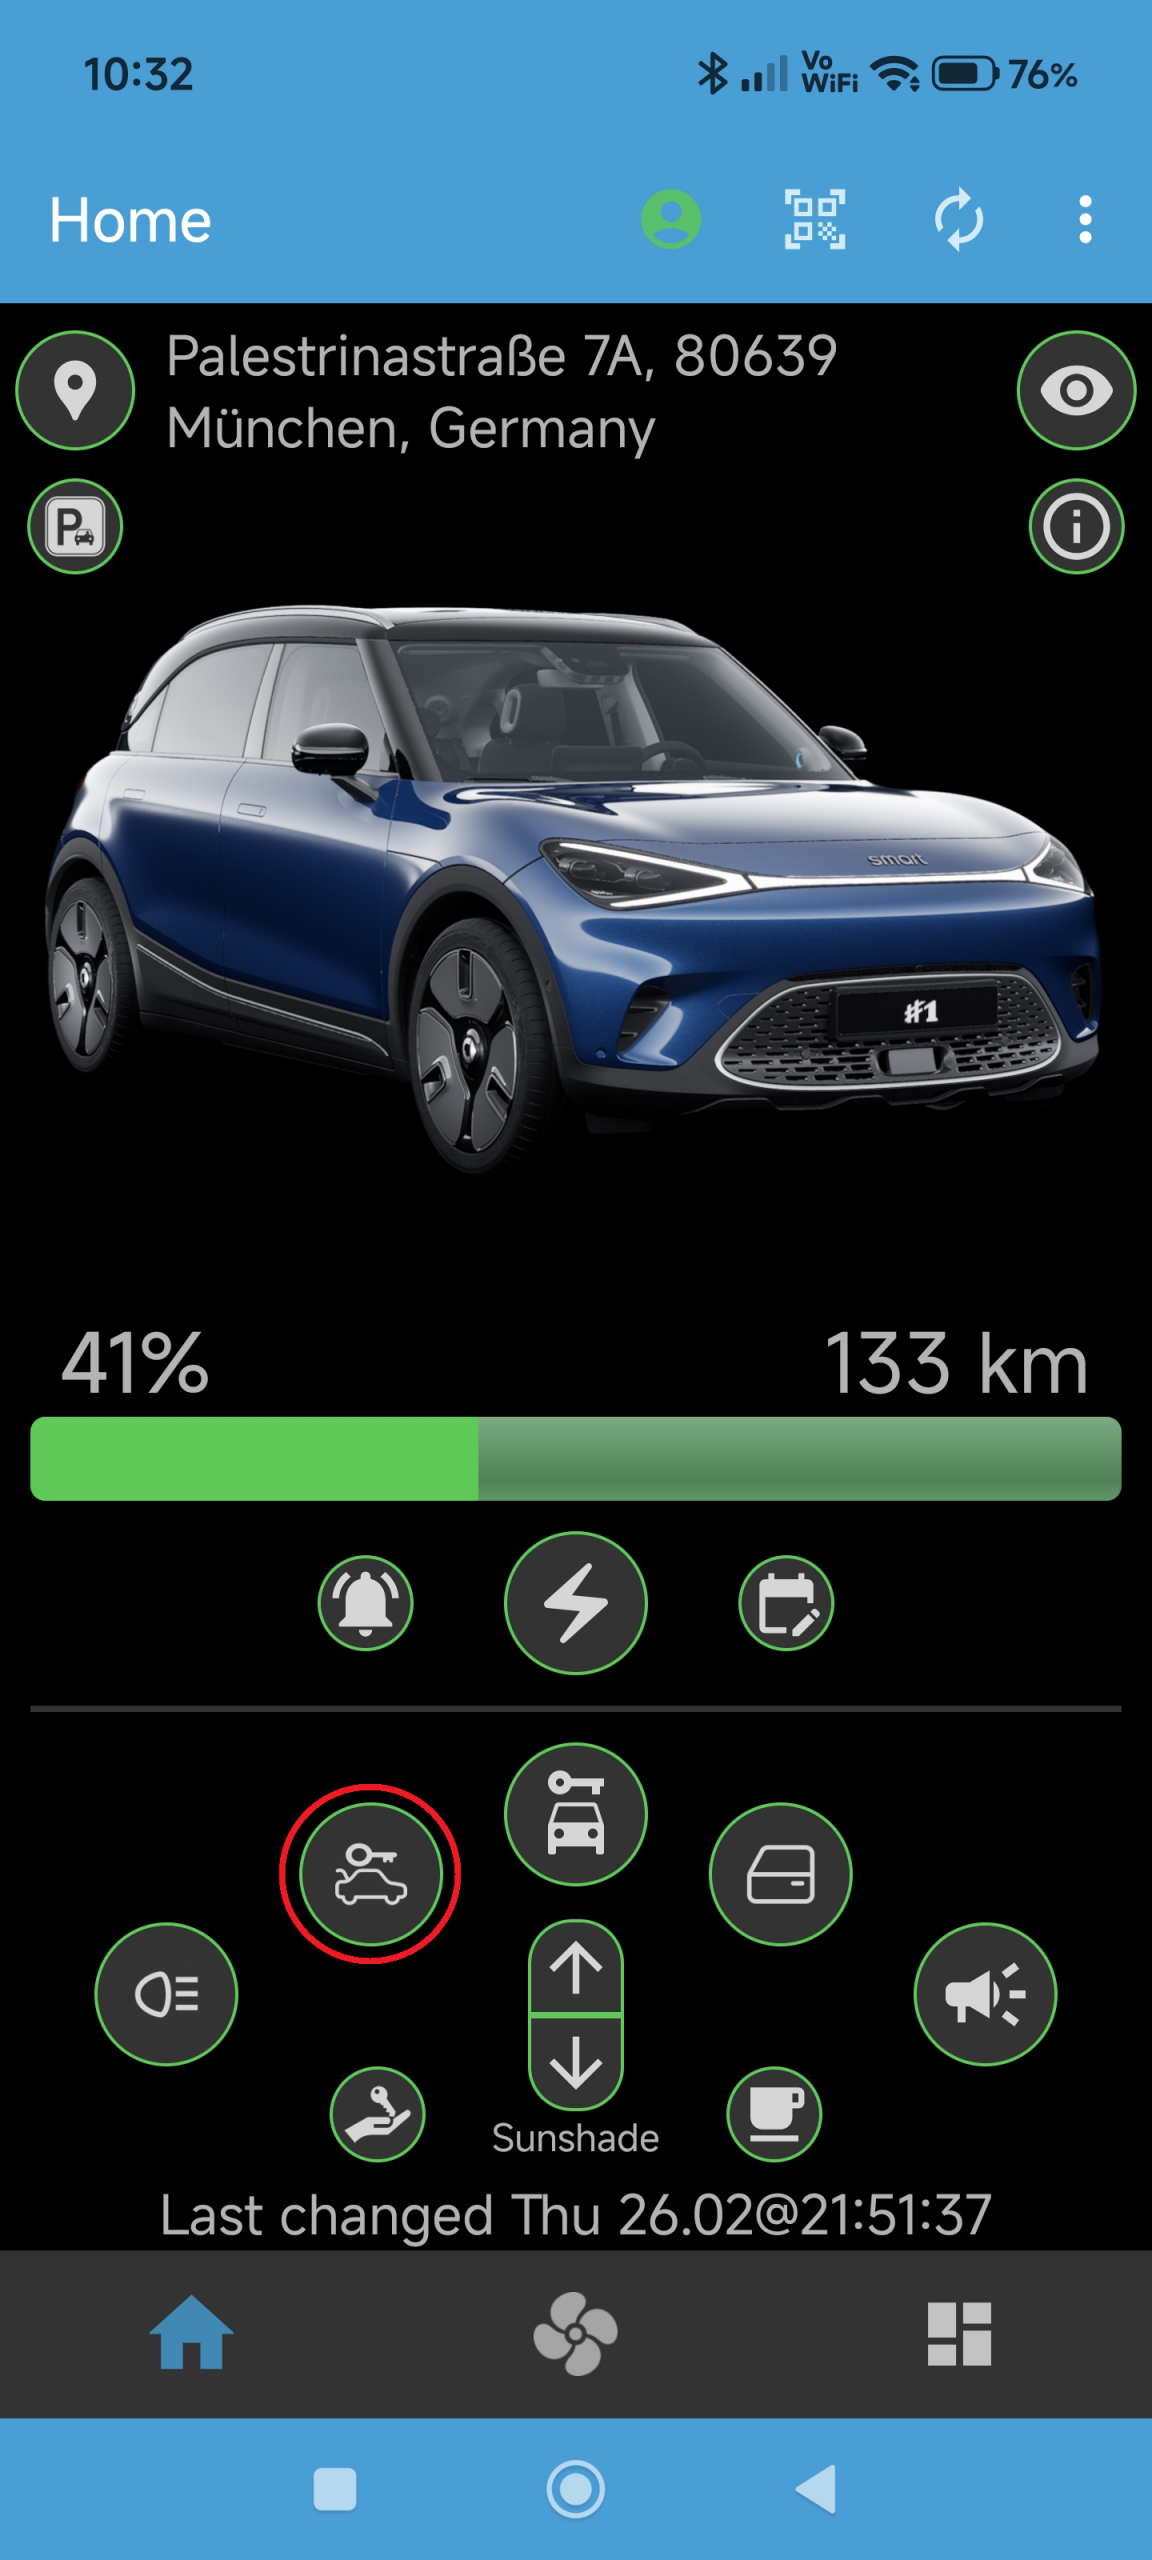
After pressing, the button will rotate to show the execution of the command. SMore# will then read the current status from the car – in case the trunk was unlocked successfully, the button will turn orange.
Note: A short press on the button will not execute the command but show a small description of the button’s function – this is to prevent accidental execution!
Also, the car should lock after about one minute again, if no door/trunk is opened!
Why: SMore# offers the possibility to sound the honk of your car, possibly to find it in a parking garage.
How: Go to the main screen of the SMore# app and long press on the honk button, shown below: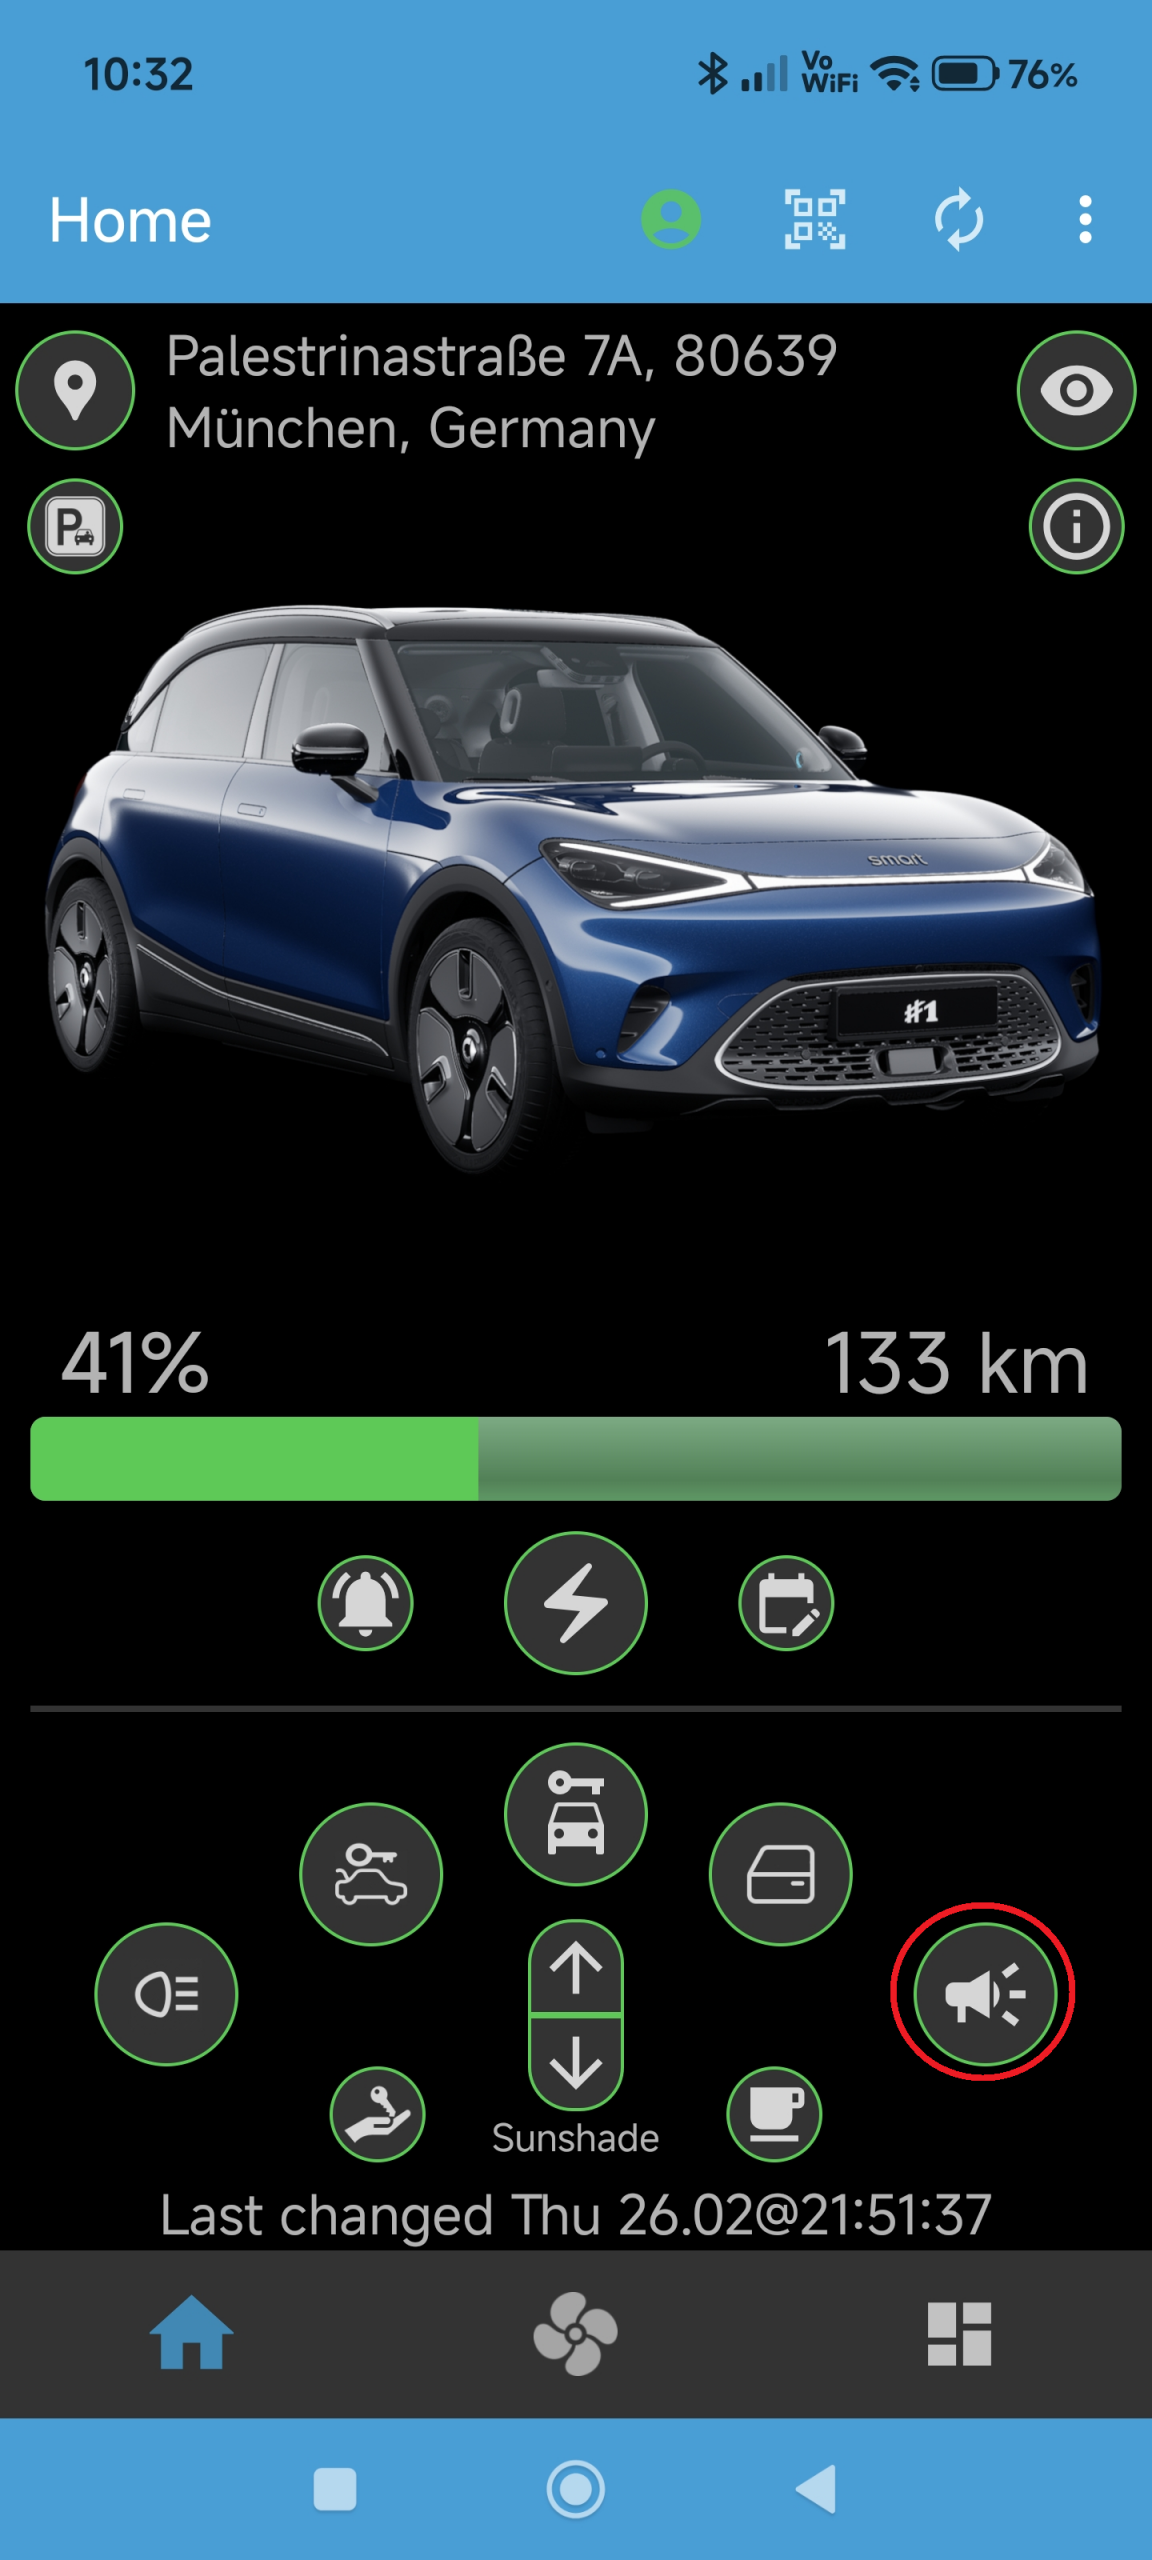
After pressing, the button will rotate to show the execution of the command.
Note: A short press on the button will not execute the command but show a small description of the button’s function – this is to prevent accidental execution!
Why: SMore# offers the possibility to flash the lights of your car, possibly to locate the car in a parking garage.
How: Go to the main screen of the SMore# app and long press on the flash button, shown below: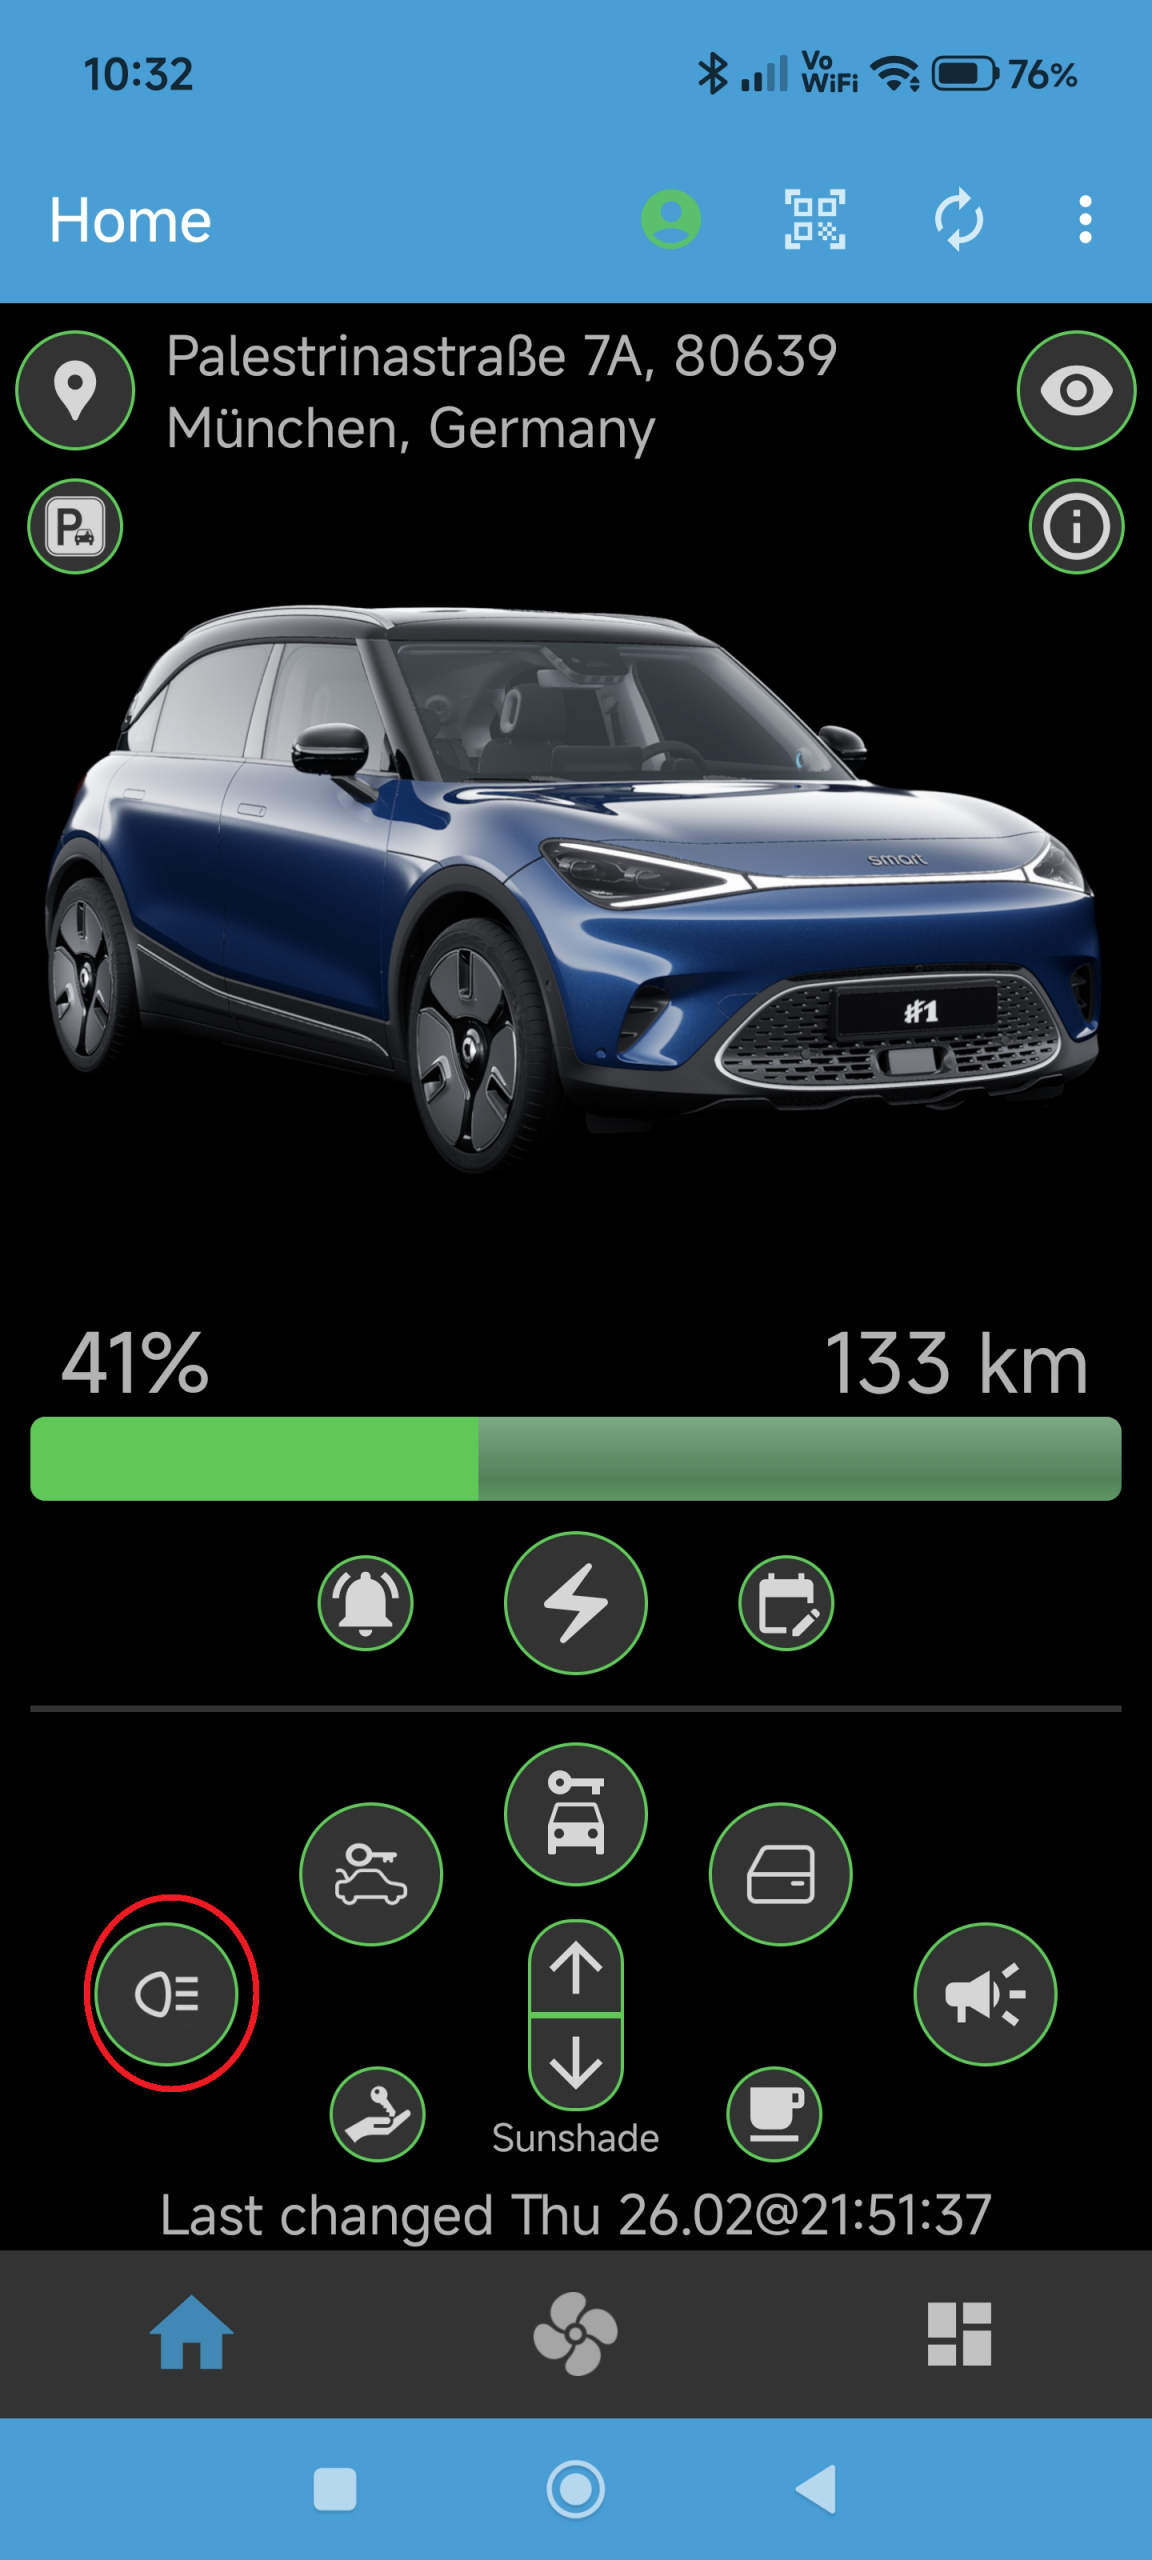
After pressing, the button will rotate to show the execution of the command.
Note: A short press on the button will not execute the command but show a small description of the button’s function – this is to prevent accidental execution!
Why: SMore# offers the possibility to ventilate your car by lowering all windows a bit.
How: Go to the main screen of the SMore# app and long press on the window button, shown below: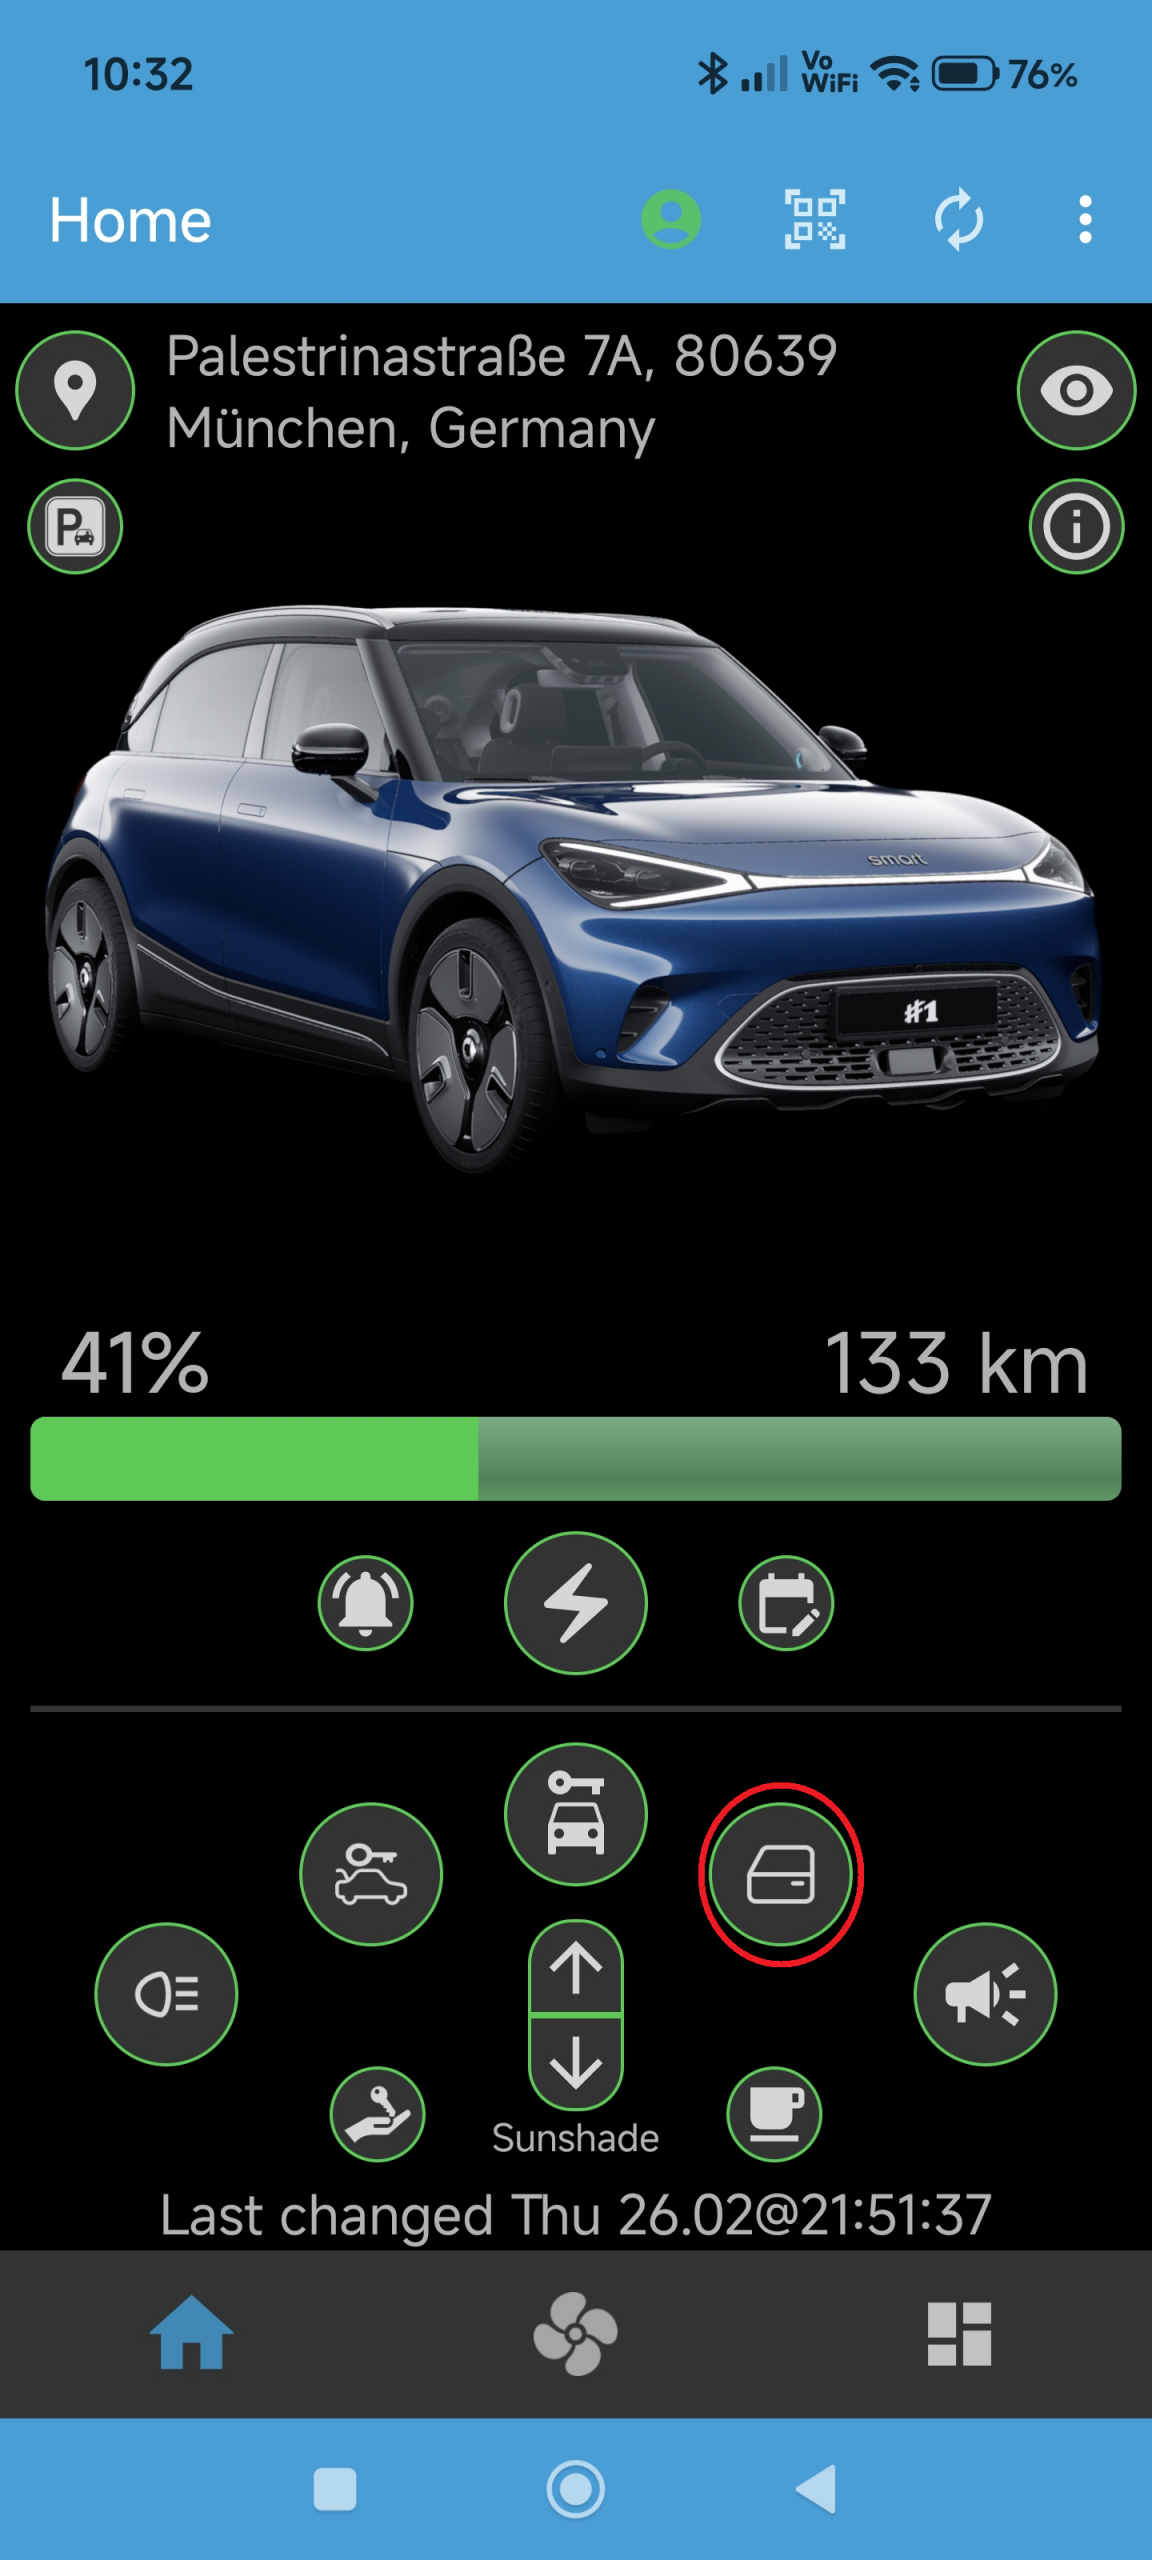
After pressing, the button will rotate to show the execution of the command. SMore# will then read the current status from the car – in case the car windows were lowered successfully, the lock button will turn orange.
Note: A short press on the button will not execute the command but show a small description of the button’s function – this is to prevent accidental execution!
Why: SMore# offers the possibility to open or close the sunshare of your Smart #1 (not supported on #3).
How: Go to the main screen of the SMore# app and long press on either the up or down sunshade button, shown below: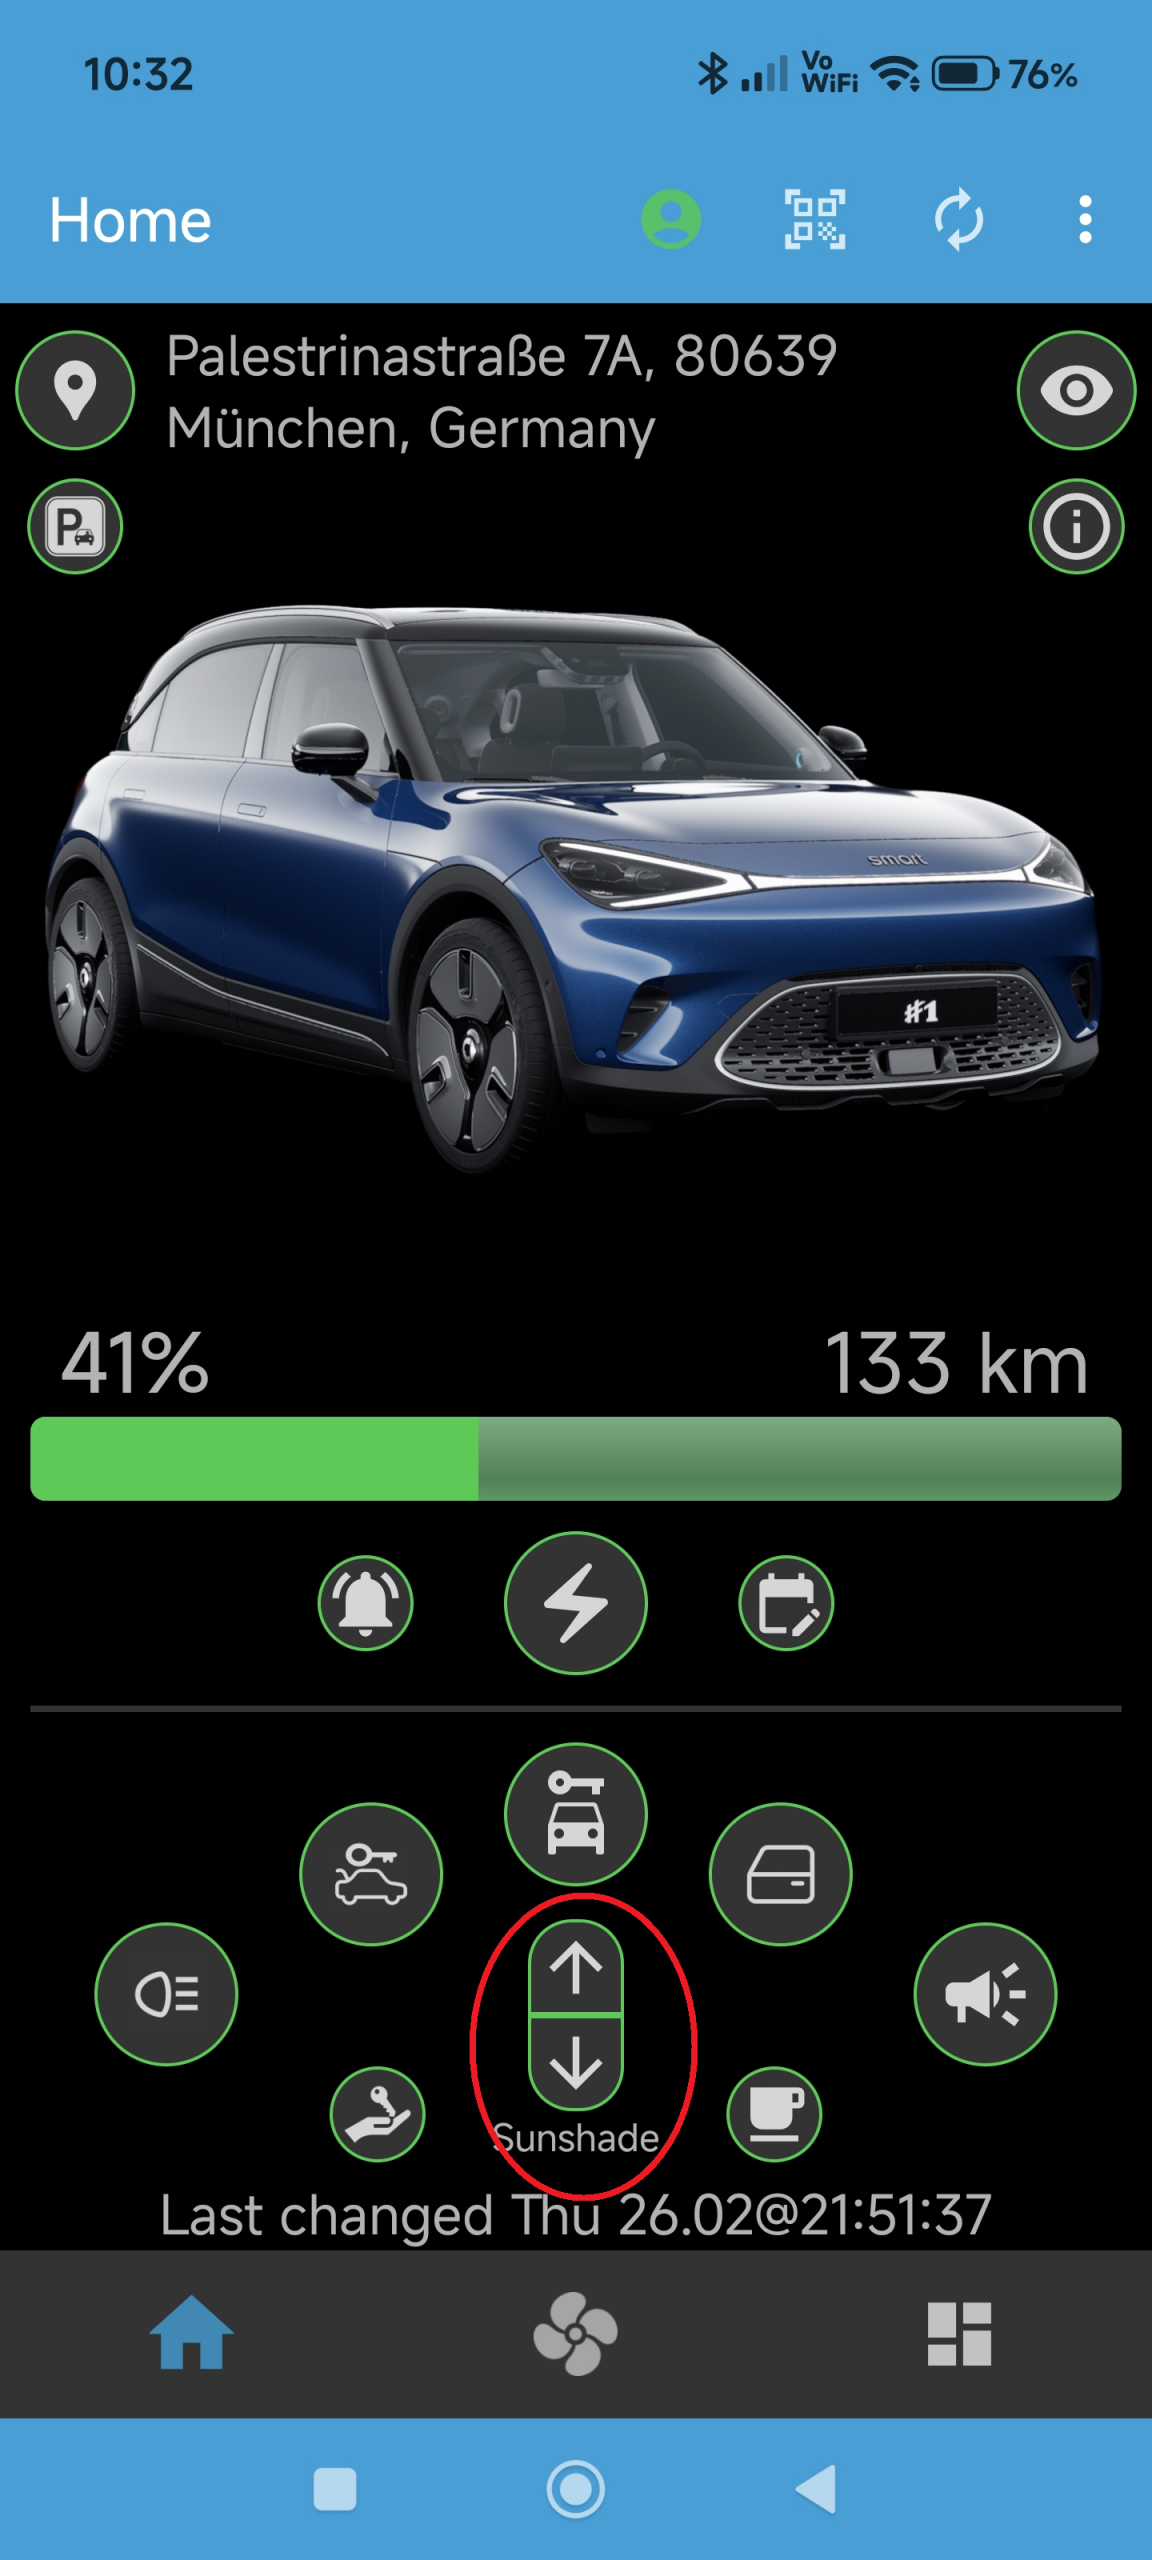
After pressing, the button will rotate to show the execution of the command. SMore# will then read the current status from the car. You can observe the status of the sunshade (open or closed) in the dashboard tab.
Note: A short press on the button will not execute the command but show a small description of the button’s function – this is to prevent accidental execution!
Why: SMore# offers the possibility to check whether comfort or valet mode is currently active.
How: Go to the main screen of the SMore# app and check the color of either of the two buttons below: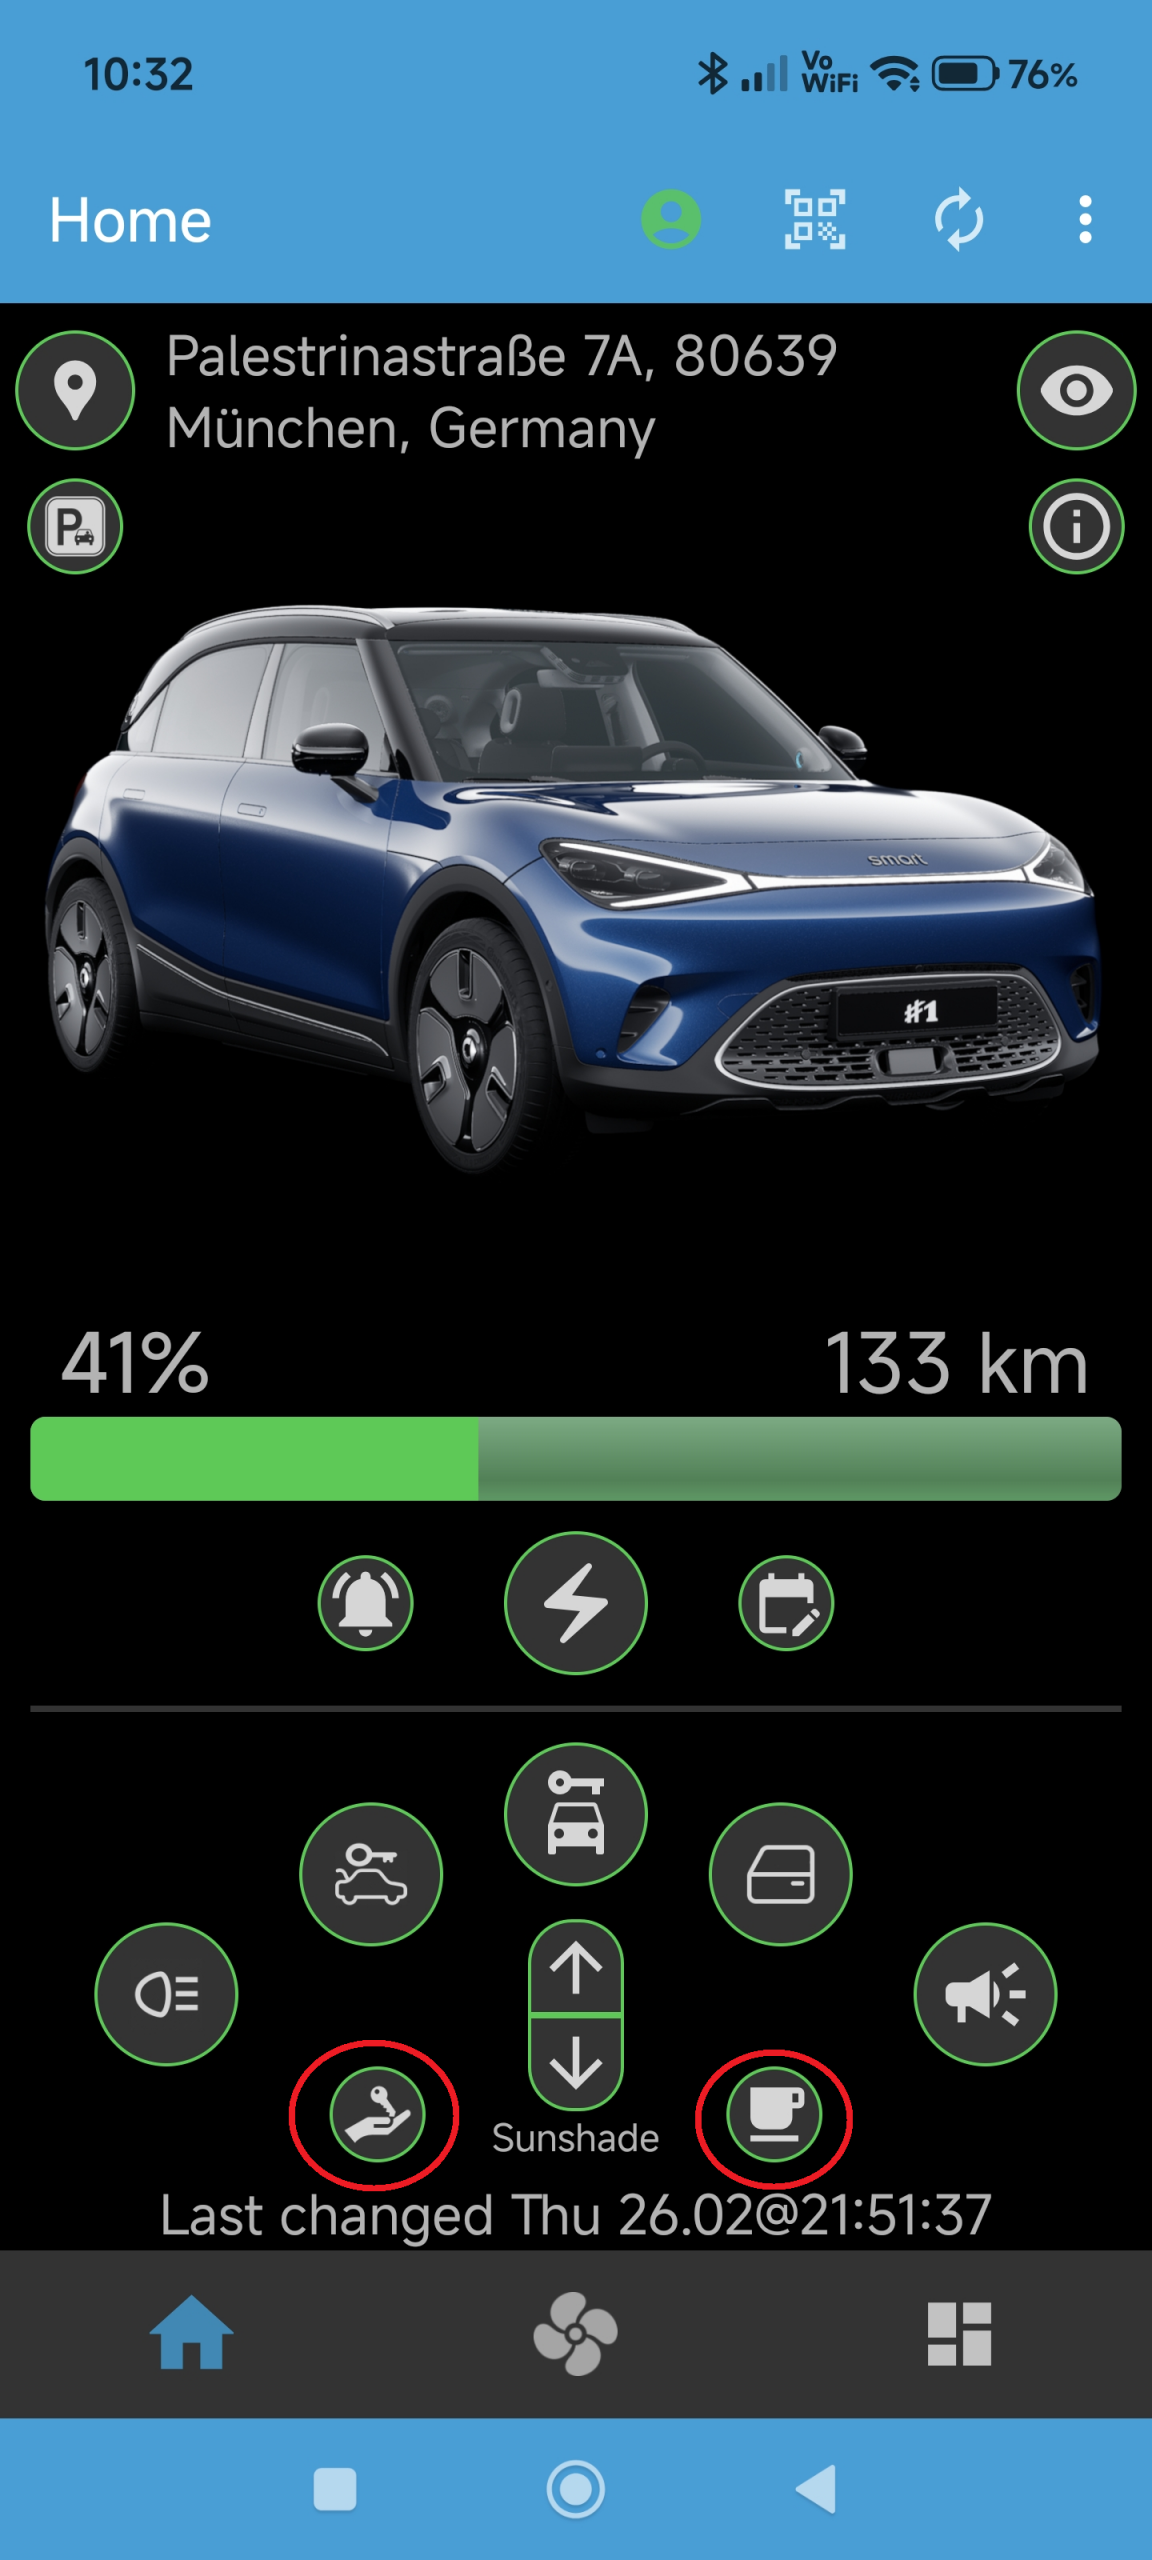
The right button (coffee cup) will turn orange if any comfort mode in the car is active, such as pet or entertainment mode. Unfortunately, the Smart does not provide information WHICH comfort mode is active.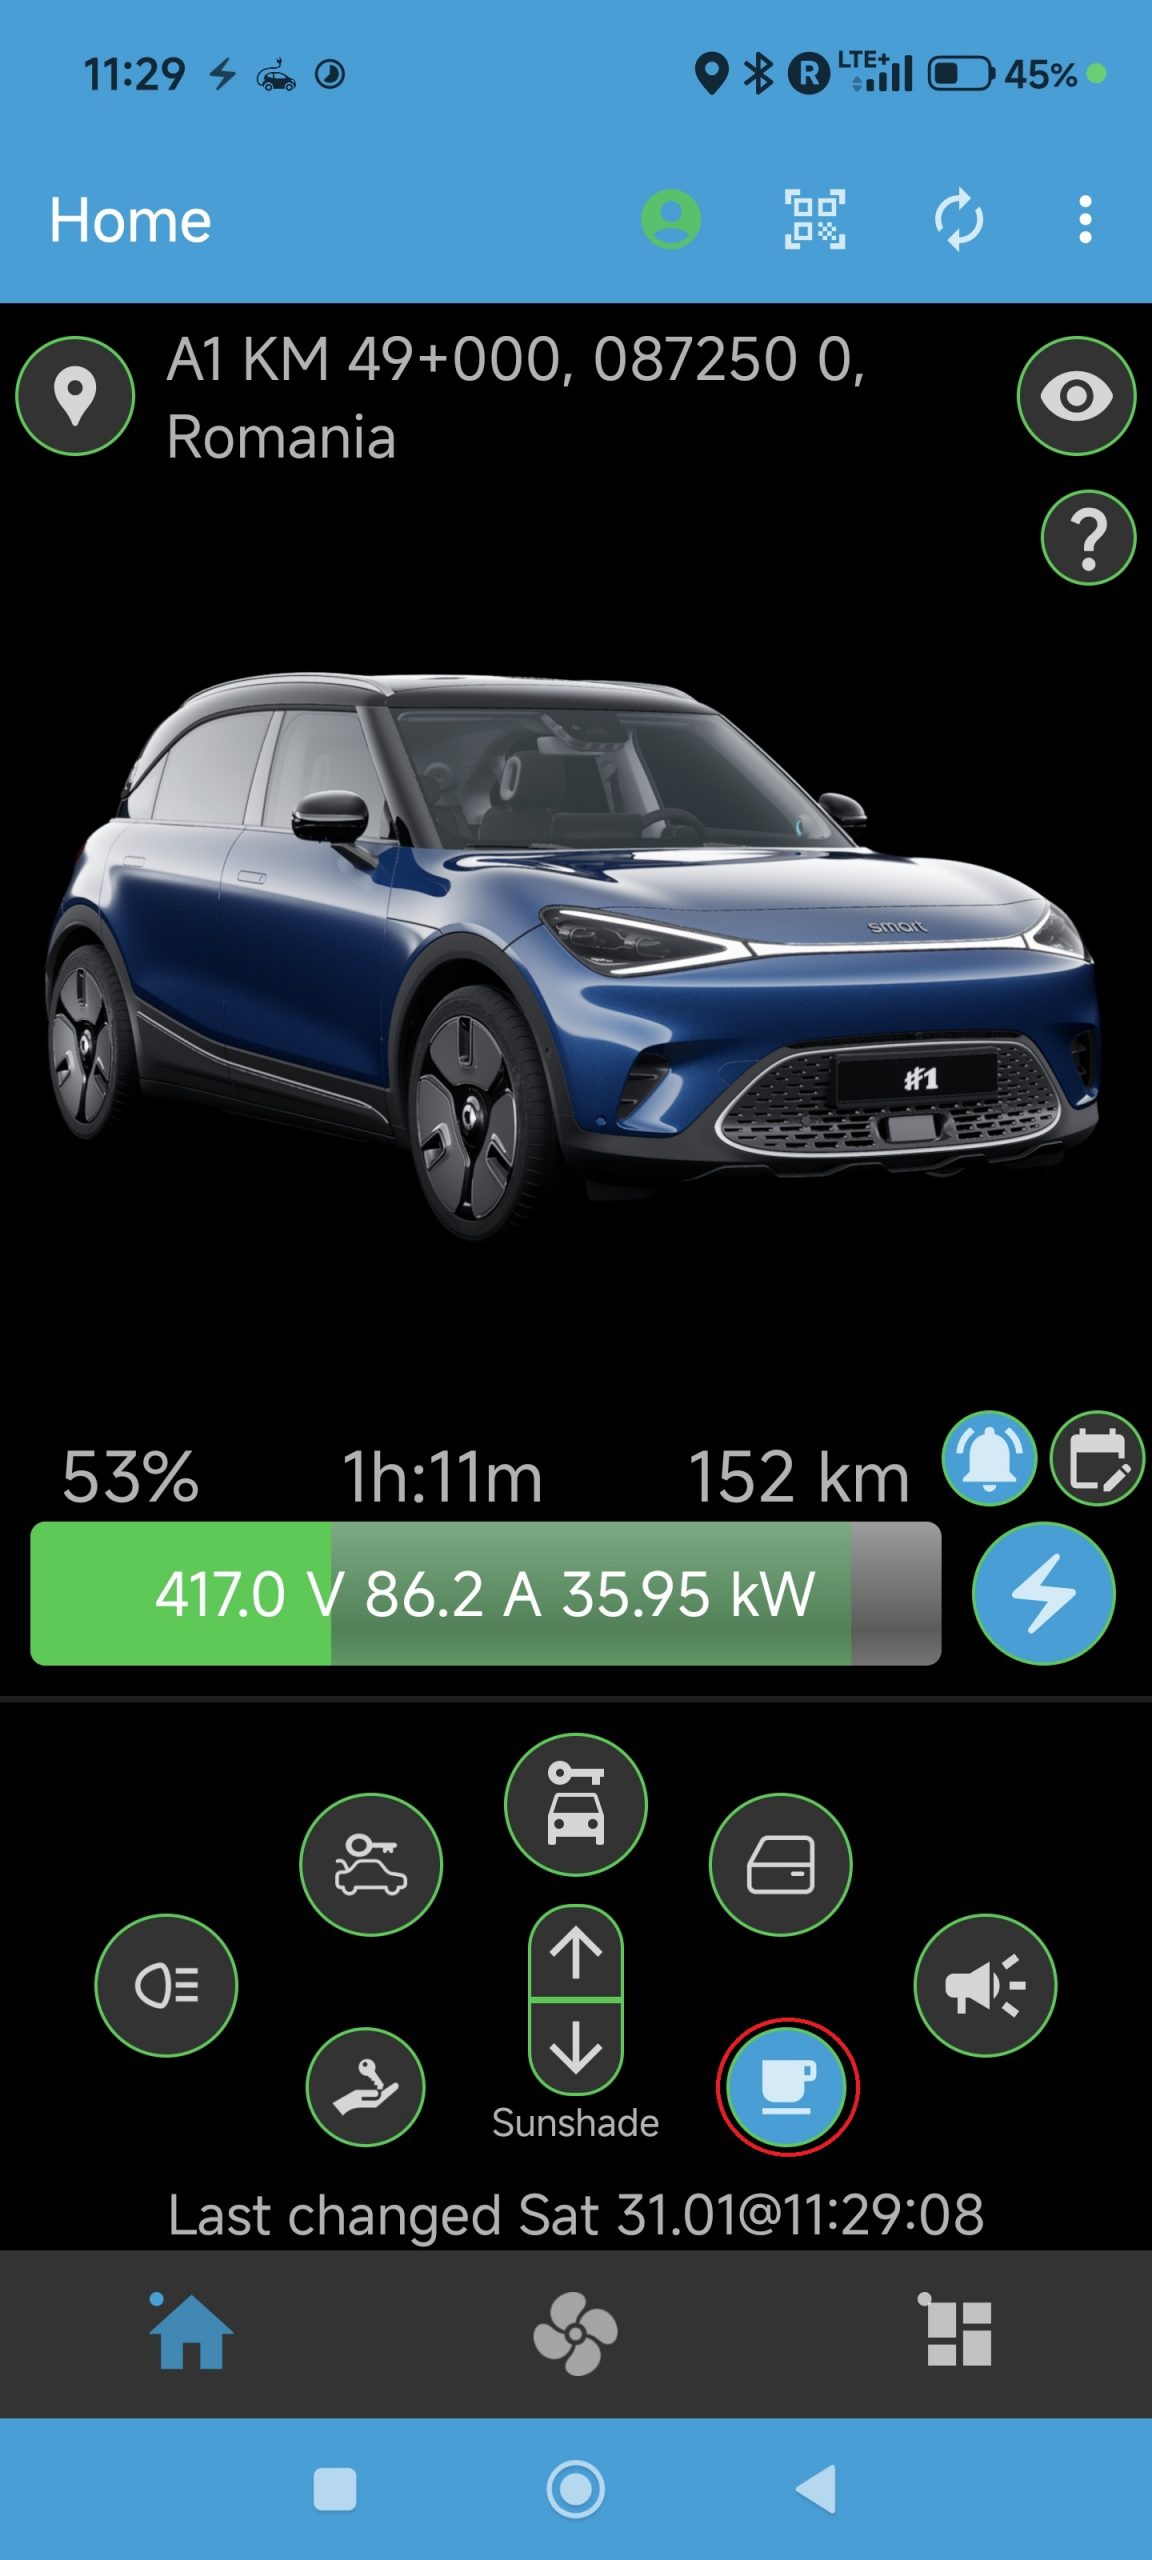
The left button will turn orage if the valet mode is active.
Why: You may want to know if your car is driving or is parked.
How: Press the car state icon at the left top, as shown below:
When pressing, a small message appears at the bottom of the screen, showing if your car is parked or driving.
Why: Car status values can be updated at any time.
How: Press the update menu button at the top right in the menu bar (spinning symbol):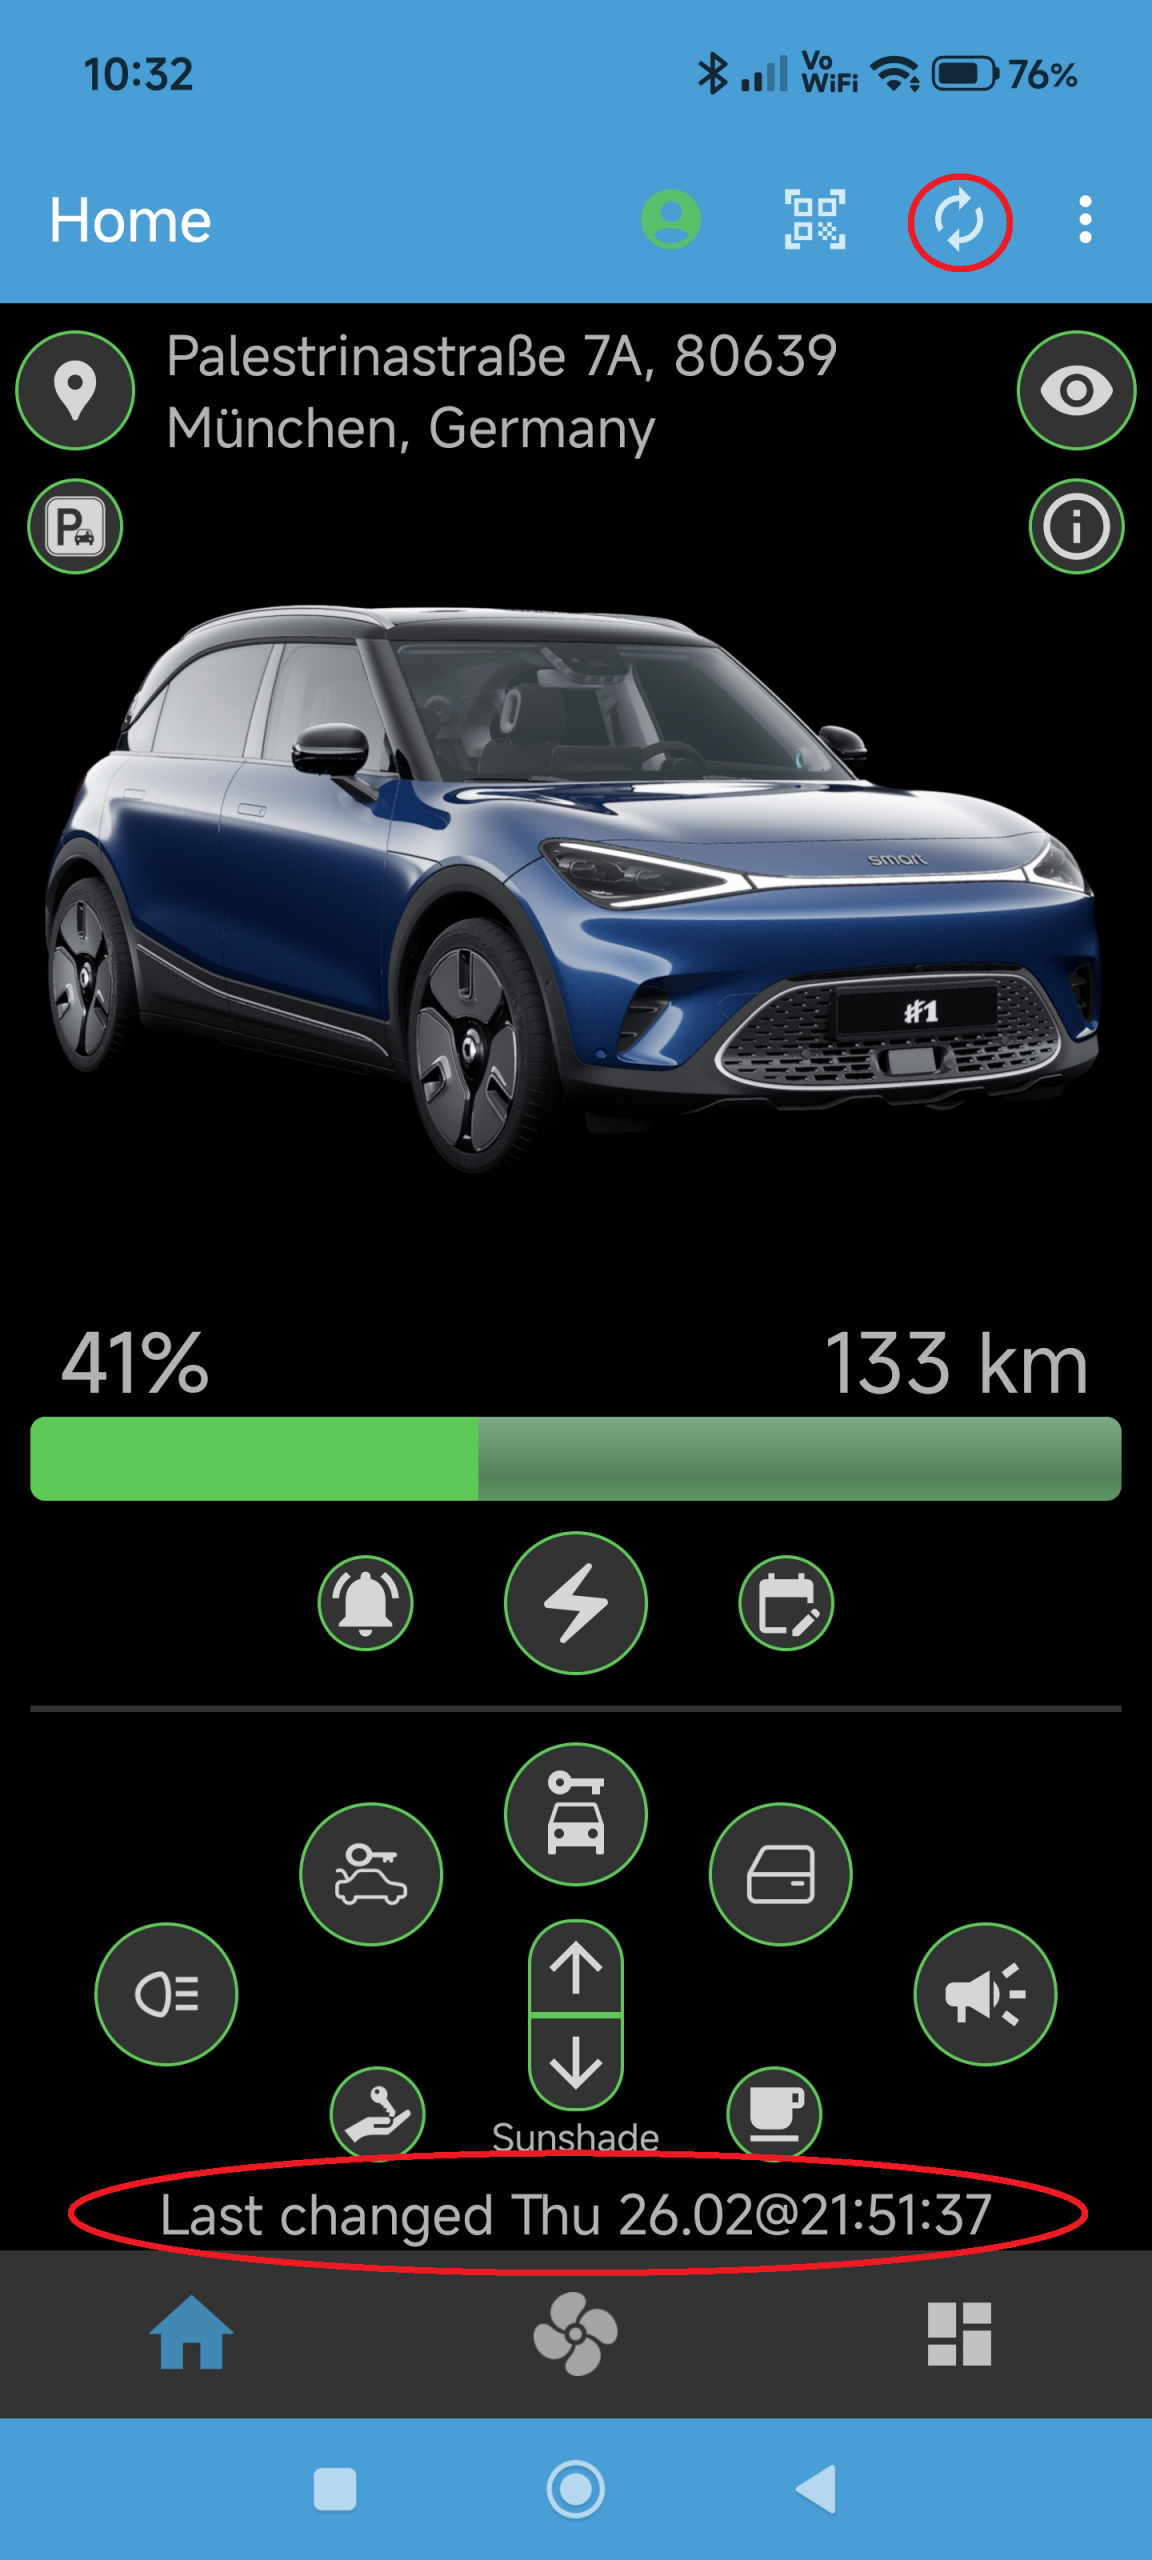
The app will now request updates from the Smart server and update the various symbols, buttons, and dashboard values accordingly and update the timestamp at the bottom of the app screen.
Note: If there are no new values available, the timestamp will not change, indicating this situation. If the car is parked and goes into sleep mode, values cannot be updated anymore without the car being woken, e.g., through unlocking it.
Also note, that new values are requested automatically when you change tabs or bring the app into the foreground, so manual updating it usually not needed.
Charging
Why: SMore# offers the possibility to check on your charging status.
How: The charging status is shown through the color of the charging button, as below:
If the car is not charging, the button is grey, as shown.
The button will turn blue, if the car is charging. Additionally, the expected time to charge limit is shown in-between the battery percentage and range text above the charge bar, while the charge bar is animated from the current charge level to the charge limit, as shown below: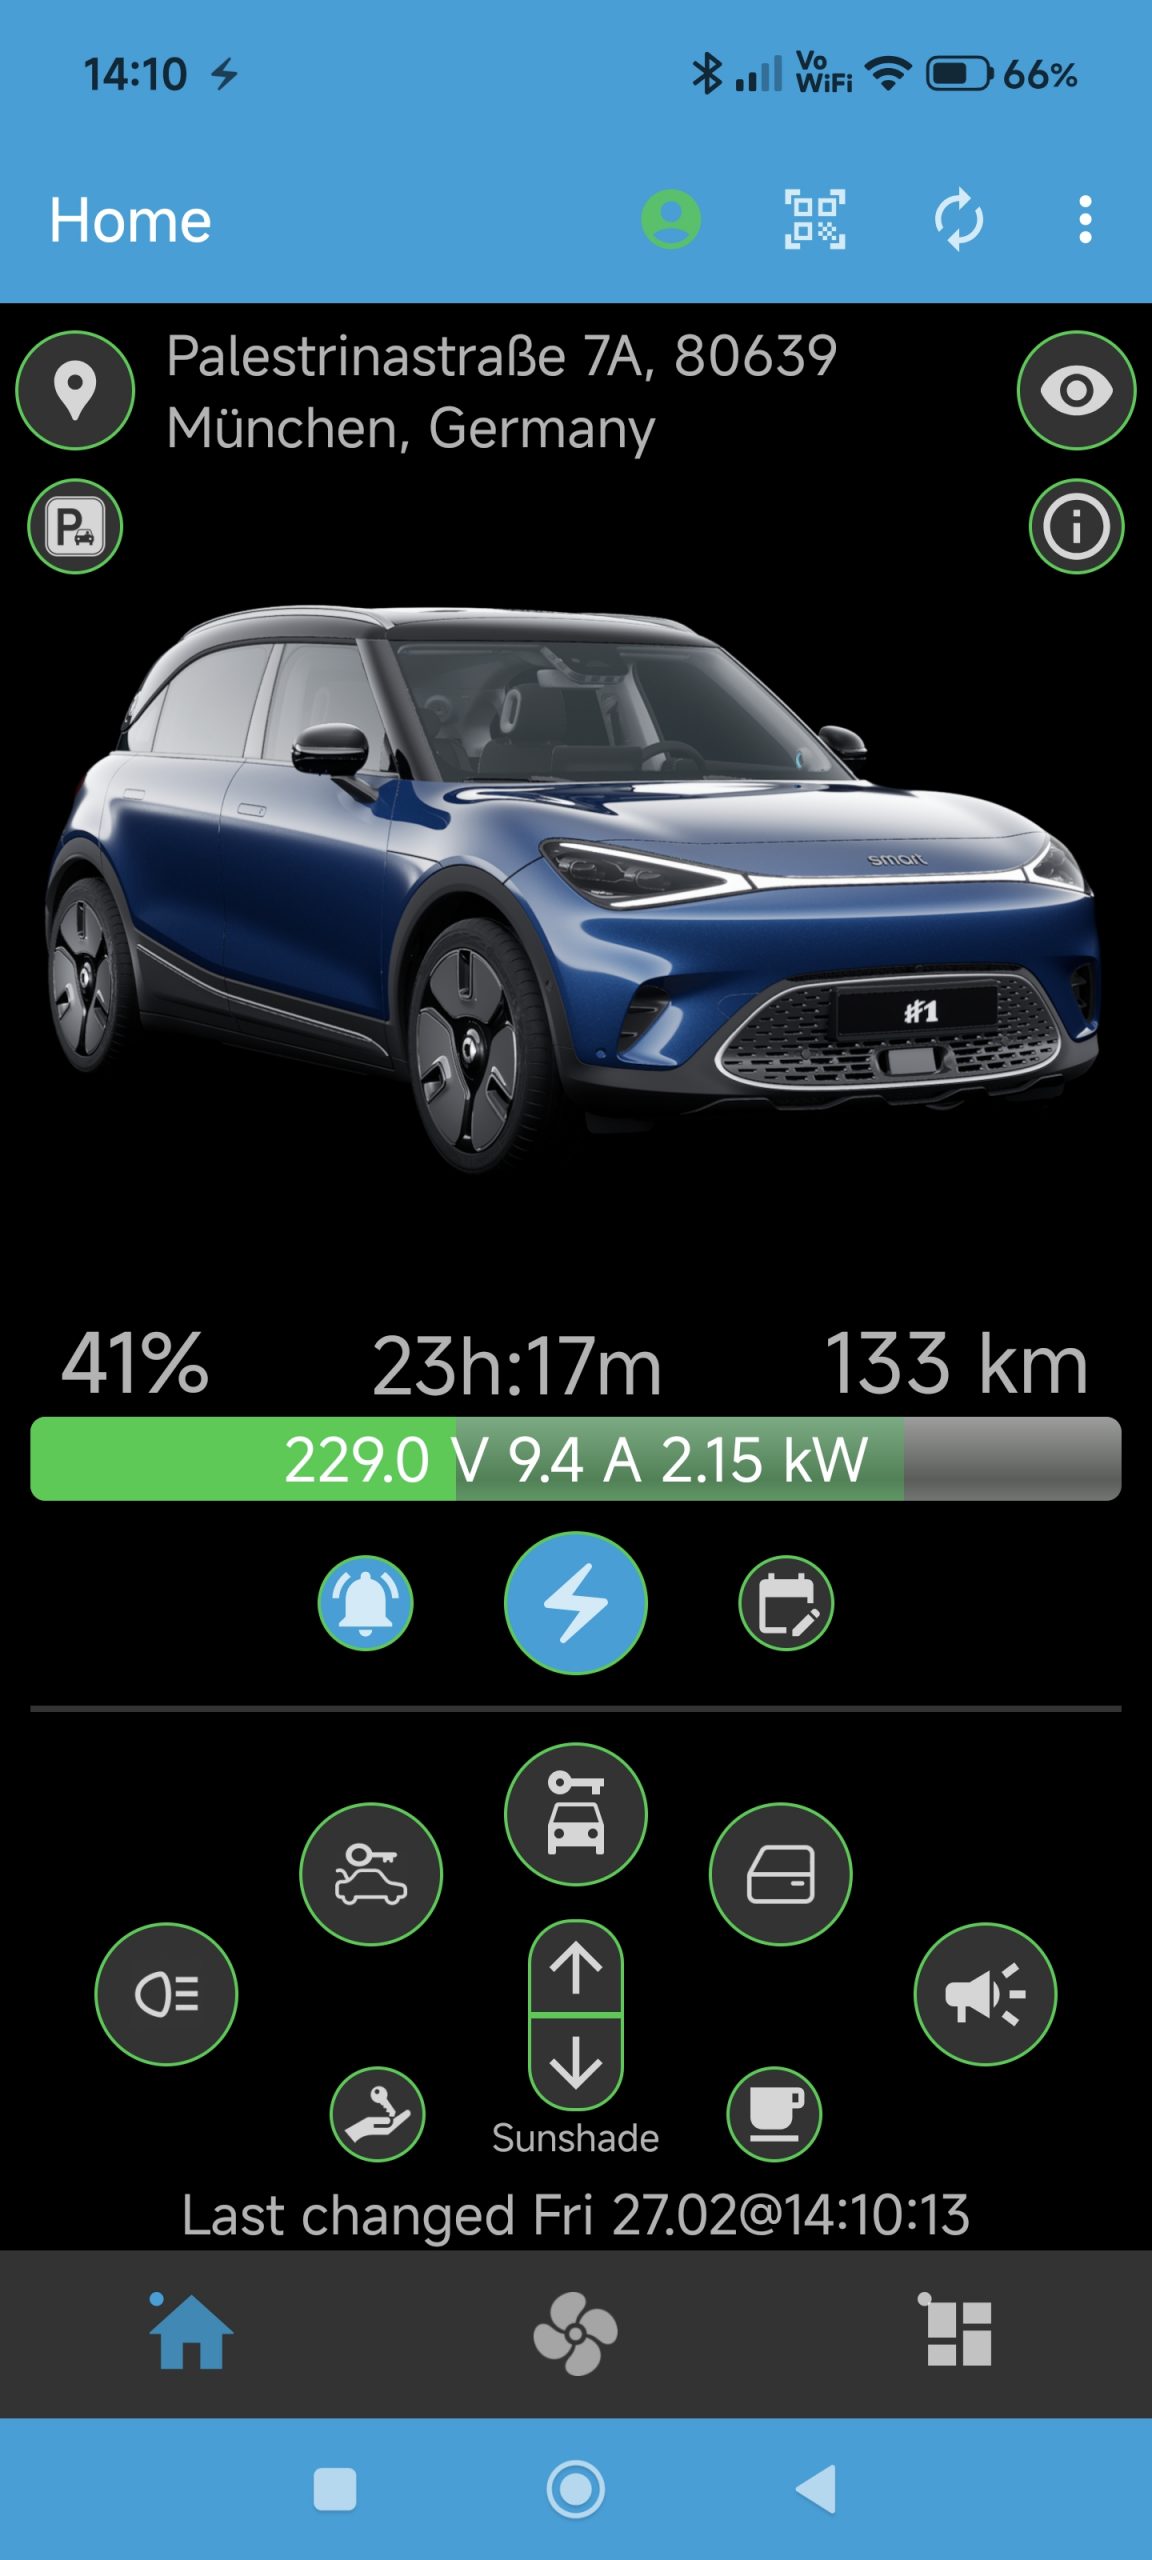
Also, a notification will be shown that your car is currently charging – see the relevant How-To under the notification category.
The button will turn orange, if the charge falls under ca. 1kW. This usually happens when the charging is finished but the cable remains in the car.
Why: SMore# offers the possibility to stop an ongoing charging session.
How: Press the charging button, shown below, when it is illuminated in blue:
Alternatively, you can press Stop Charging in the notification that is shown during charging, as shown below:
After a successful stopping of the charging, the values will be updated and the button should either turn grey or orange – it often stays orange for AC chargers if the cable remains in the car since the charger may maintain a small charge, which is shown.
Why: SMore# offers the possibility to restart a charging session, if the cable remained in the car.
How: Press the charging button, shown below, if it is illuminated in orange.
Note: Restarting a session must be supported by the charger. Public AC charger will unlikely do this, requiring new authentication through a charging card or similar. Wallboxes may support this although this has not been extensively tested.
Why: SMore# offers the possibility to set/change your charging limit to stop charging at the desired level.
How: Press on the charging bar, after which a charging limit dialog box appears, as shown below: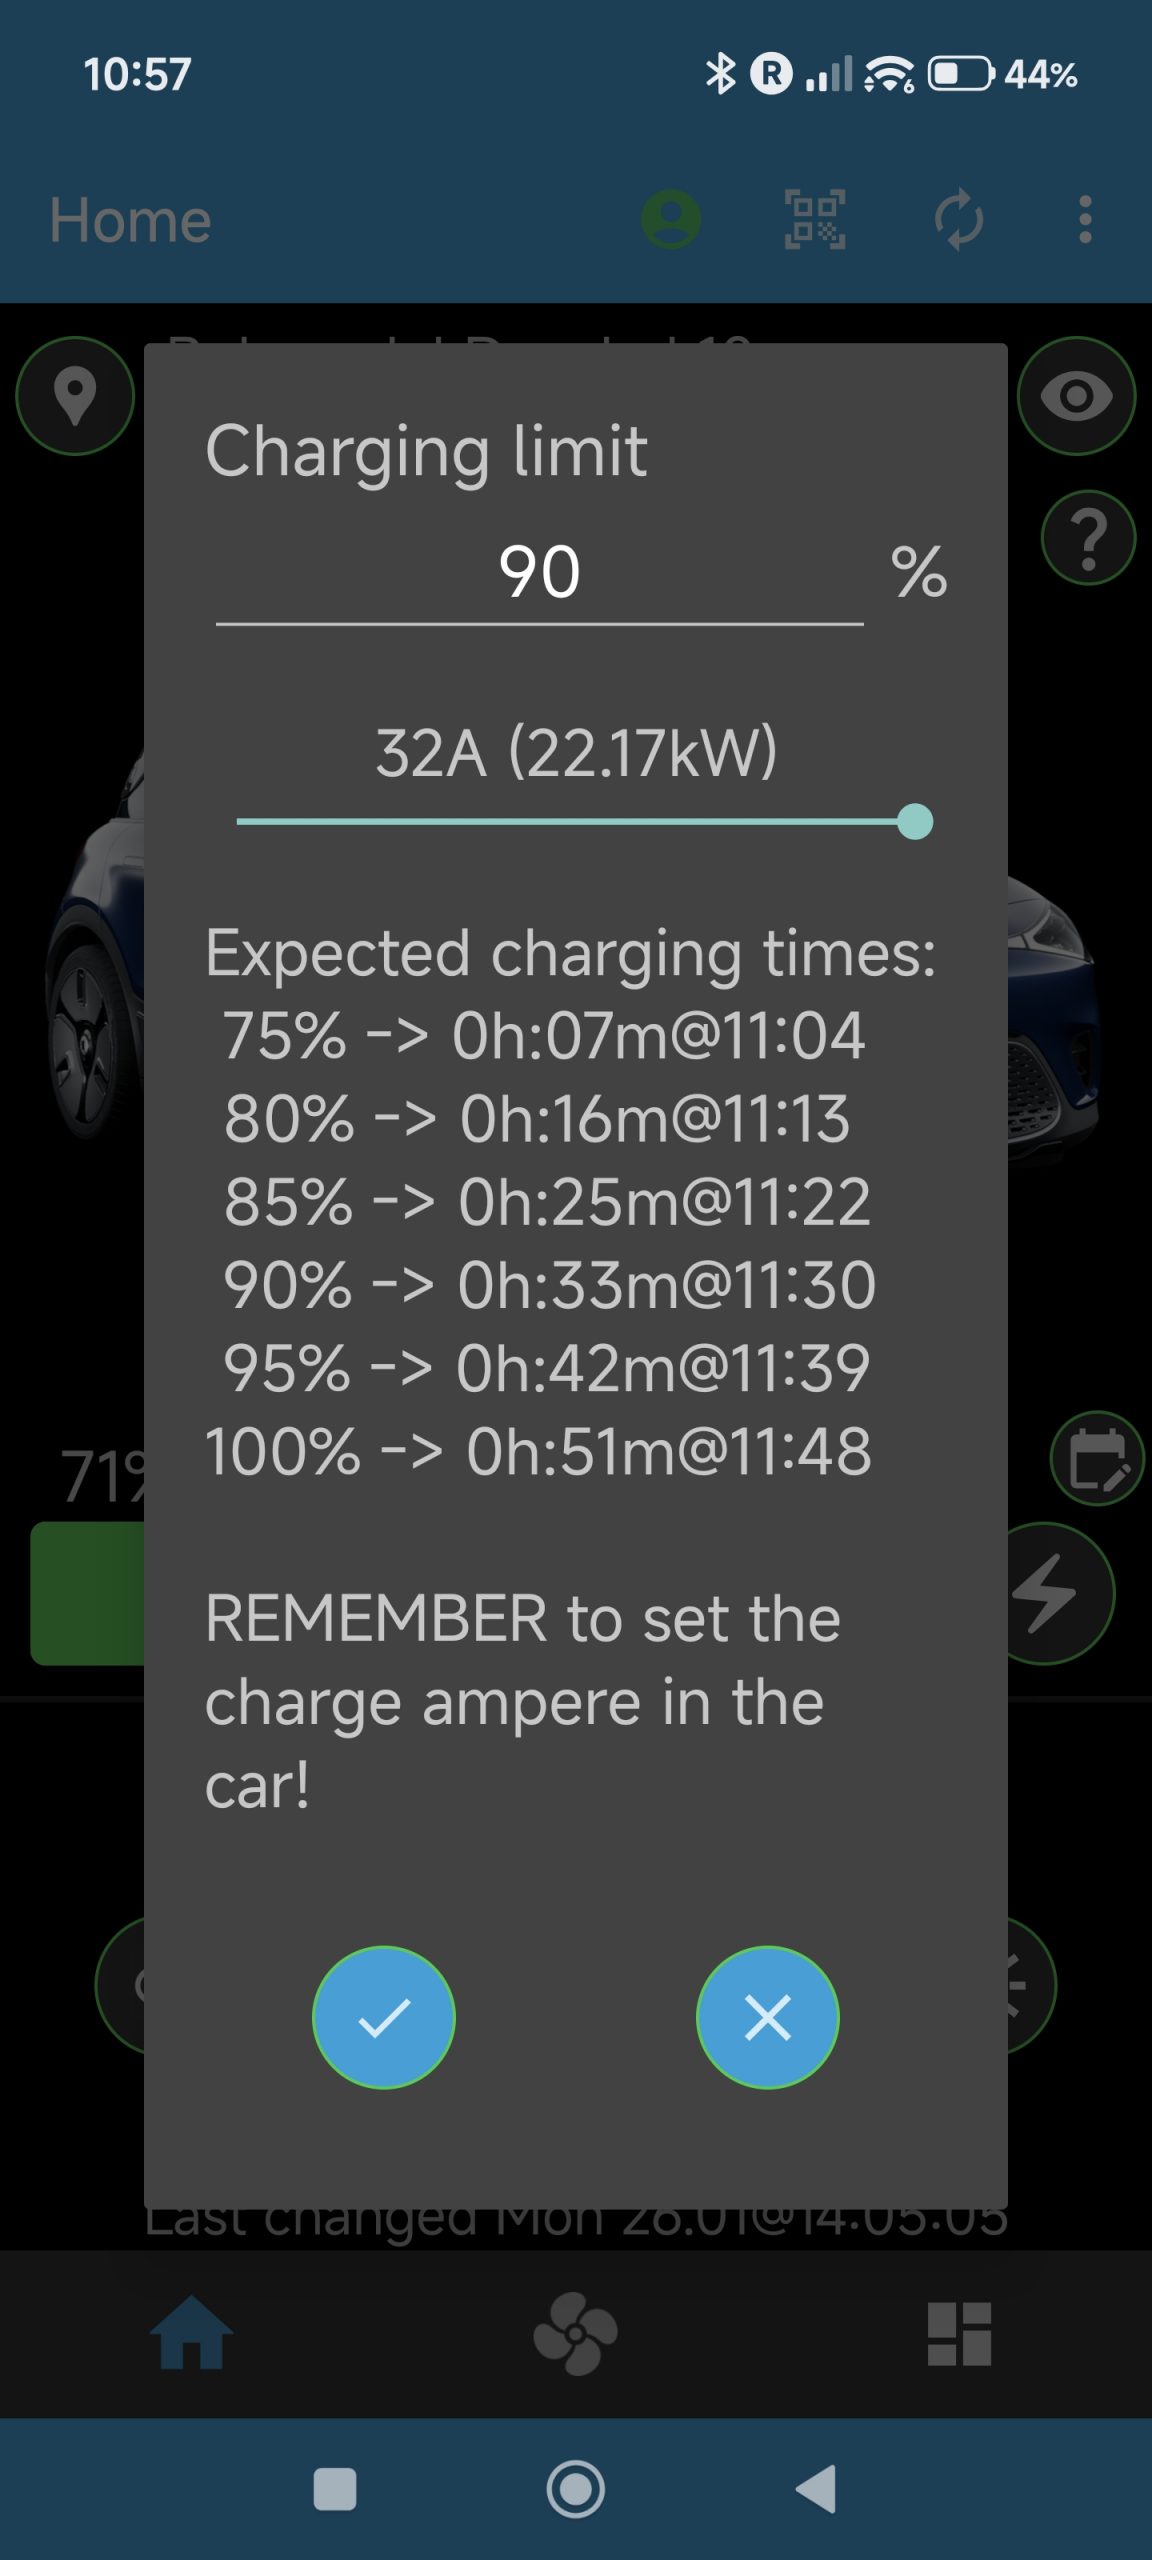
You can now change the charging limit in the topmost field by setting a different value.
Note: The chosen value must be higher than the current battery level for this to work. Also, the setting is best done while charging for it to work reliably.
Why: SMore# offers the possibility to estimate how it will take to charge until a given limit with a given charging load. This may be useful when setting the charging load in Ampere at a public charger, wanting to estimate when needing to return.
How: Press on the charging bar for the following dialog box to appear:
You can change the slider of the charging load from 32 ampere downwards as well as the charging limit in the topmost field. The expected charging times are now showing in the list, i.e., how long and until when the charging will occur.
Note: You will need to change the charging load still manually in the car since Smart does not support setting this value through the app. Also note that the estimations here are usually too optimistic since the real charging speed is usually slower than calculated through load and capability.
Why: SMore# offers the possibility to set an alarm to notify the user when the charging will be finished. This may be useful when charging during a lunch break to receive a notification, say 10 minutes before the expected end of charge, to walk back to the car.
How: Press on the alarm button that will show blue right next to the blue charging button, once the car is actually charging:
After pressing, a dialog box will appear where you can choose the estimated time before charging end, when the alarm will be shown in your notification shade. 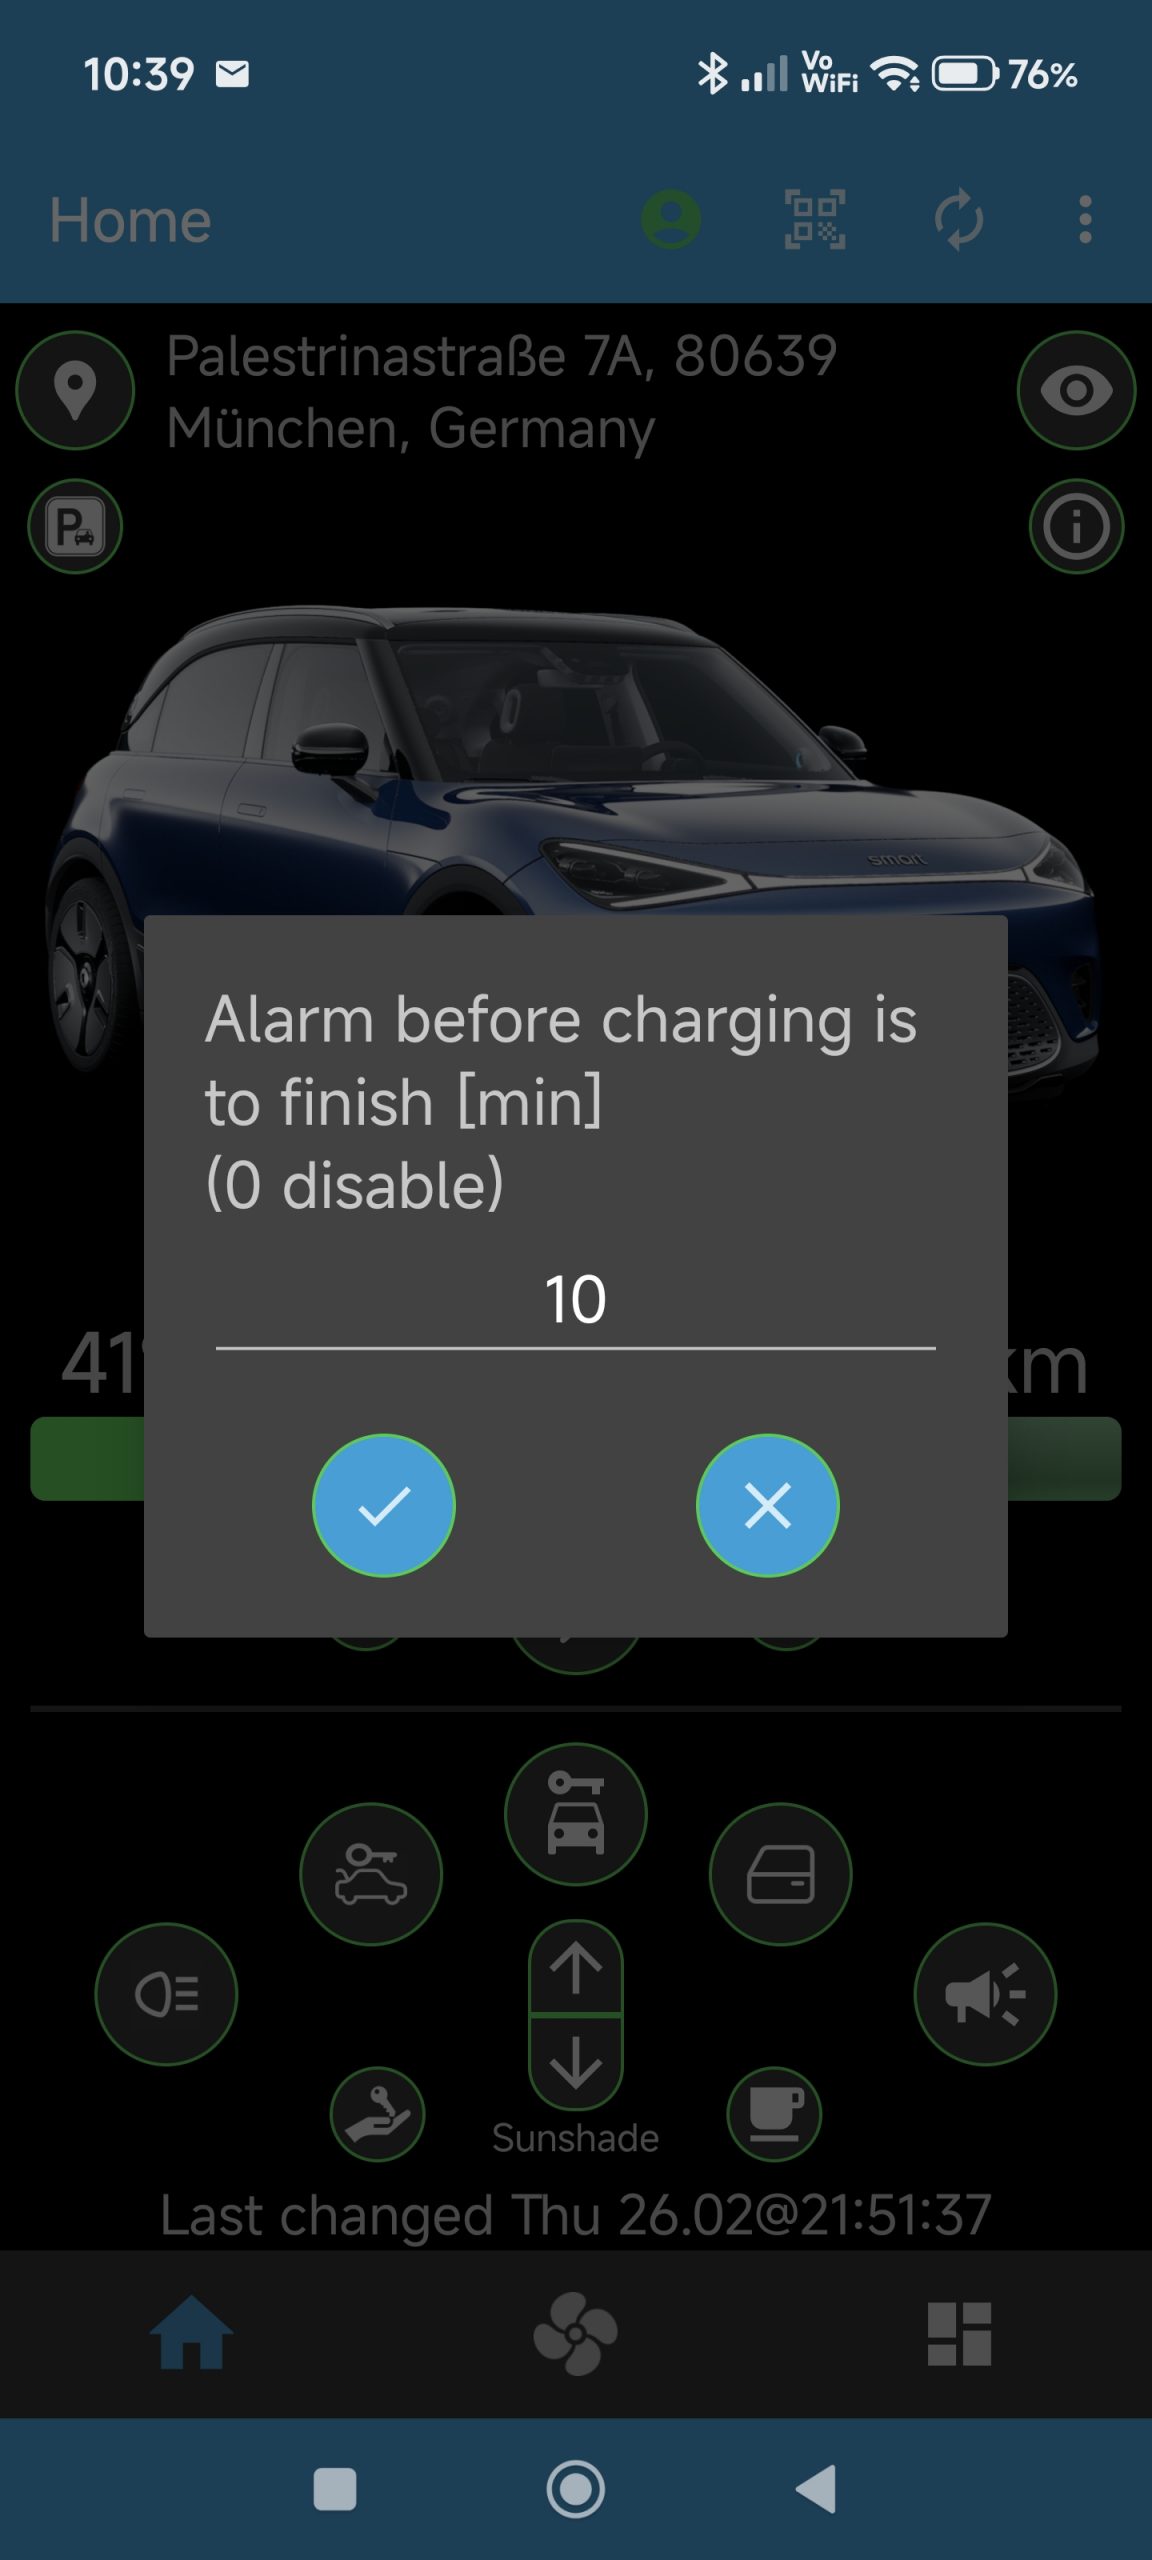
After confirming the dialog box positively, a notification will appear that will show to the user that an alarm has been set and that the app is frequently checking the charging status, as shown below: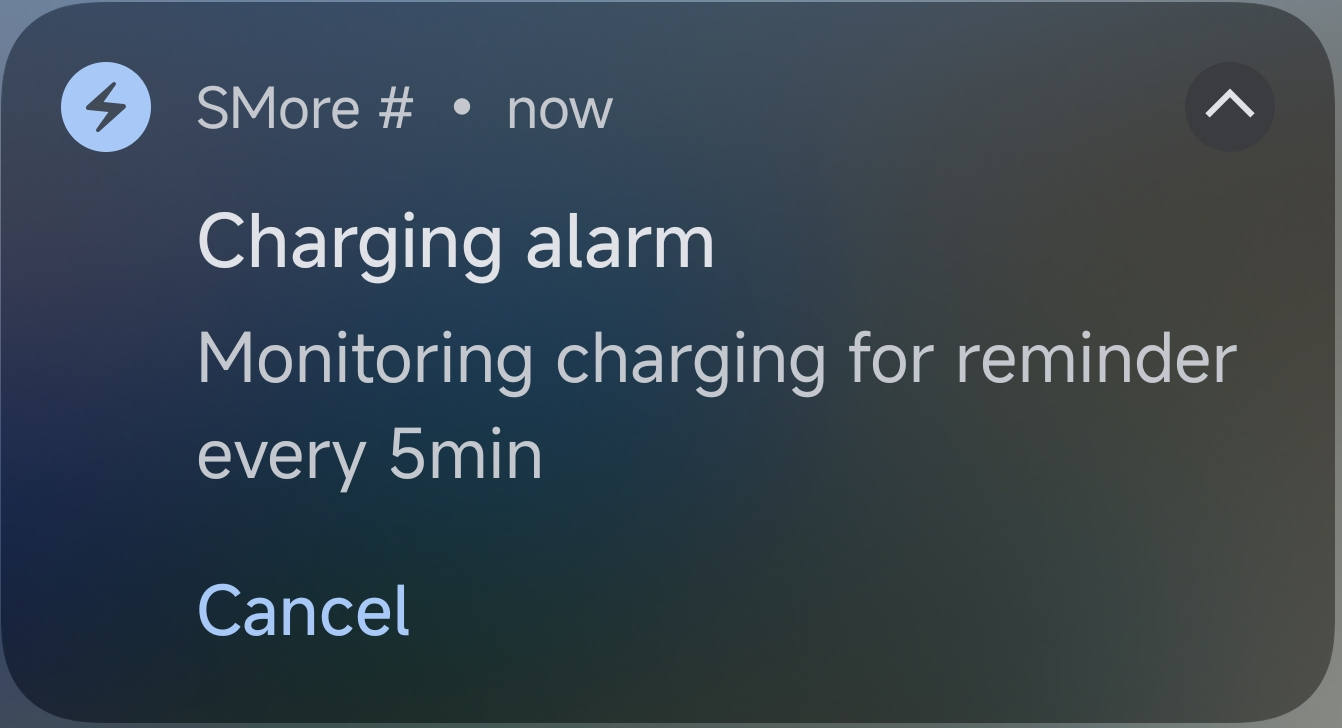
The notification can be cancelled directly from the notification with the Cancel button. When the alarm is reached, i.e., the previously selected time before estimated charging end is reached, the notification changes its text to show that the alarm time has been reached.
Note: The charging alarm is assigned to an Android notification category, here Alarm. In your Android notification settings for SMore#, you can select this category and change, for instance, its alarm sound to something noticable and likable for you.
Climate
Why: SMore# offers the possibility to start ore-climating your car, e.g., to warm it up before arrival or cool down in the summer.
How: Go to the climate tab in the SMore app. You can now set the temperate you would want, using the buttons shown below: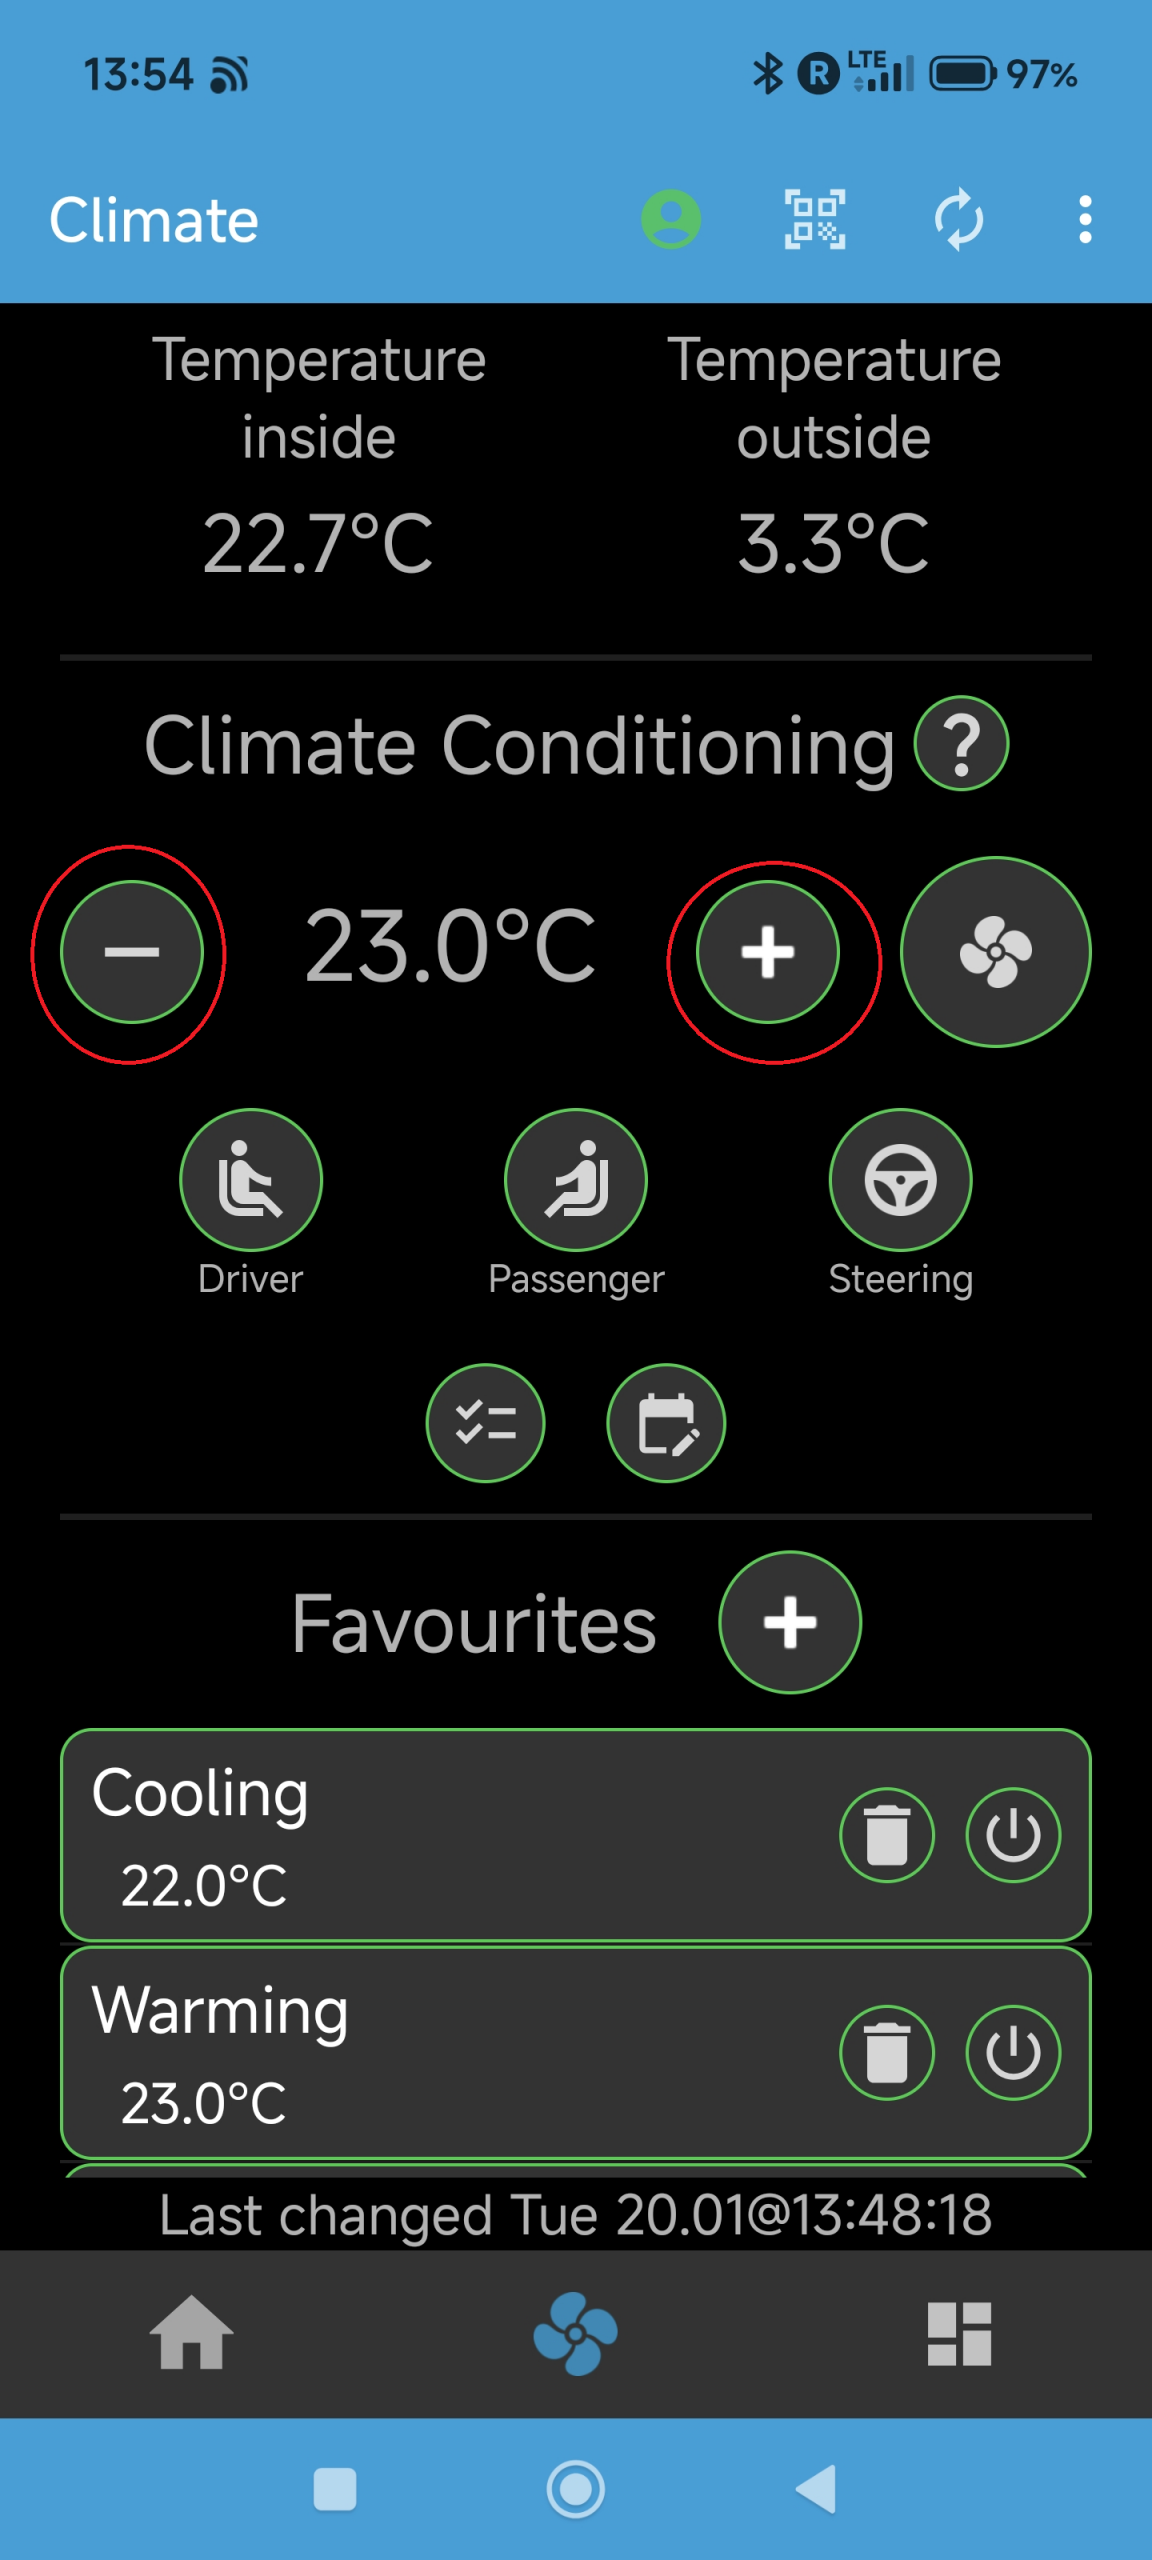
If wanted, you can also enable the driver, passenger, and steering wheel heating with the buttons shown below: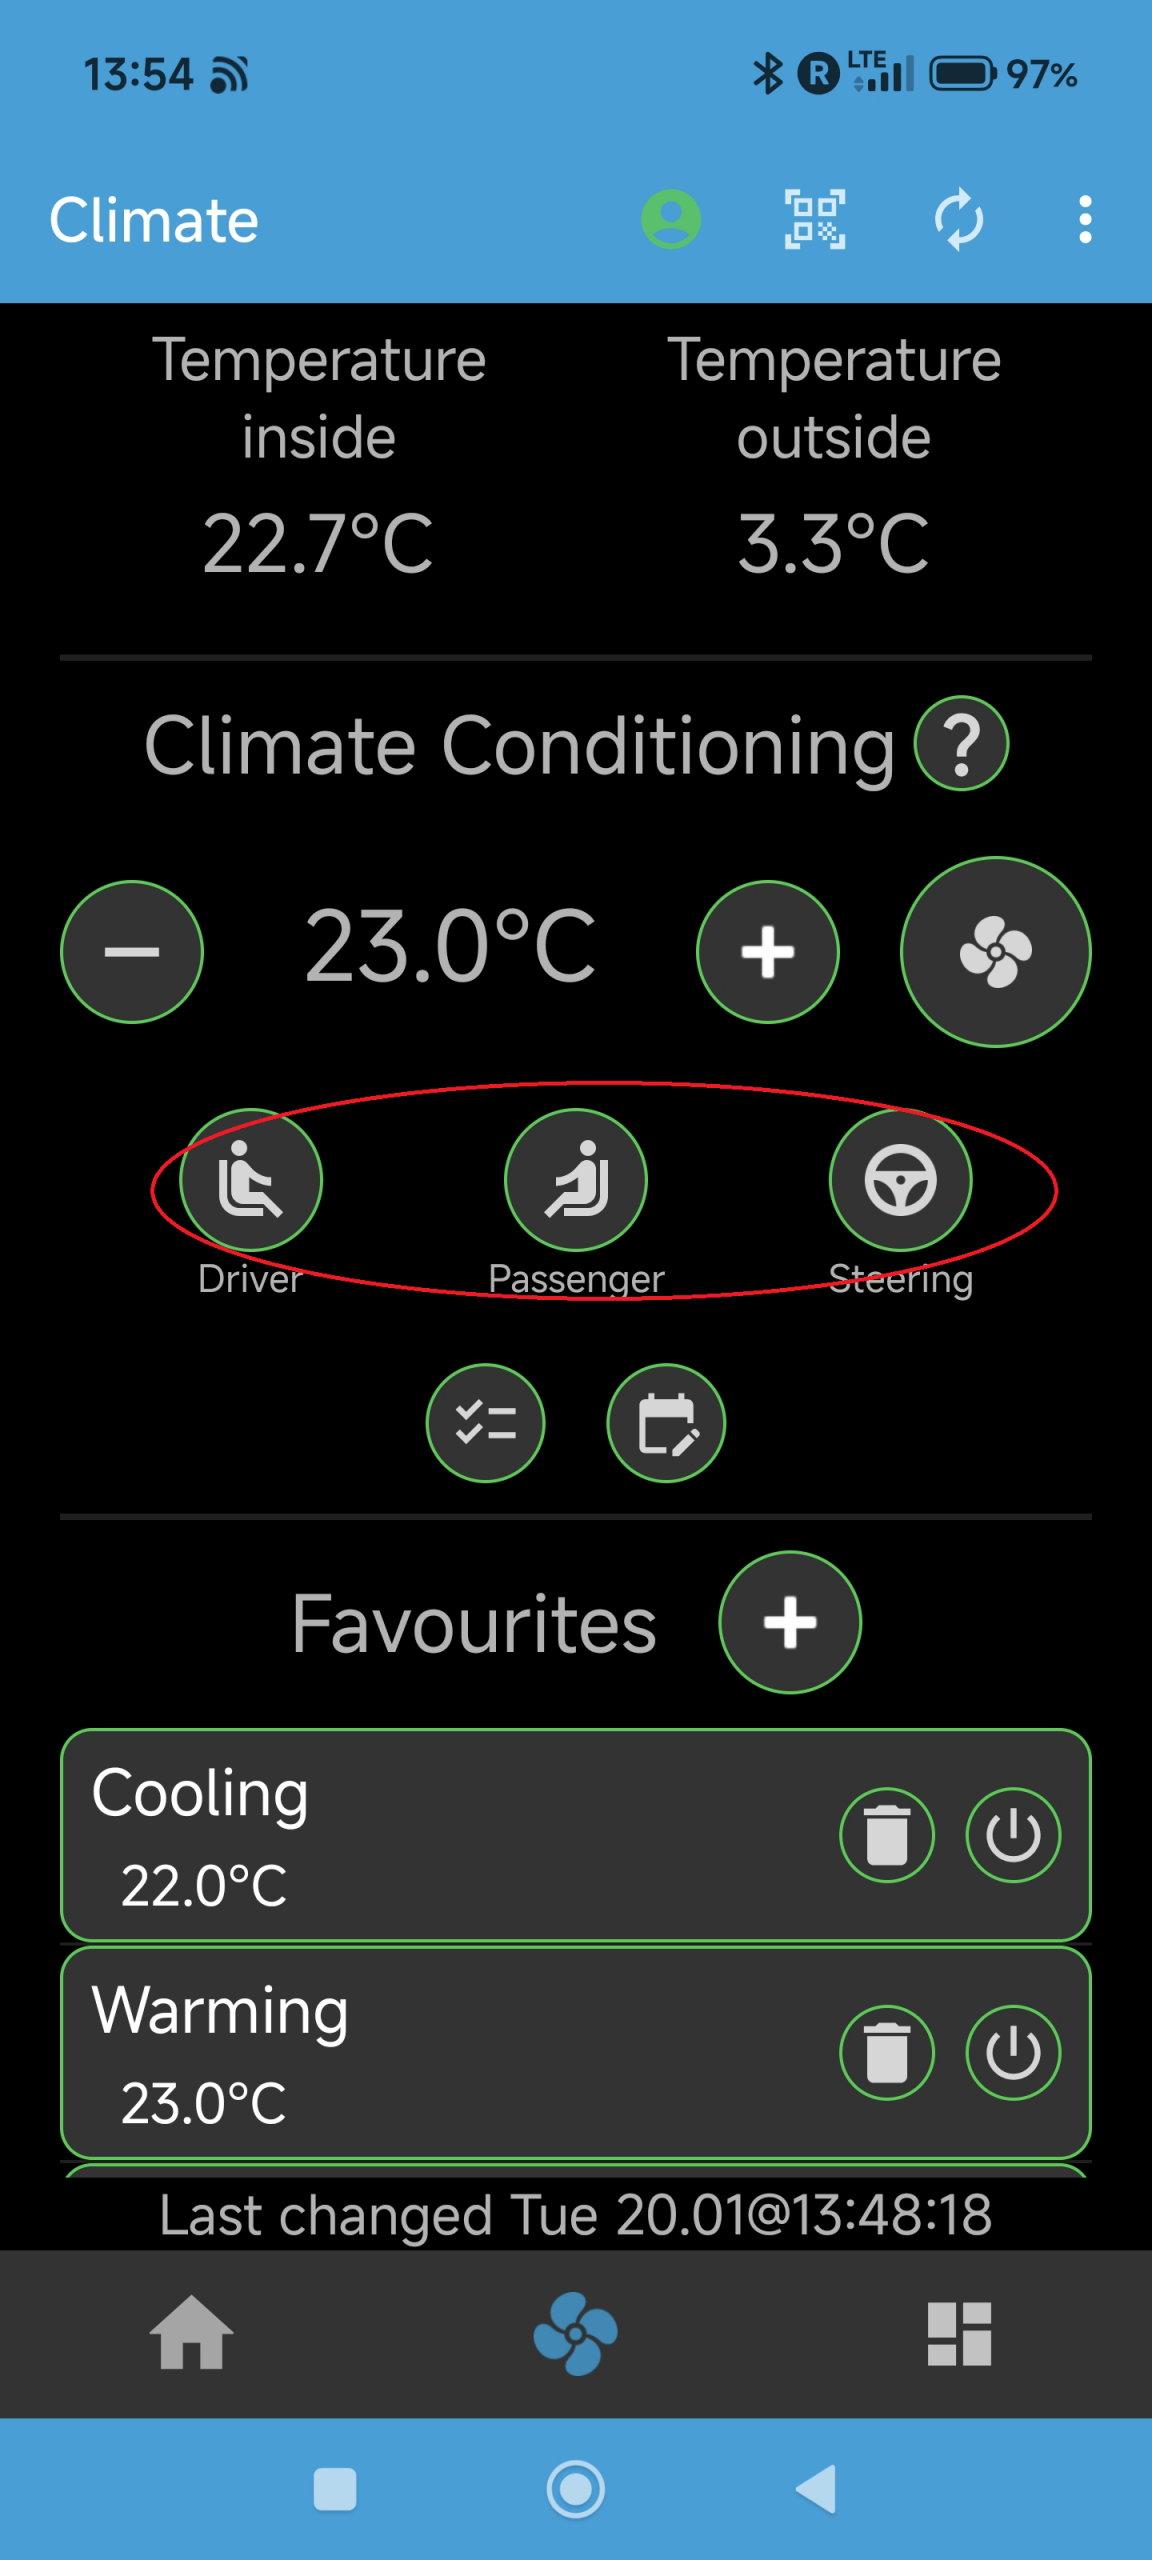
The selected heating button will show the level of heating through shades of red with dark red being the hottest level. Keep pressing the respective button to change the level, until it is shown grey (for being off) again.
Note: the driver, passenger, and steering wheel level can only be the same for all. So if you enable any of those buttons and change any of the others, the levels will be adjusted so that all enabled heatings are at the same level – this is a limitation of the Smart server API!
After you adjusted the climate settings to what you would want to happen, press the fan button on the right, as shown below: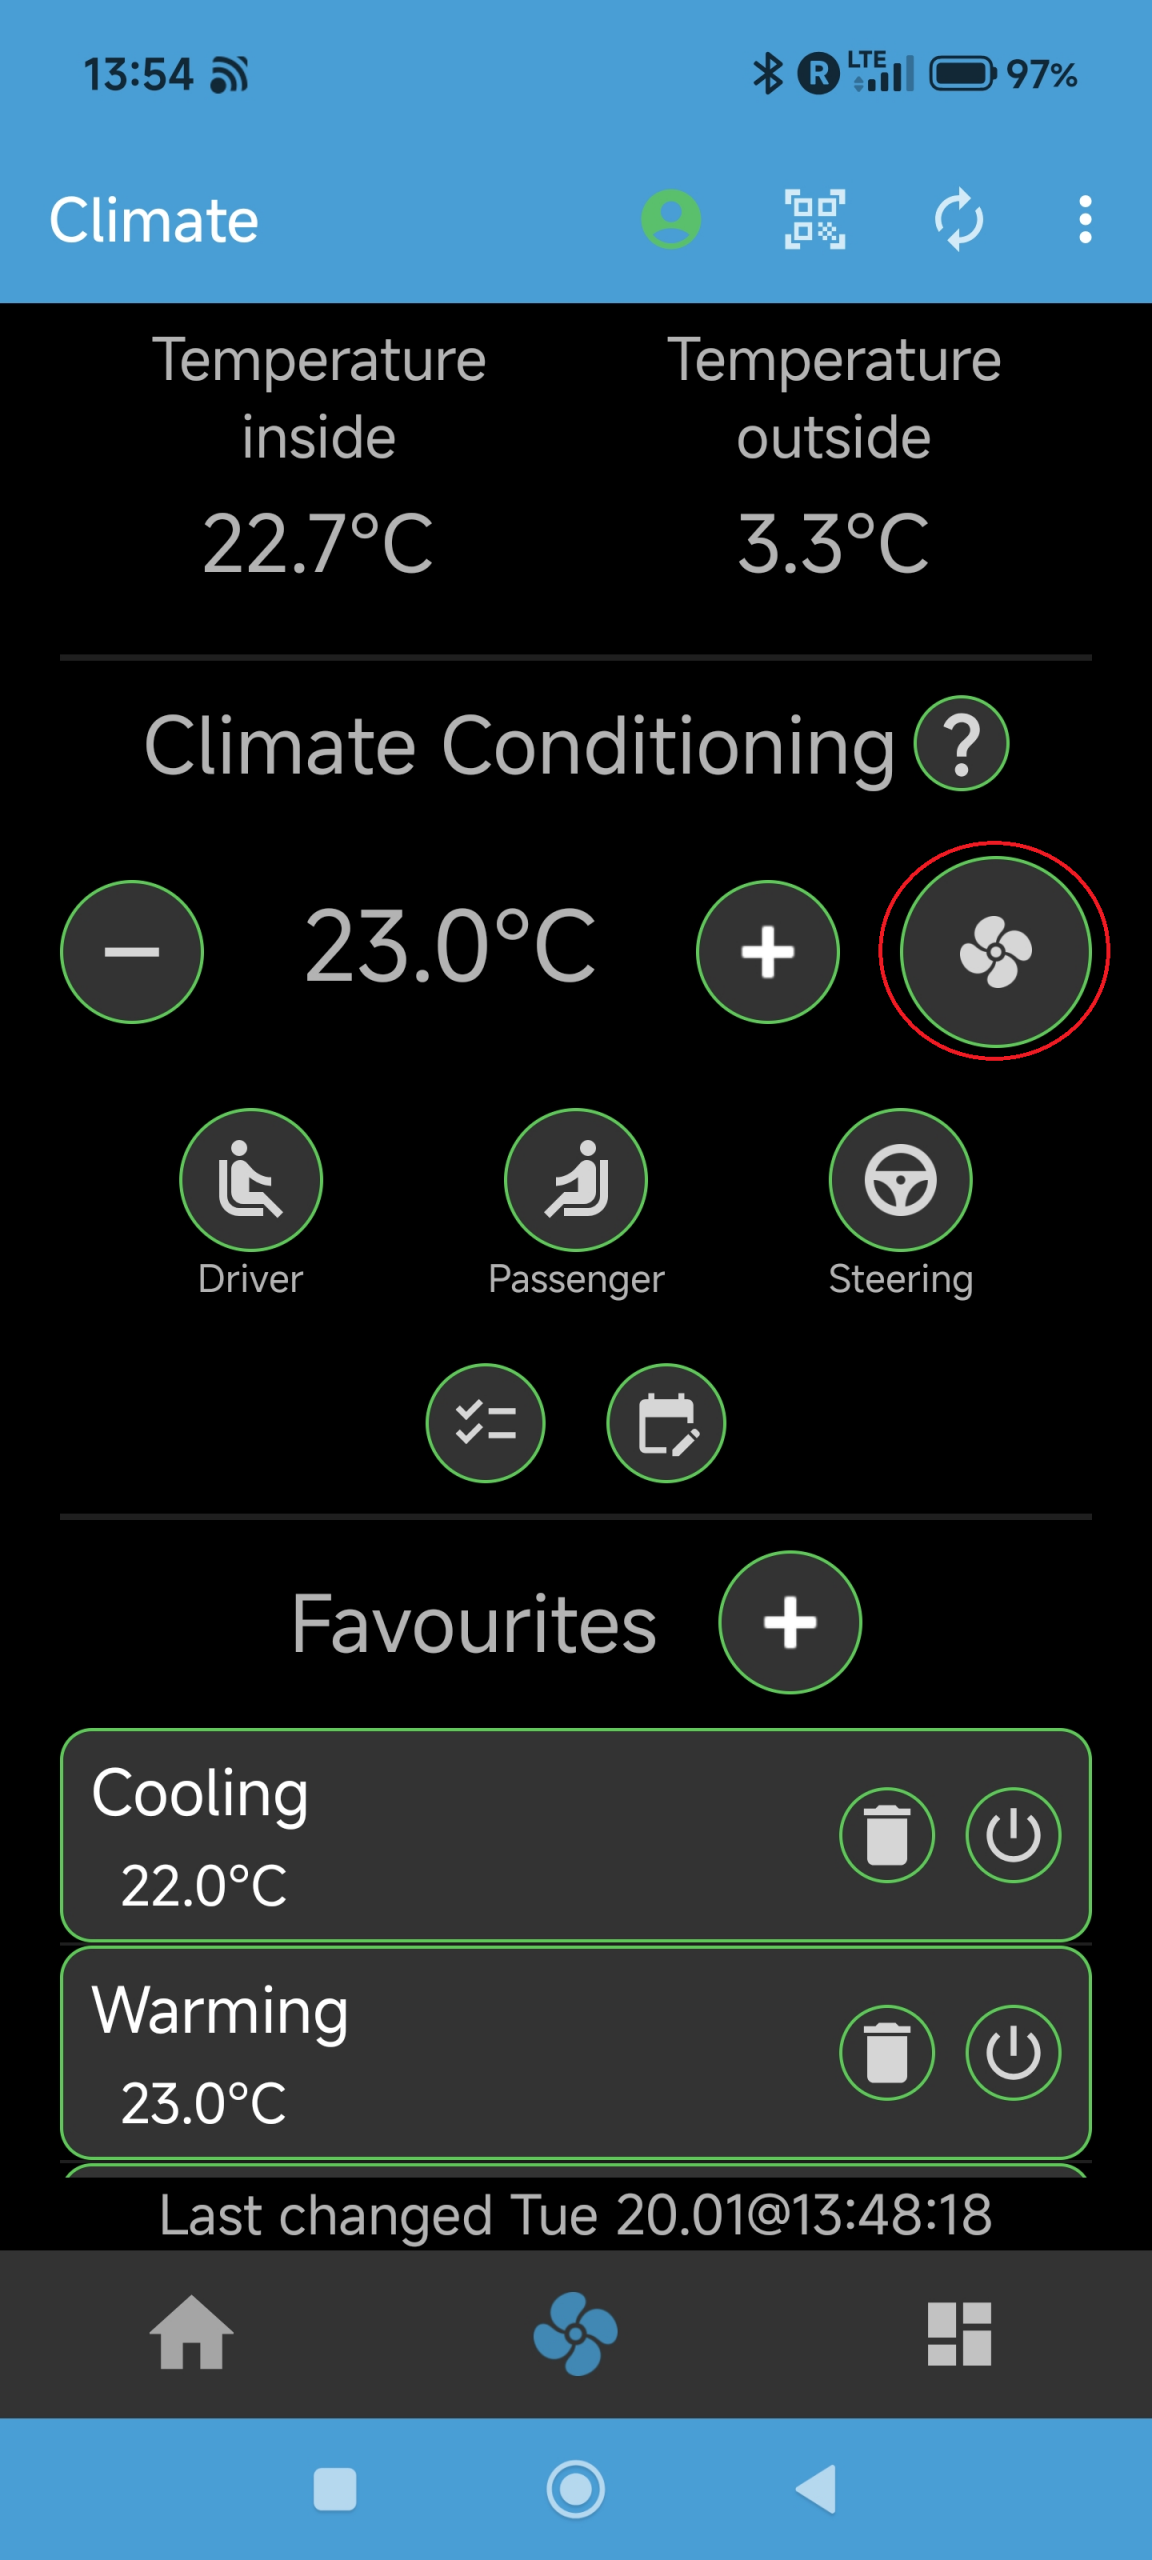
The fan button will start rotating while the command is being sent to the car. When the rotation stops, the new values will be shown. If the command was successful, the buttons should show the desired heating level and the fan button should be shown in blue.
Also, a notification will be shown that your climate control is enabled – see the relevant How-To under the notification category.
Note: commands may not be executed by the car due to server issues or the car being in deep sleep. The command should wake up the car but this may, unfortunately, fail!
Why: SMore# offers the possibility to stop an ongoing climate control, e.g., to stop cooling a car after you previously switched on the cooling.
How: If the fan button is shown in blue, press the fan button to stop the climate control, as shown below:
The fan button will rotate, indicating the execution of the climate control command. Once it stops rotating, the fan button should turn grey to show the successful switching off of the pre-climating operation. Any notification previously shown for the climate control should disappear.
Why: SMore# allows for storing different pre-climate settings to quickly access them, e.g., to store a ‘winter’ setting for warming the car and driver seat or a winter setting that warms all seats and the steering wheel, while a ‘summer’ setting may be used to cool down the car. A favourite setting also stores conditions (see “How to conditionally control your climate” How-to) and a current charge plan (see “How to schedule climate control” how-to) as part of the favourite. With this, you can store, e.g., a climate plan for a schedule valid for morning shift as well as another favourite setting with a schedule for evening shift.
How: Set your desire climate settings, i.e., temperature, driver, passenger, steering wheel heating, as explained in the “how to start your climate control” How-to, conditions, or climate plan. Then press the + button, as shown below: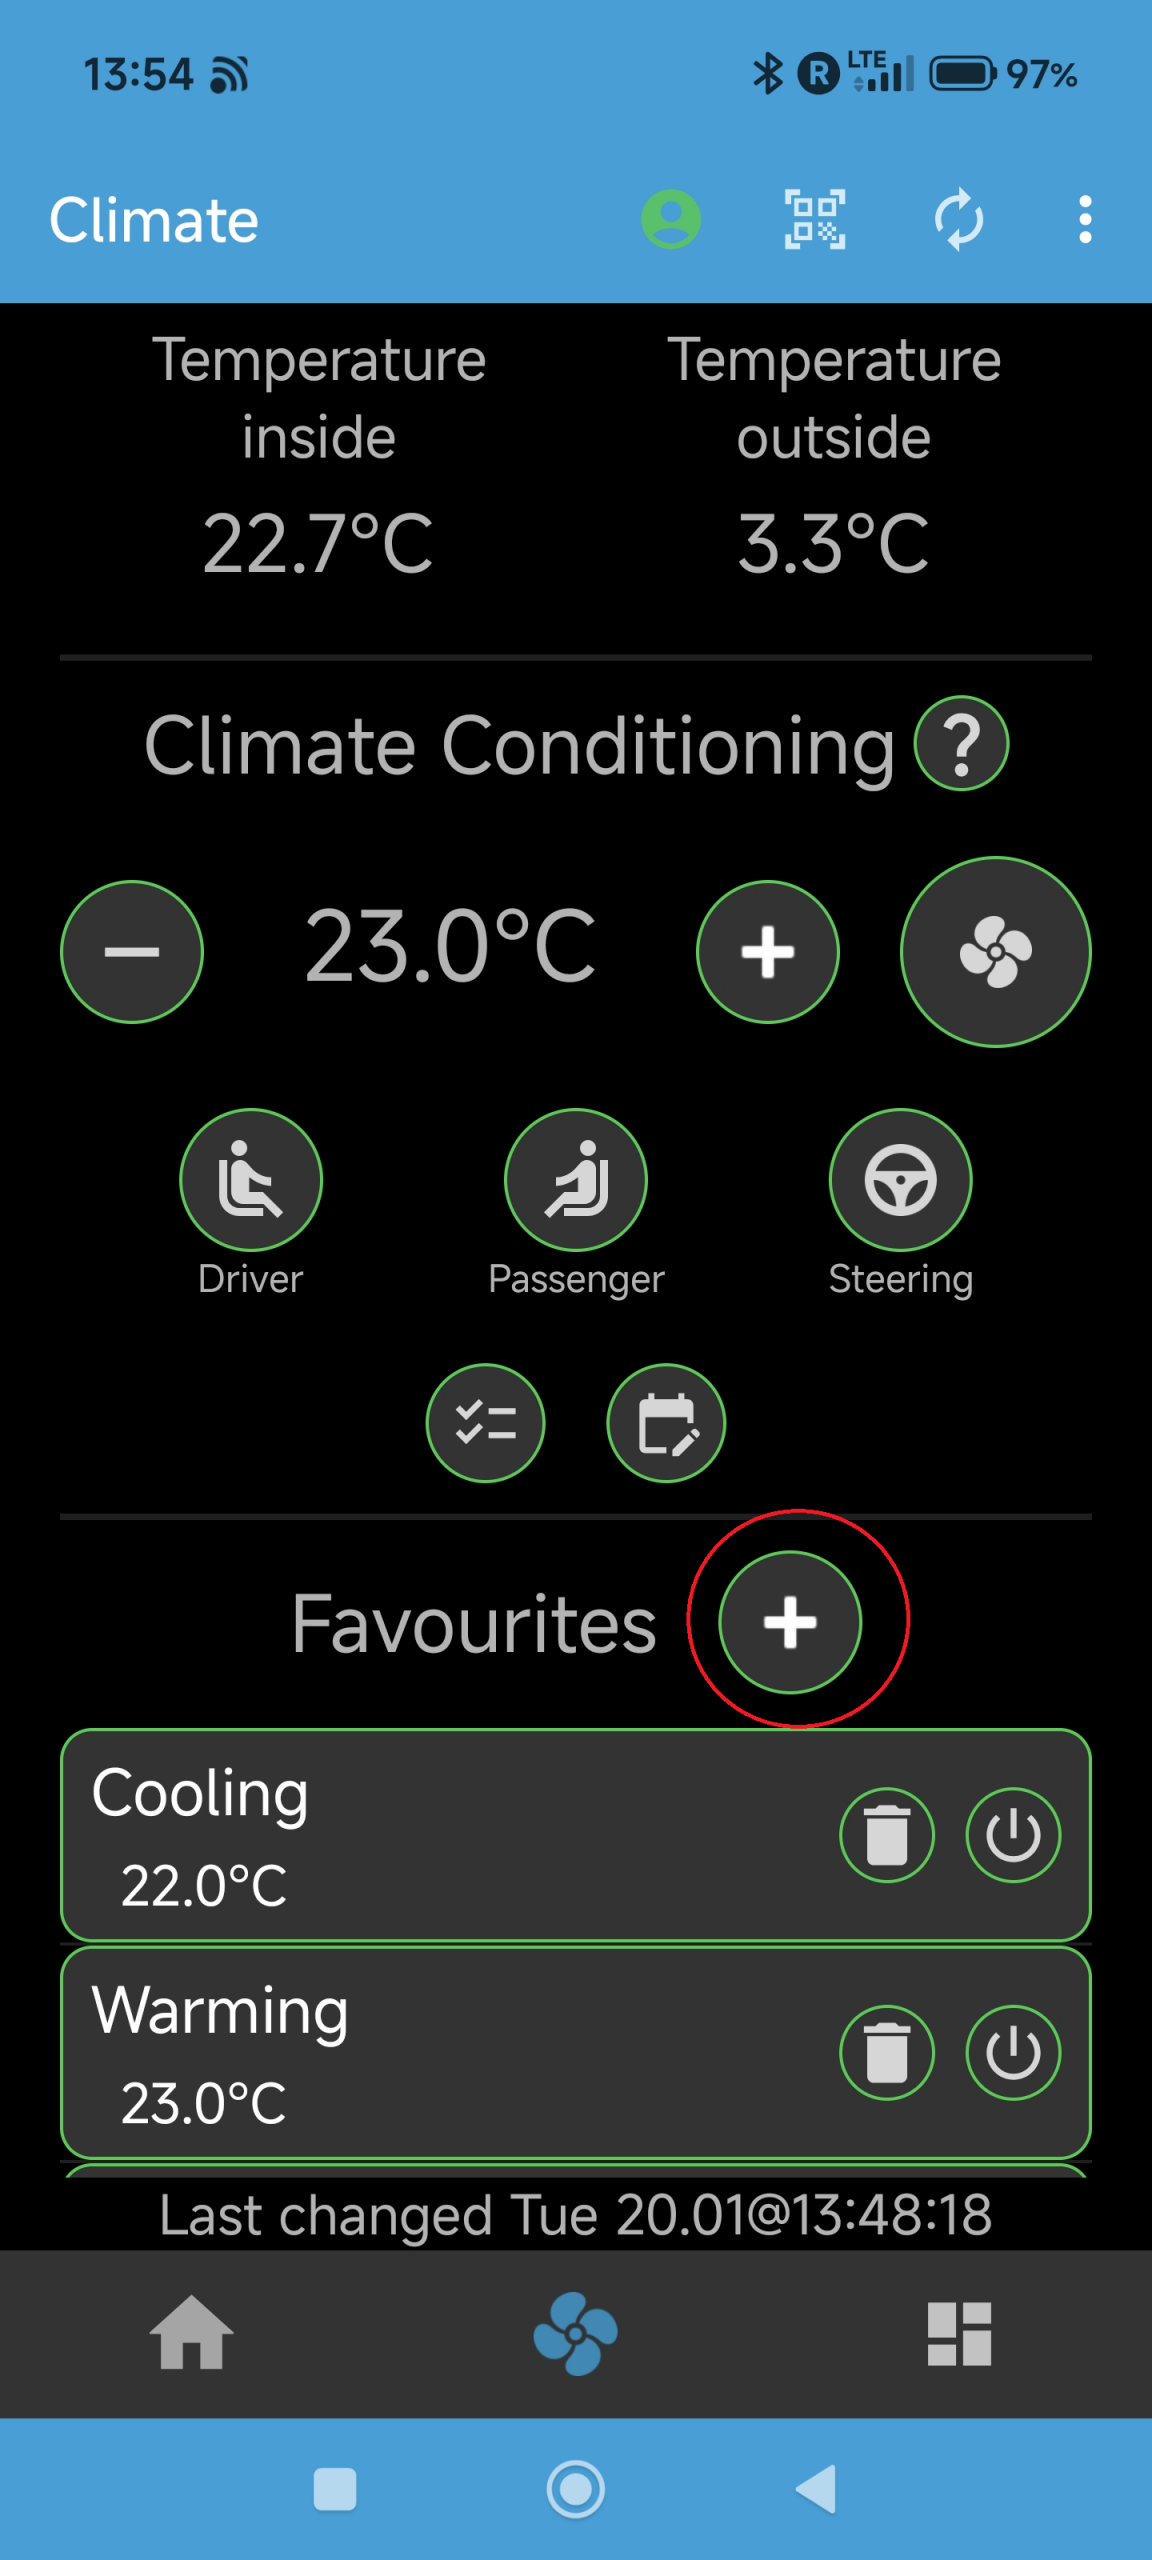
A dialog box will appear to enter the name of your favourite entry. Confirm this dialog box to save the settings under this name or cancel the operation. The favourite will now appear as an entry in the list under Favourites line, showing the chosen settings as text.
Why: SMore# allows for restoring fabourite climate settings as a fast way to configure and start your pre-climate in the car, e.g., when quickly heating up your car and seats in the winter.
How: Use the previous “How to save a favourite climate setting” instructions to save a set of climate settings under a name of your choice. To restore this setting and start the pre-climate operation, select the desired favourite setting and press the activate button on the right of the entry, as shown below: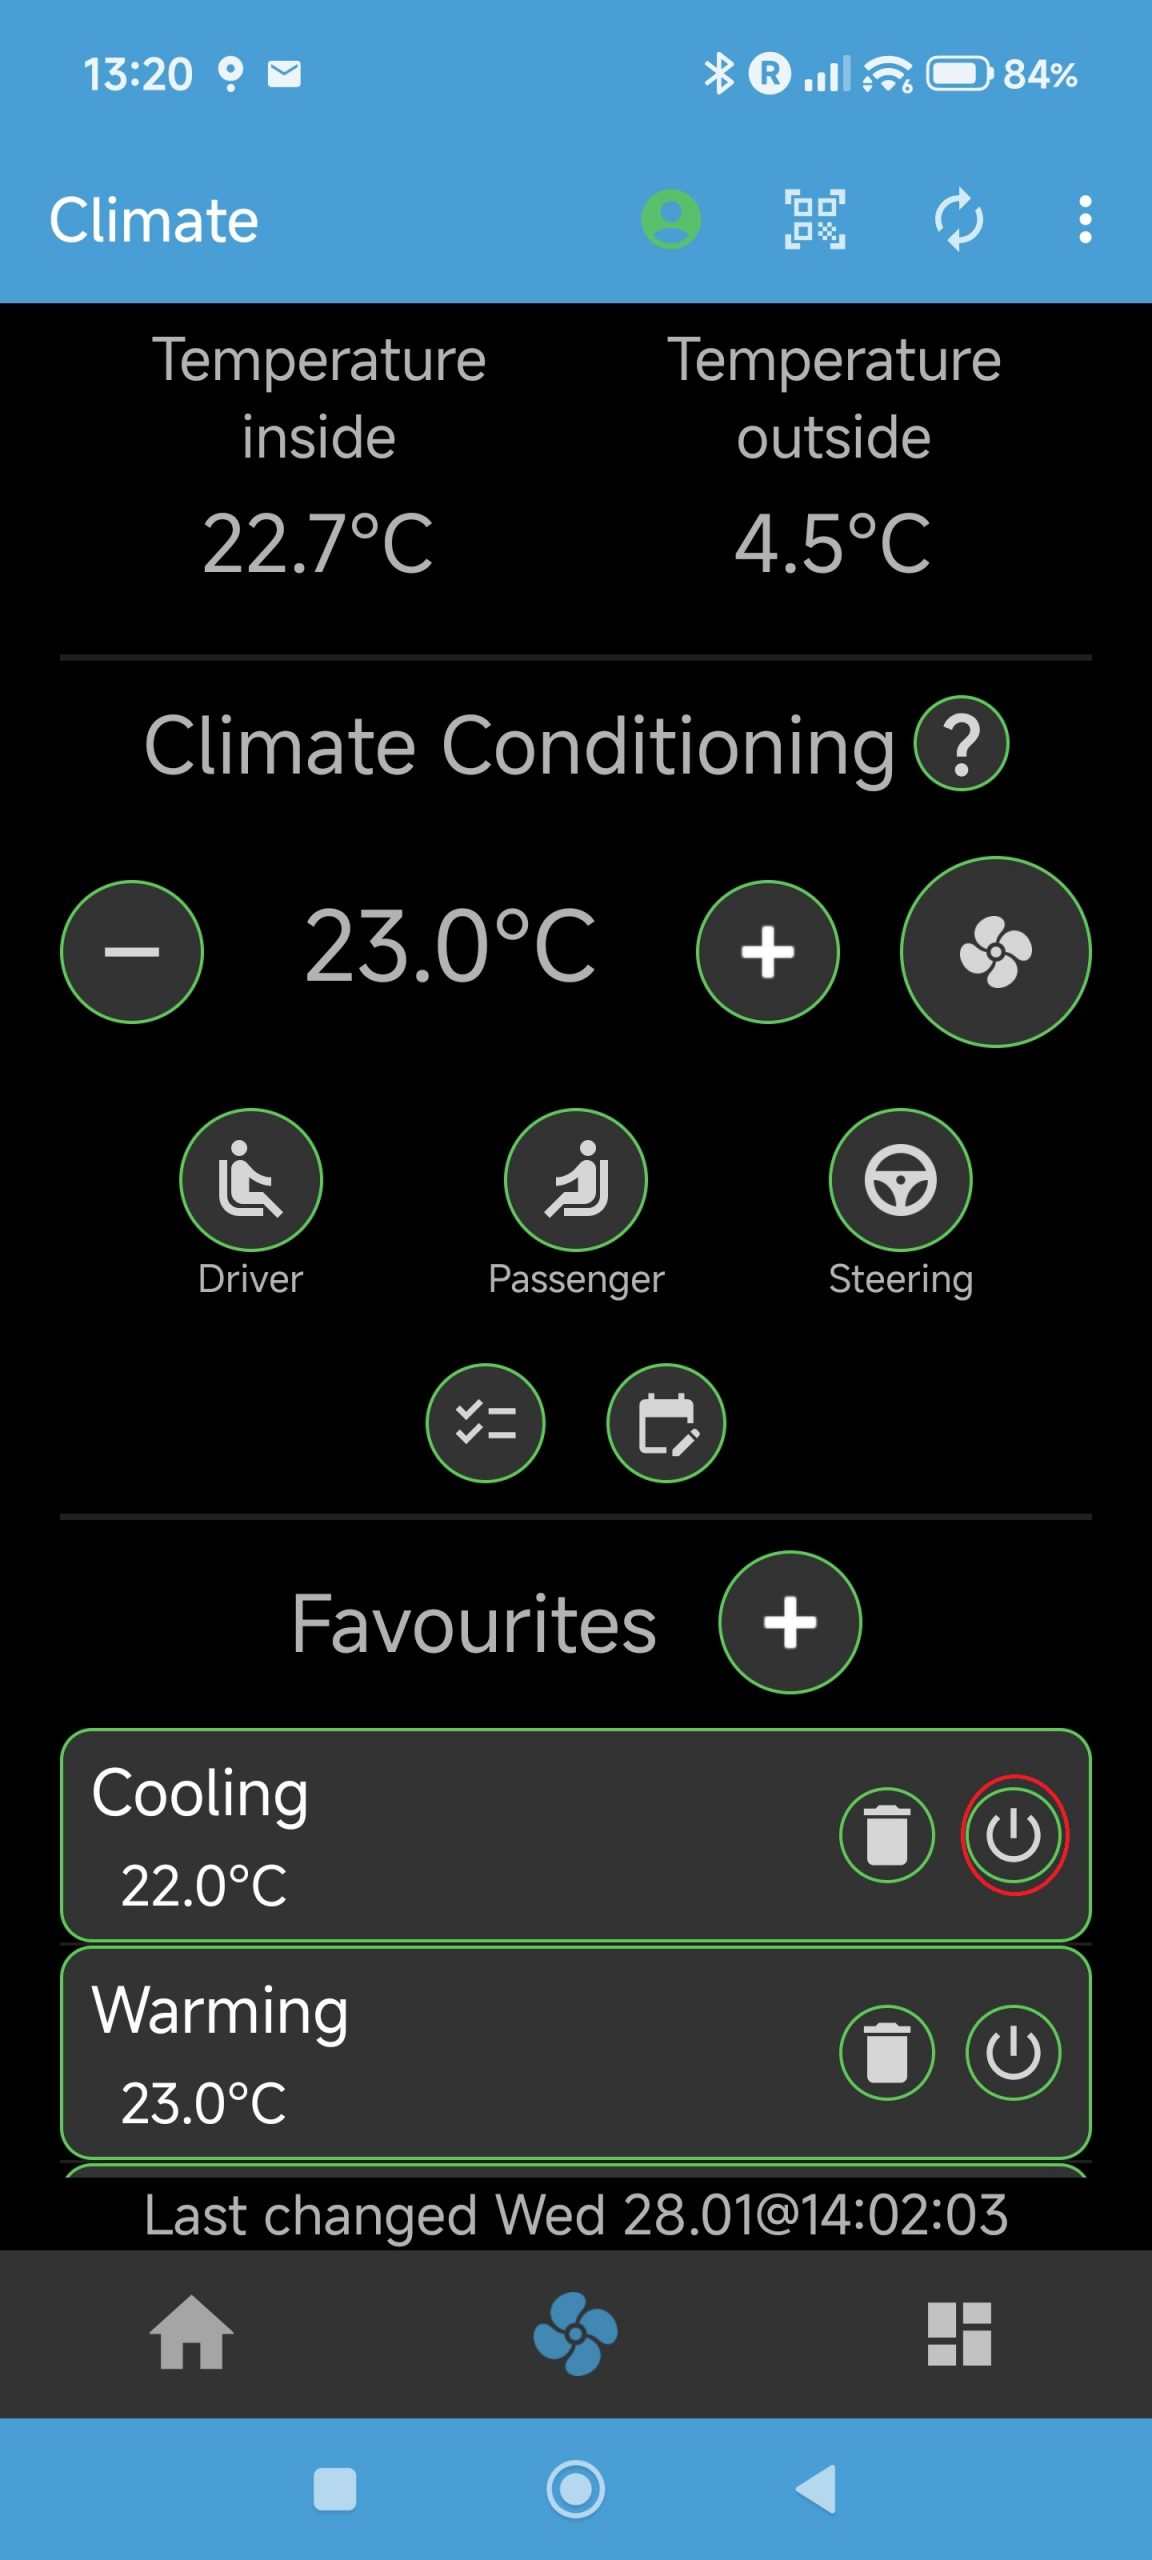
The settings will now be set to those of the favourite (in the example of the above figure, the temperature will be set to 22 degrees and all heatings will be switched off) and the command will be sent to the car, shown through the fan button to start rotating. In case the command will be executed successfully, the fan button will stop rotating, turn blue, and the respective settings will be shown. If the fan button remains grey after rotation, the command unfortunately failed.
Why: SMore# offers the possibility to control your climate while charging your car, based on temperature conditions. This may be useful to avoid overheating the car, while charing in bare sun.
How: While being in the climate tab of the SMore# app, press the conditions button, as shown below: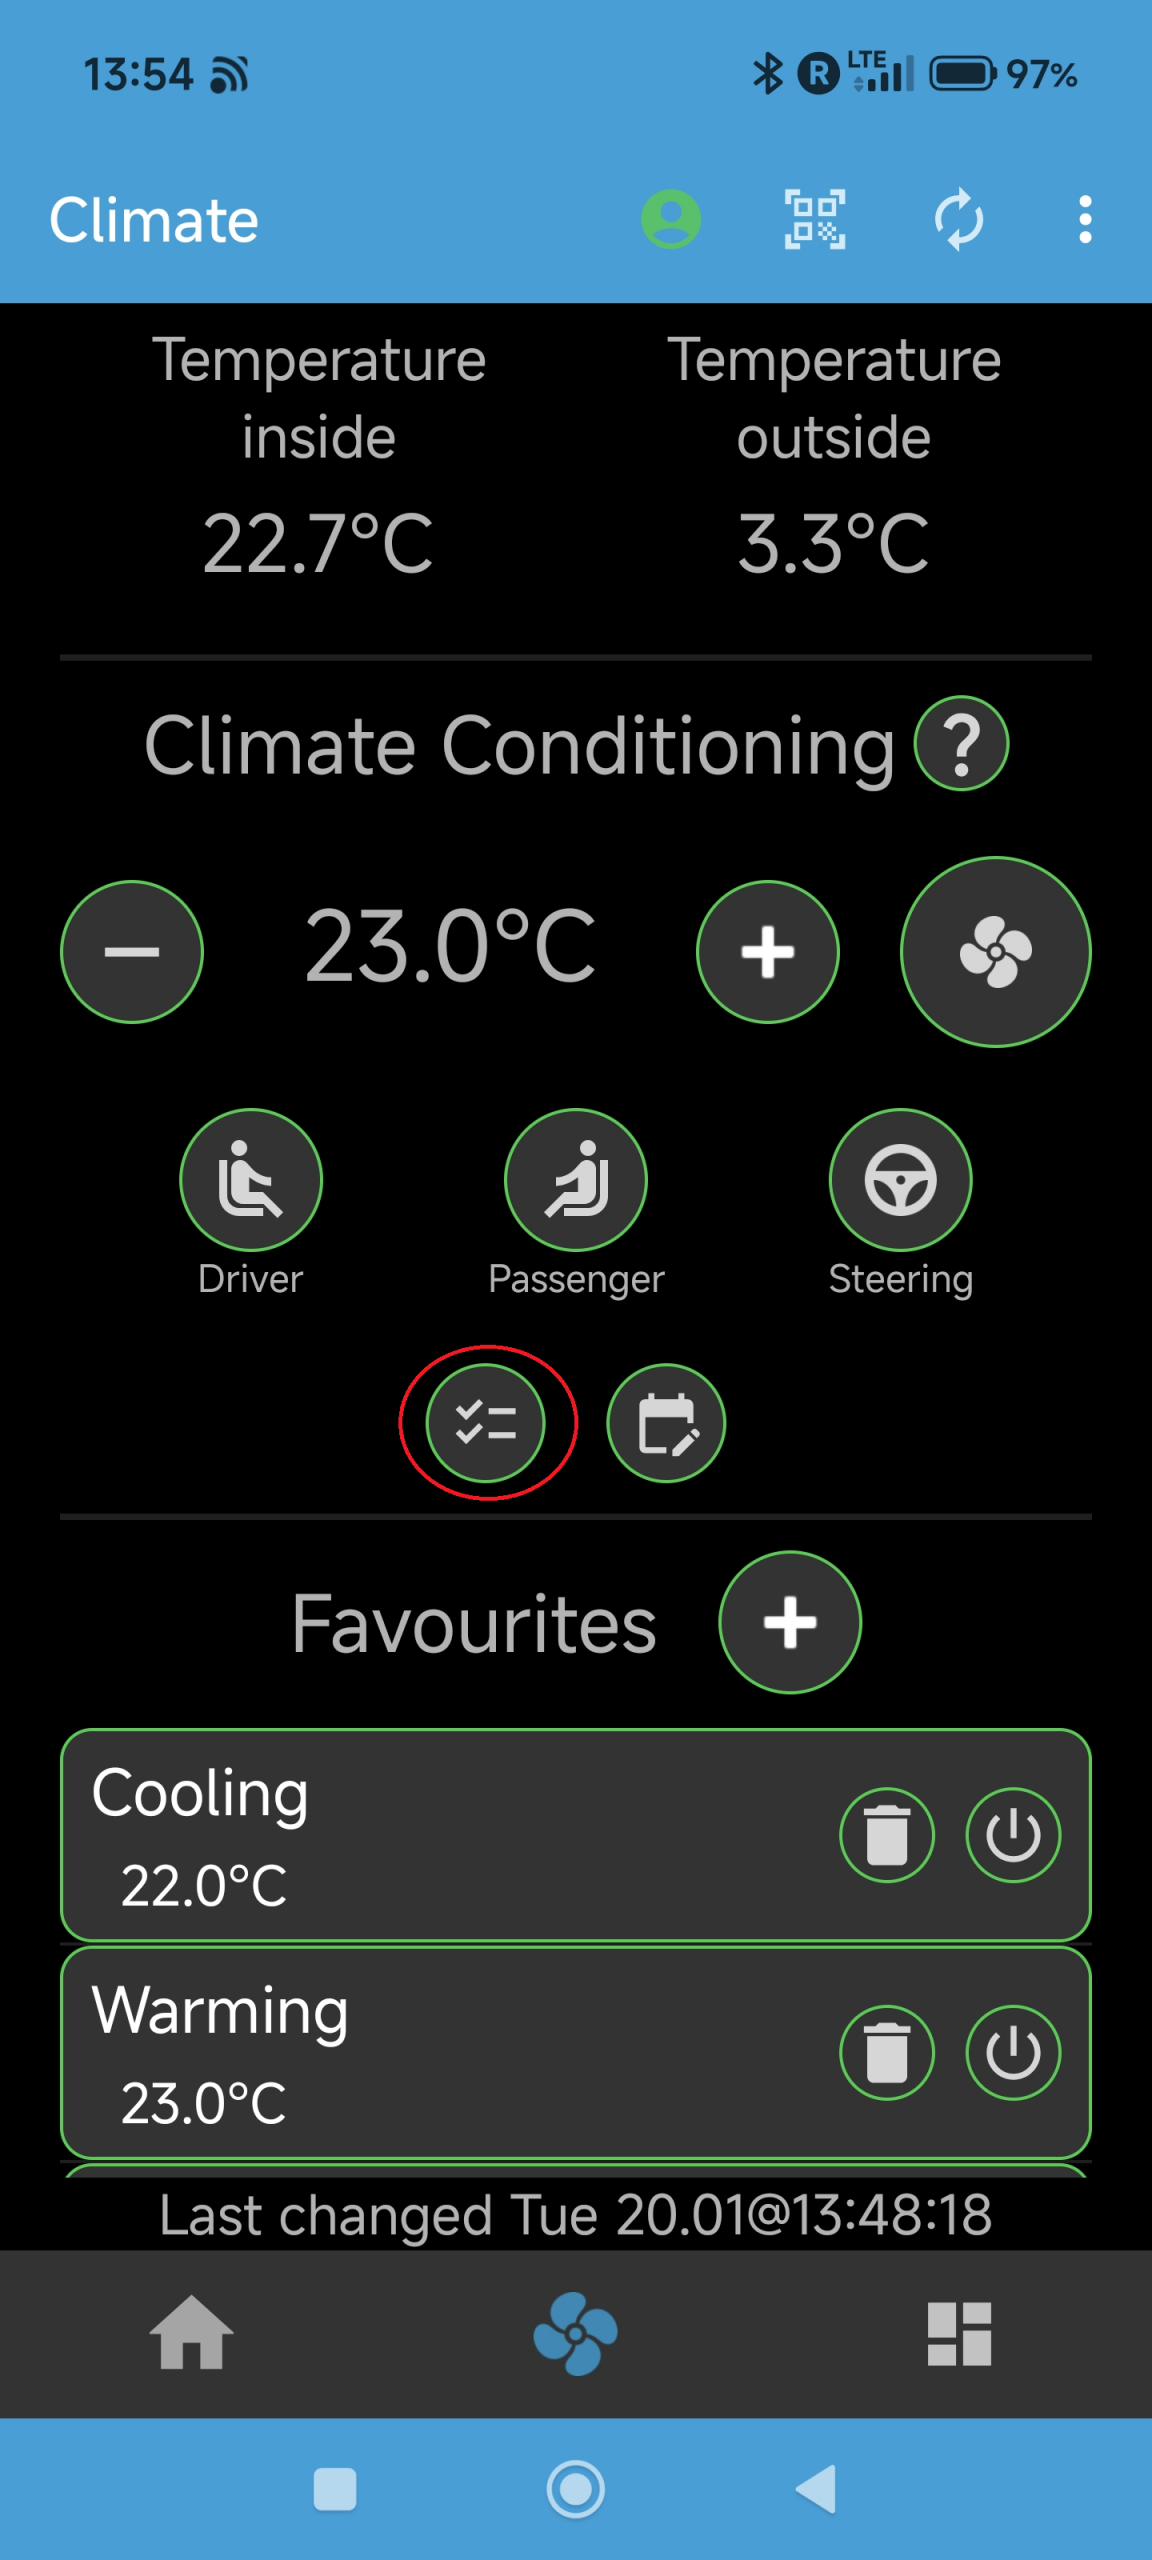
This will open the Conditions dialog box to set the parameters for the conditions under which the climate control will be switched on, as shown below: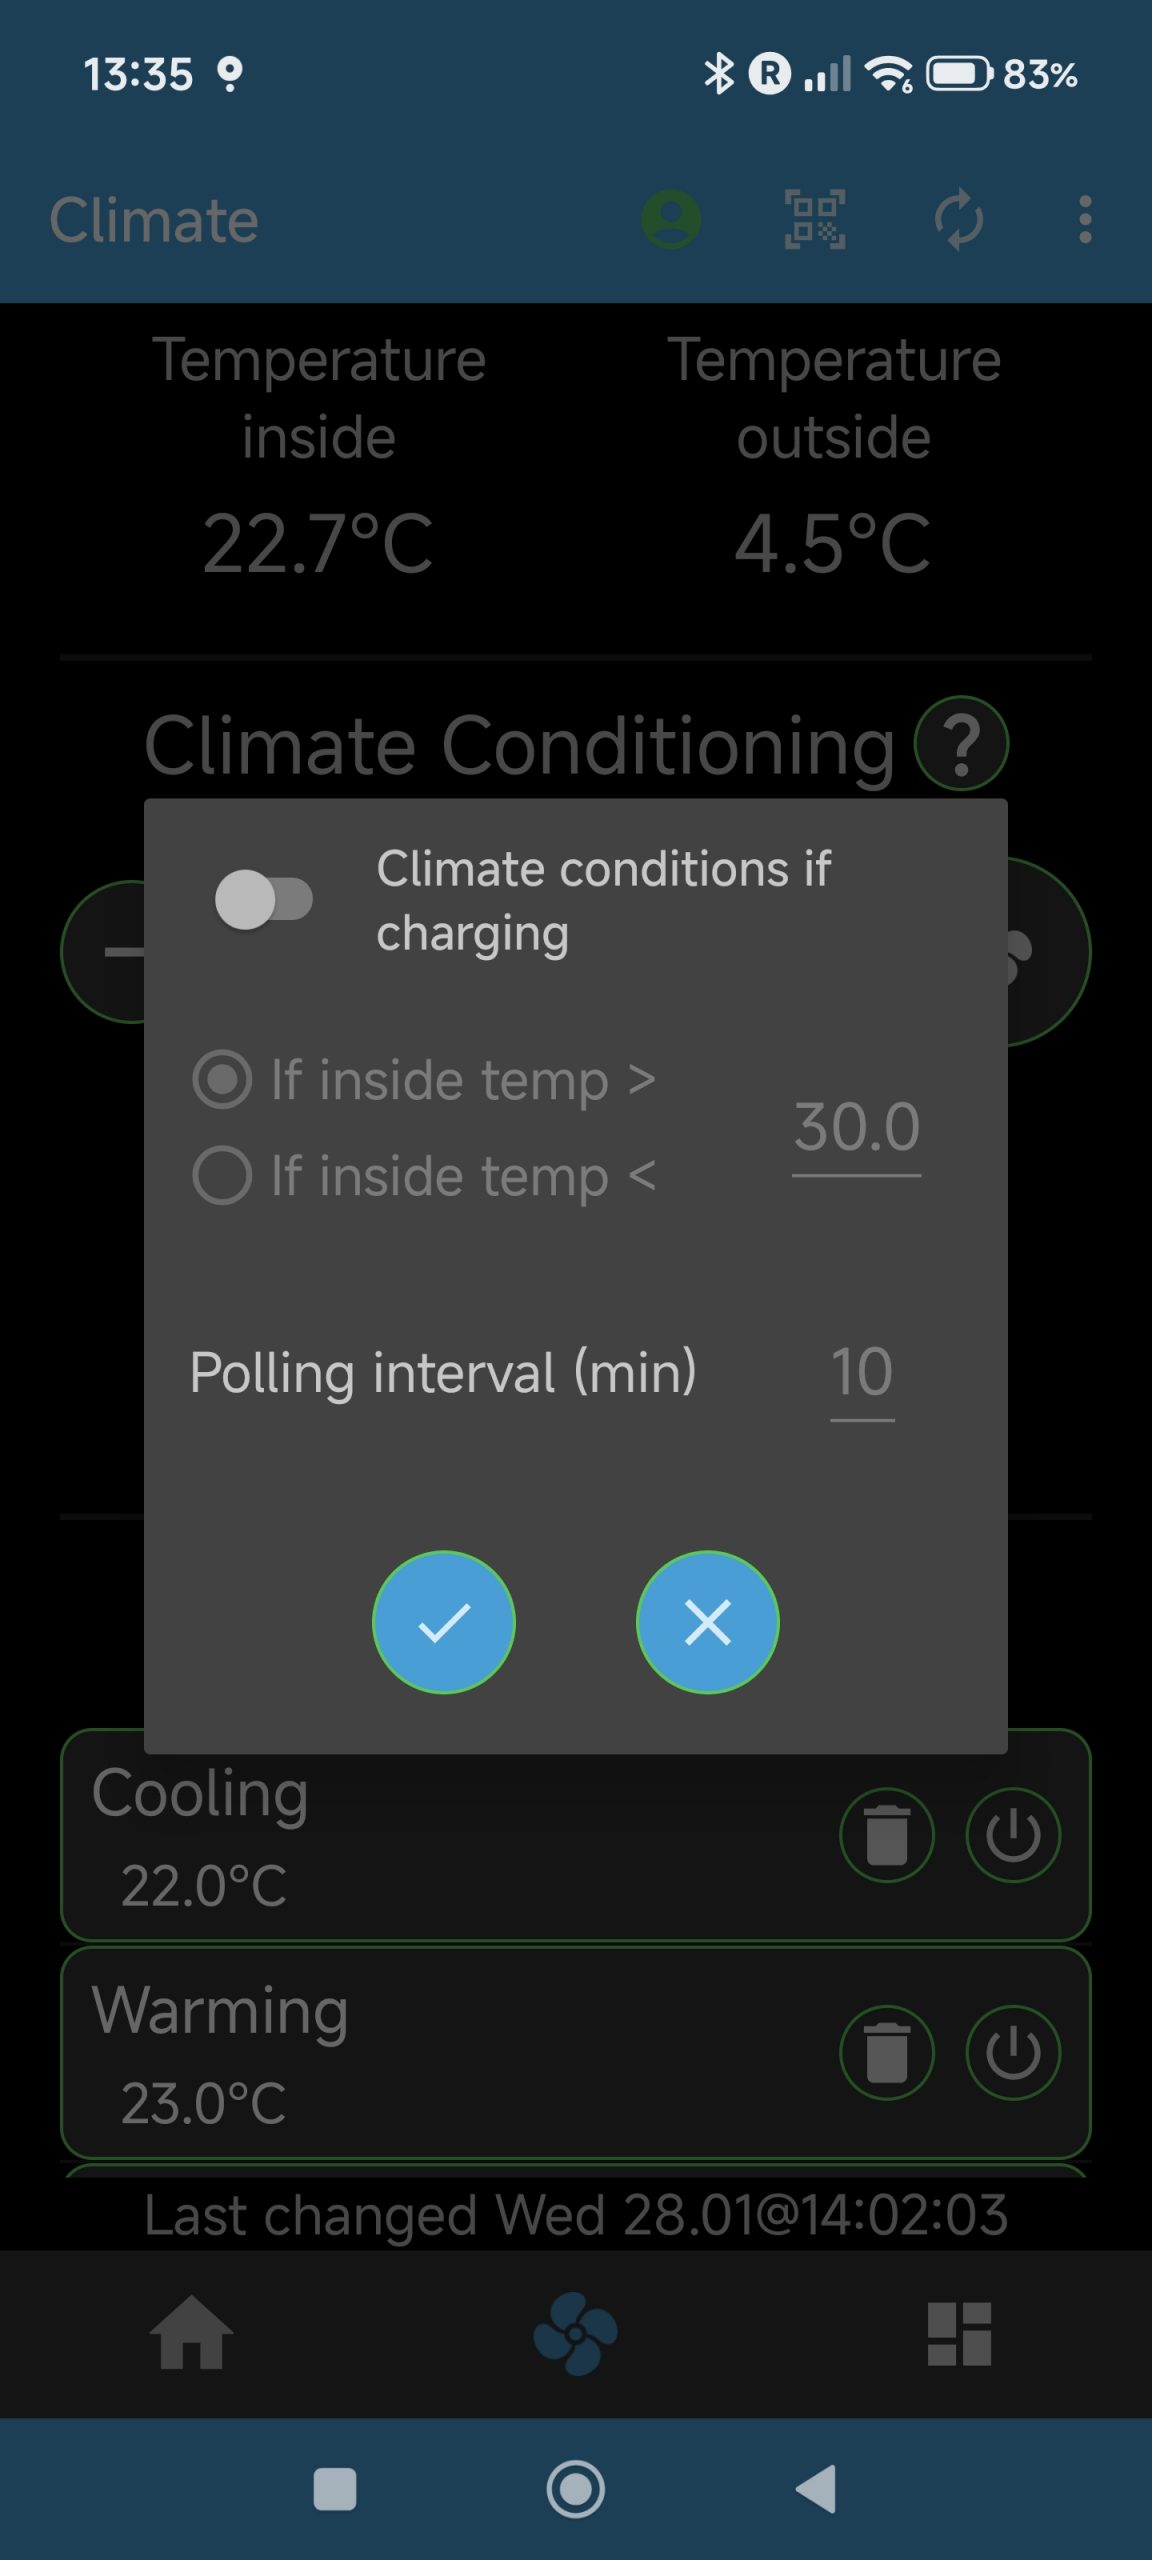
Enable the conditions check with the switch at the top of the dialog box (it will only work during charging, as indicated, since the car needs to be awake to provide inside temperature information). Then set the condition for the temperature as either being below or above a certain inside temperature. Then set the interval after which the temperature should be check to lower the need for the mobile app to check frequently.
Confirm the settings, which then will return to the climate tab of SMore#. If you enabled the conditions in the previous dialog, the conditions button on the climate tab will be shown in blue and a notification will appear to indicate the ongoing operation of checking the car’s temperature.
Also, a notification will be shown that your temperature is being checked – see the relevant How-To under the notification category.
You can disable the checking through disabling the switch again in the Conditions dialog box (see above) or by pressing the Cancel button in the notification shown.
Scheduling your Charging or Climate
Why: SMore# offers the possibility to schedule your charging start and stop, such as to utilise cheaper energy prices or to have your car charged in the morning.
How: You will need to connect your car to your wallbox for this to work! On the main home tab of the SMore# app, click on the schedule button, as shown below: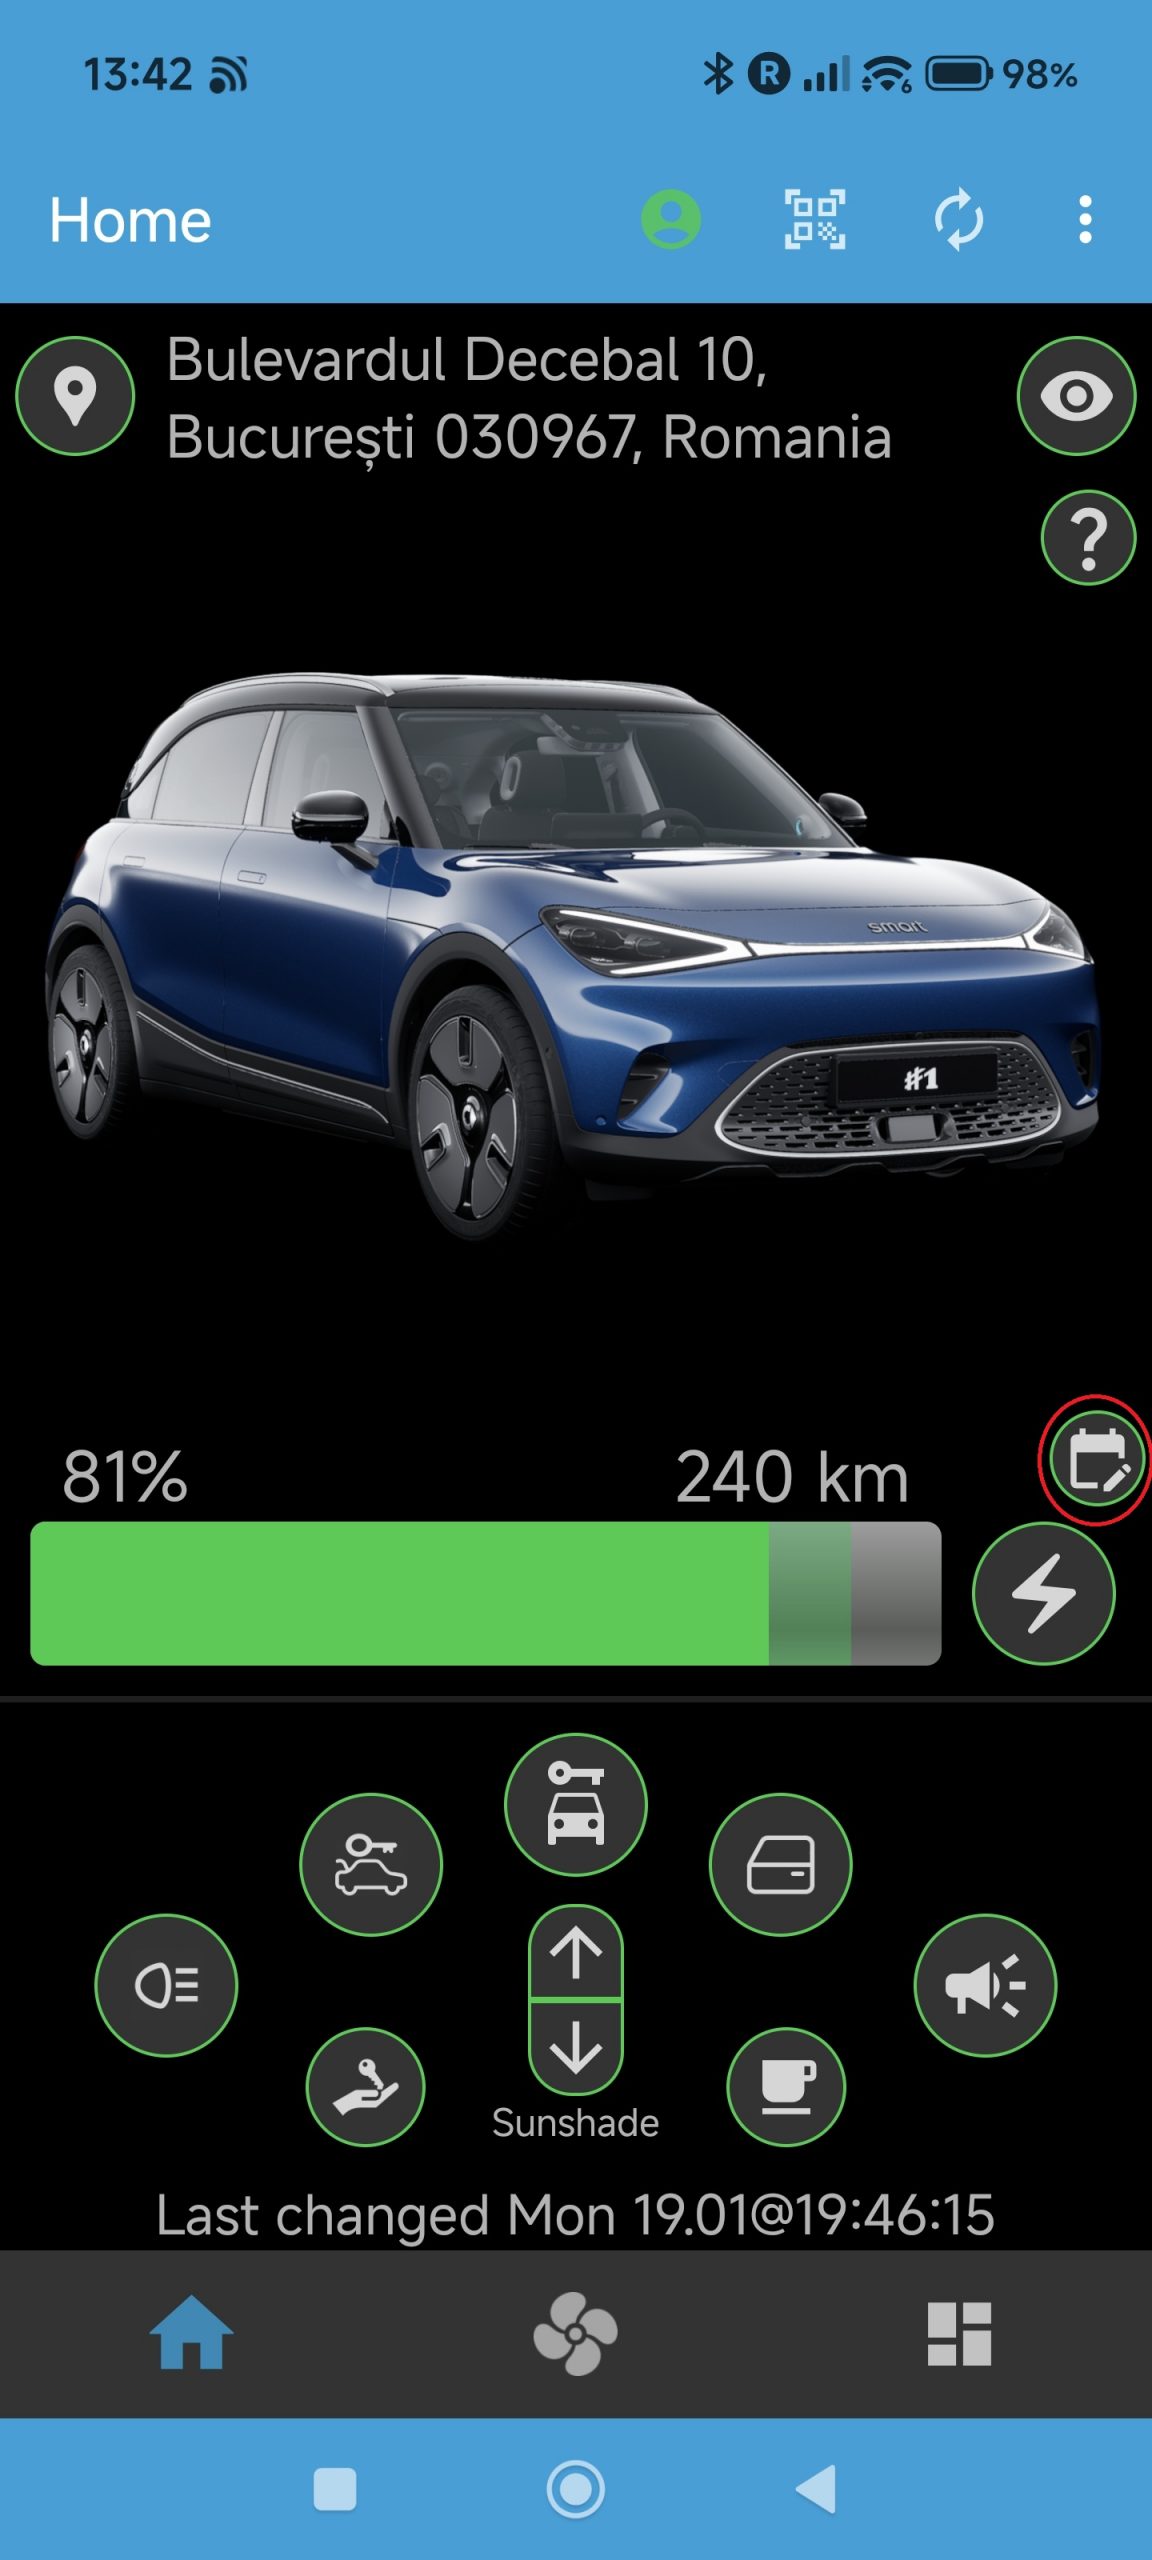
This will now open your list of charging entries, as shown below, showing the charge schedules per week day with a brief description for the start/end time and charging limit: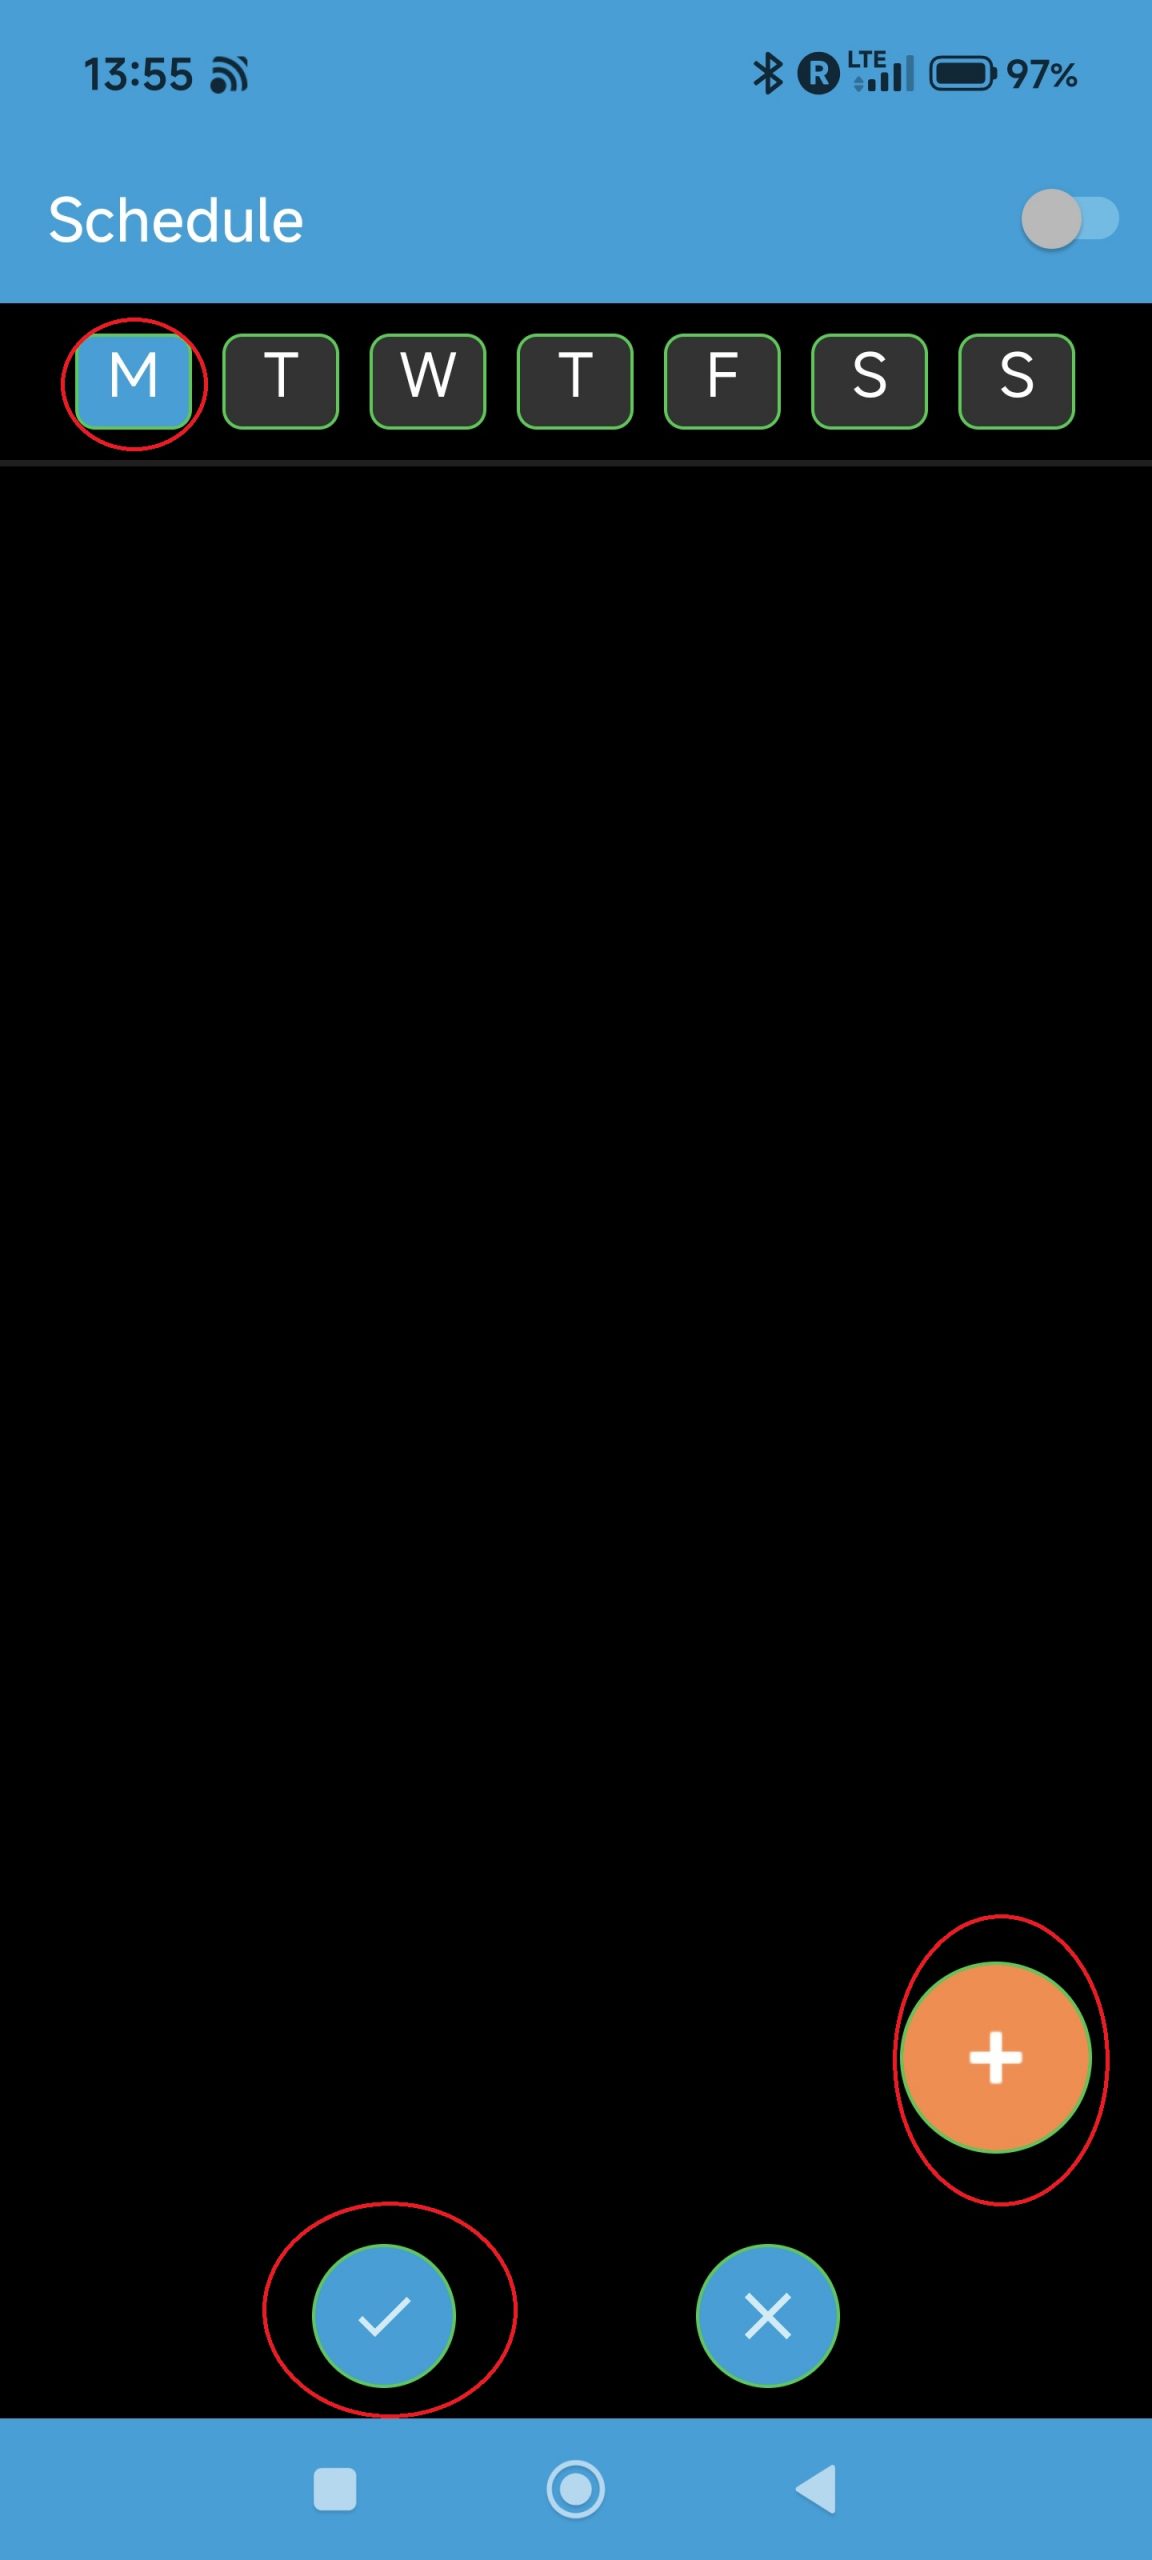
First select the date of the week at which you want to create or edit an entry. Now select an existing entry by clicking on the entry’s pen button or create a new entry by clicking on the orange + button. This will display the entry in a different screen, either filled with the existing values or through default values for a new entry: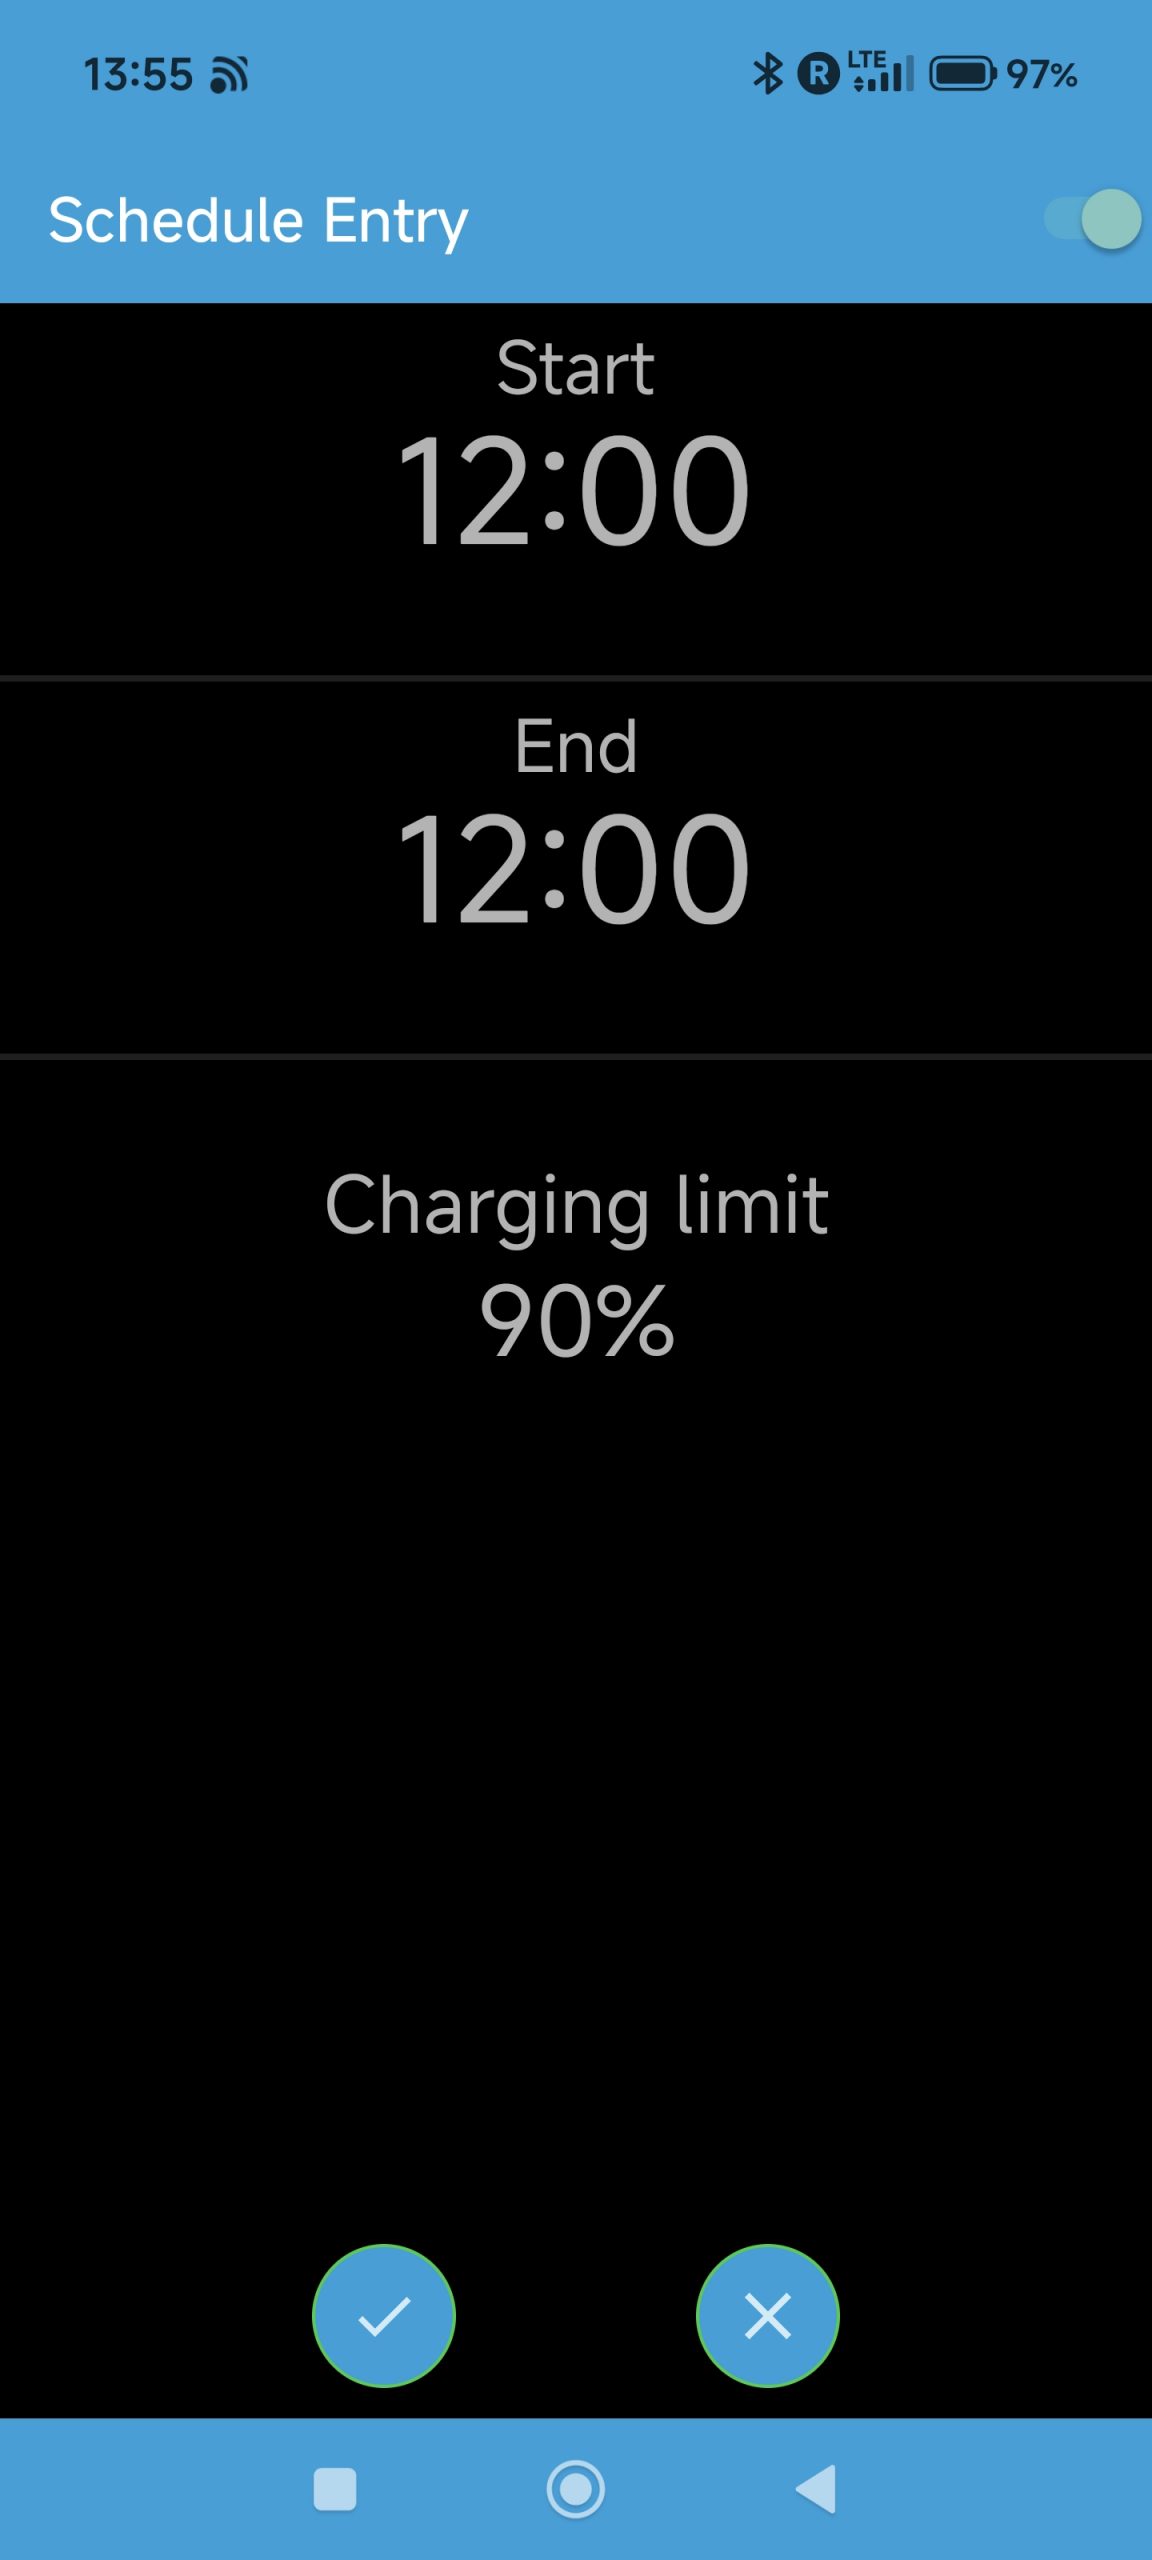
You can select the charge start time, the end time, and the charging limit. The last two define the condition at which the charging should stop. If you keep start and end time the same, only the charging limit will be taken into account. After confirming the changes, you will return to the list of charging entries and your revised or new entry will be shown in the list.
Repeat this procedure until all your schedule for all days of the week are defined.
Note: you can create several entries per day of the week!
If you want the schedule to be executed at the next planned time, leave the schedule screen by switching the schedule on with the button at the top right, encircled in black:
Finally, exit the screen with the positive confirmation button to save your changes or cancel negatively to discard your changes.
If your schedule has been enabled, the schedule button on the home tab in SMore# will be shown in blue and a notification will appear that shows the next scheduled charging operation. You have the option to cancel the schedule directly from the notification with the Cancel button. Alternatively, you can enter the charging screen again and switch the aforementioned switch at the top right to off.
Why: SMore# offers the possibility to schedule climate operations, e.g., when you want to prewarm your car during cold winter days before going to work.
How: Change to the climate tab in the SMore# app and click on the schedule button, as shown below:
This will open the climate schedule list, similar to the charge list discussed in another How-To: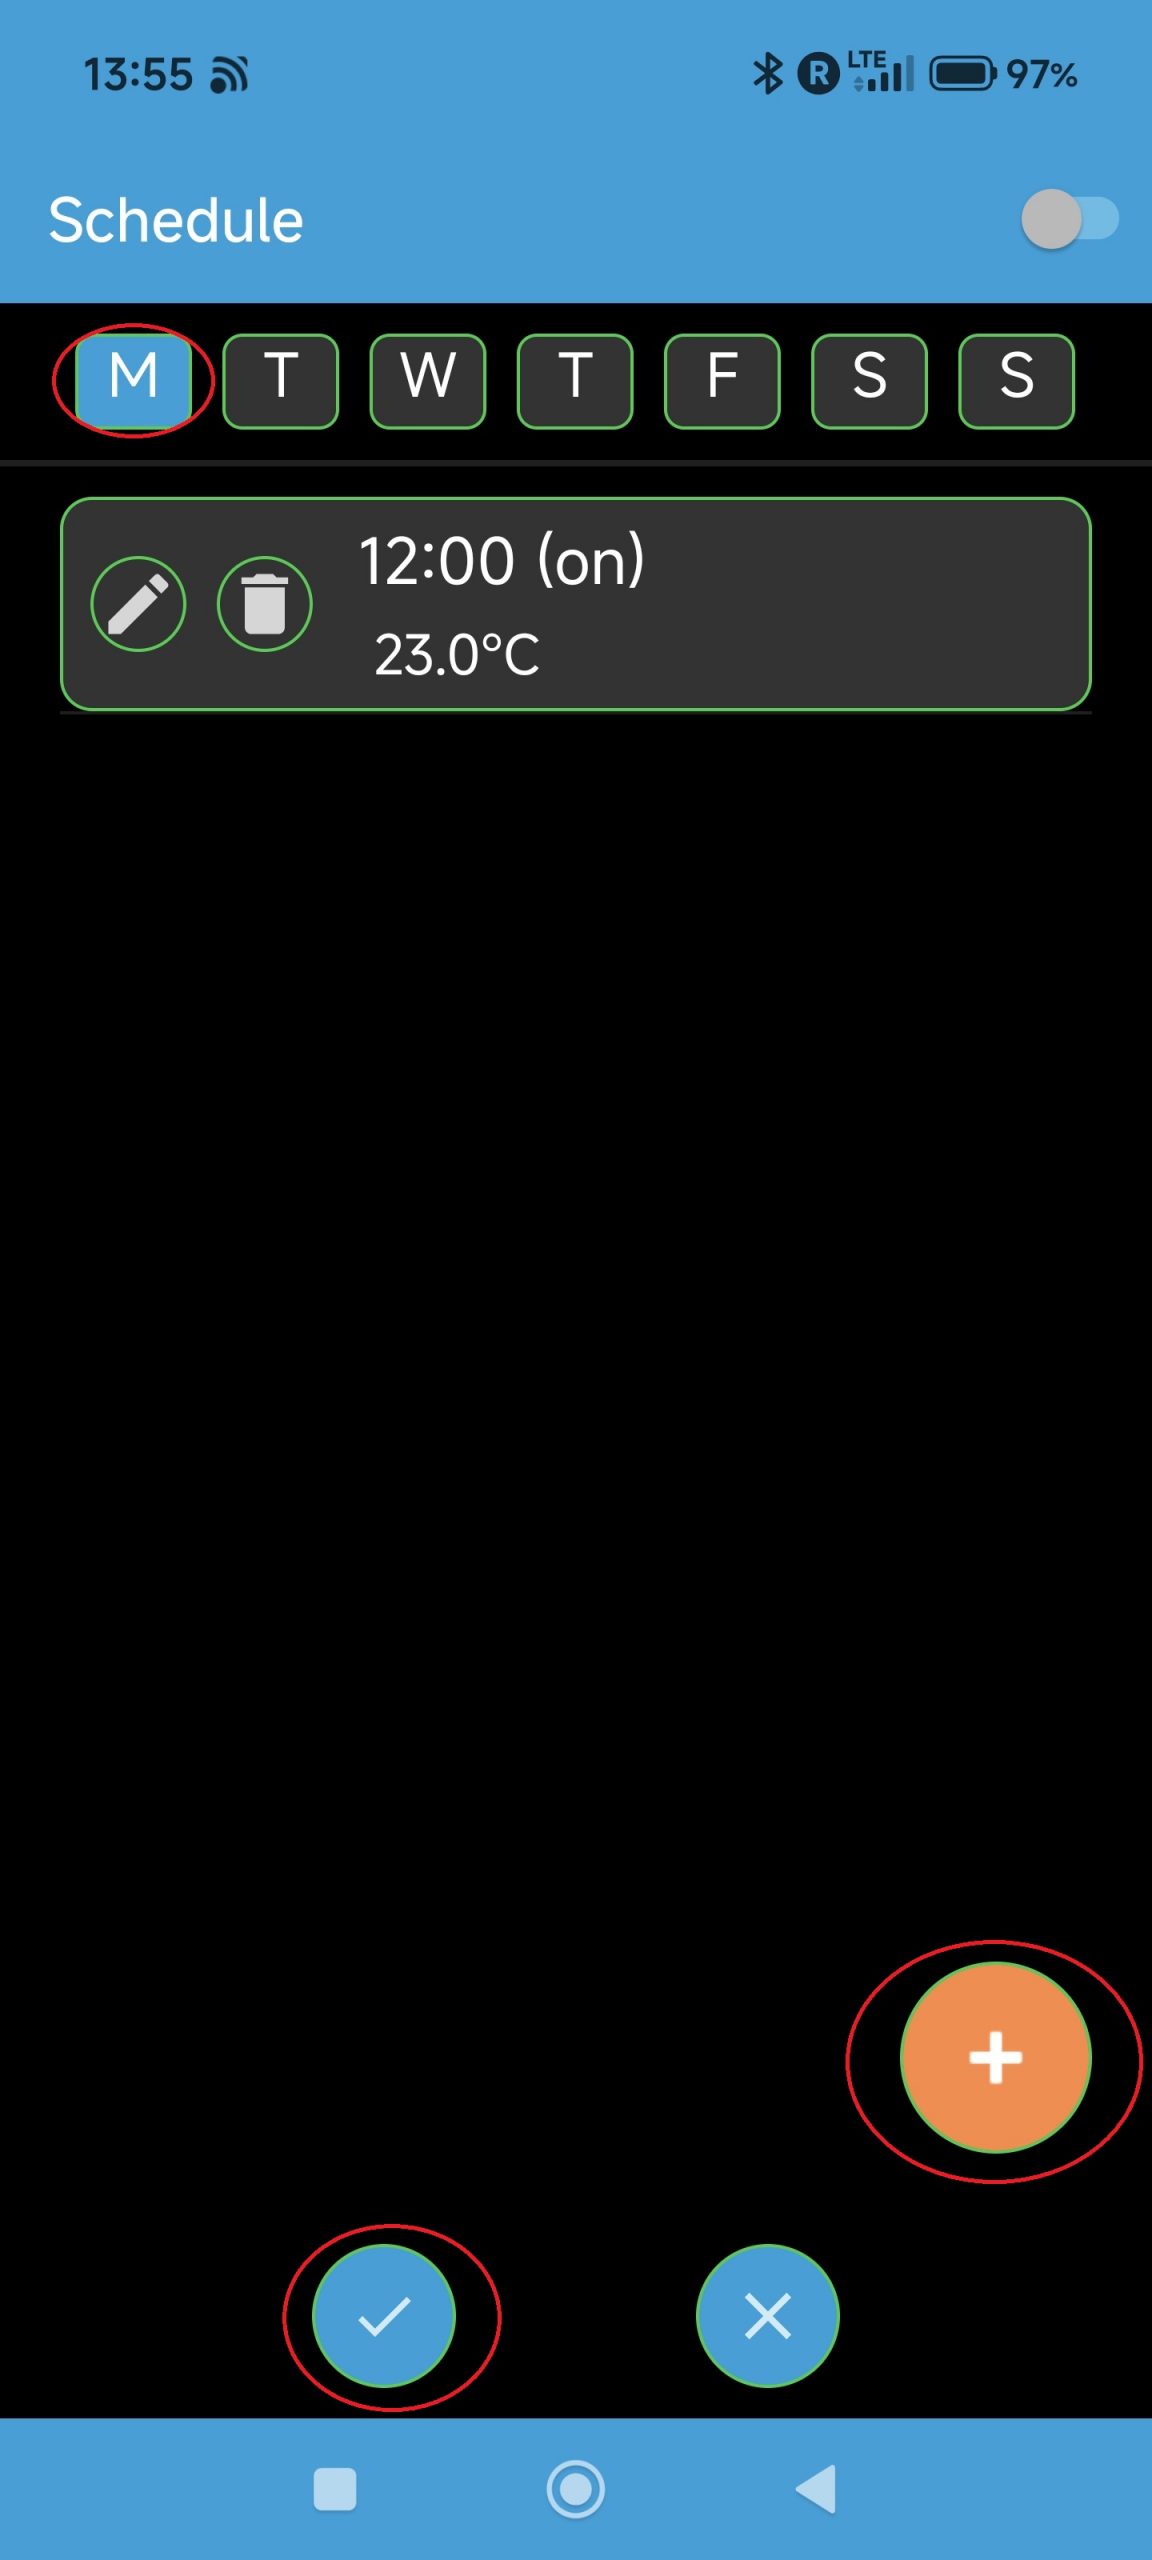
You will see a list of climate schedules per day of the week with a brief description of the actions and start time. Select the day of the week that you would like to edit or create a climate schedule entry.
You can either edit an existing entry by pressing on the entry’s pen button or create a new entry by pressing on the orange + button. This will open the climate schedule entry screen, as shown below, either filled with the values of an existing entry or with default values for a new entry: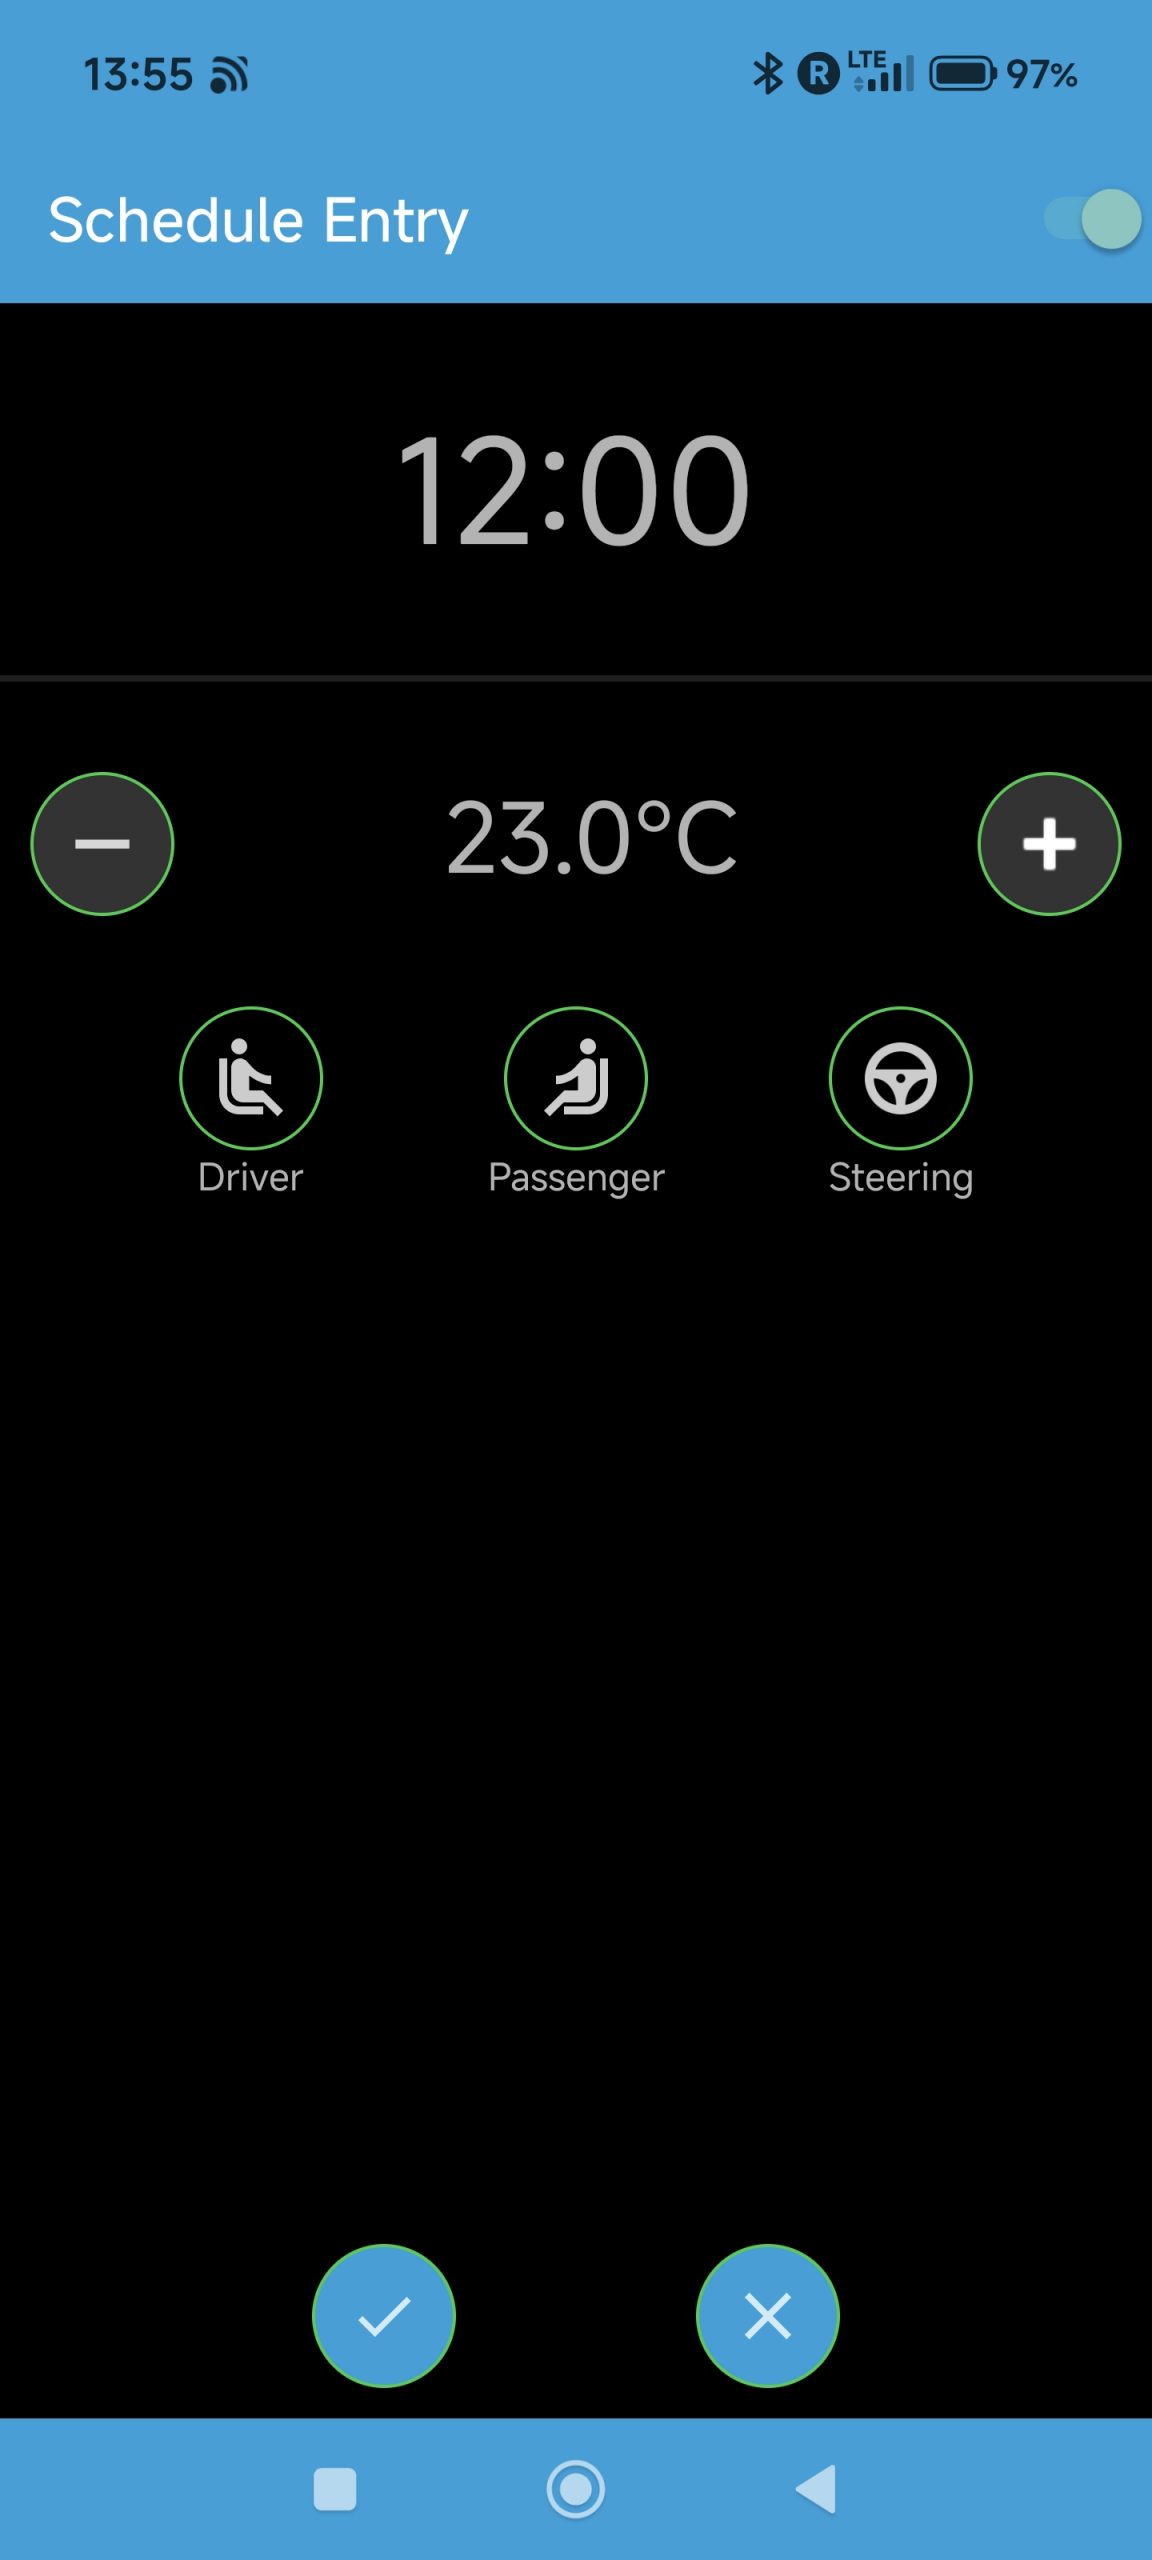
You can define the start time for the climate schedule entry, the desired temperature to set and the settings for driver, passenger and steering wheel heating. Here, the same limitation applies as in the standard climate setting in that all heating levels are kept the same. Confirm your changes positively to complete or discard through the negative confirmation.
You will return to the list of schedules for the chosen day. Repeat the process for all days of the week.
Note: you can create several entries per day of the week!
If you want the schedule to be executed at the next planned time, leave the schedule screen by switching the schedule on with the button at the top right, encircled in black:
Finally, confirm all your changes positively to return to the climate tab of SMore#. If you enabled the schedule, the schedule button will now turn blue and a notification will appear with the next planned scheduled climate operation time. You can cancel that scheduled operation directly in the notification by pressing the Cancel button or re-enter the schedule screen to switch off the schedule button at the top right of that screen.
Why: SMore# offers the possibility to maintain different climate schedules for different purposes, e.g., one schedule for morning shift and another one for evening shift or a summer schedule vs a winter schedule.
How: Define your schedule as explained in the previous How-To. Switch the schedule on.
Then save the climate settings (while the schedule is switched on) through the favourite button – see the separate How-To for saving favourite climate settings!
In your favourite list, you will now see an entry, indicating that this entry is a schedule. If you revert to that favourite setting, e.g., when wanting to switch to your morning shift schedule, the settings will now be restored – you can see this through the schedule button turning blue, indicating an active schedule!
Location
Why: SMore# offers the possibility to see your car’s location in Google Maps, e.g., to navigate to your parked car when being out and about.
How: Go to the main screen of SMore# and click on the map pin, as shown below: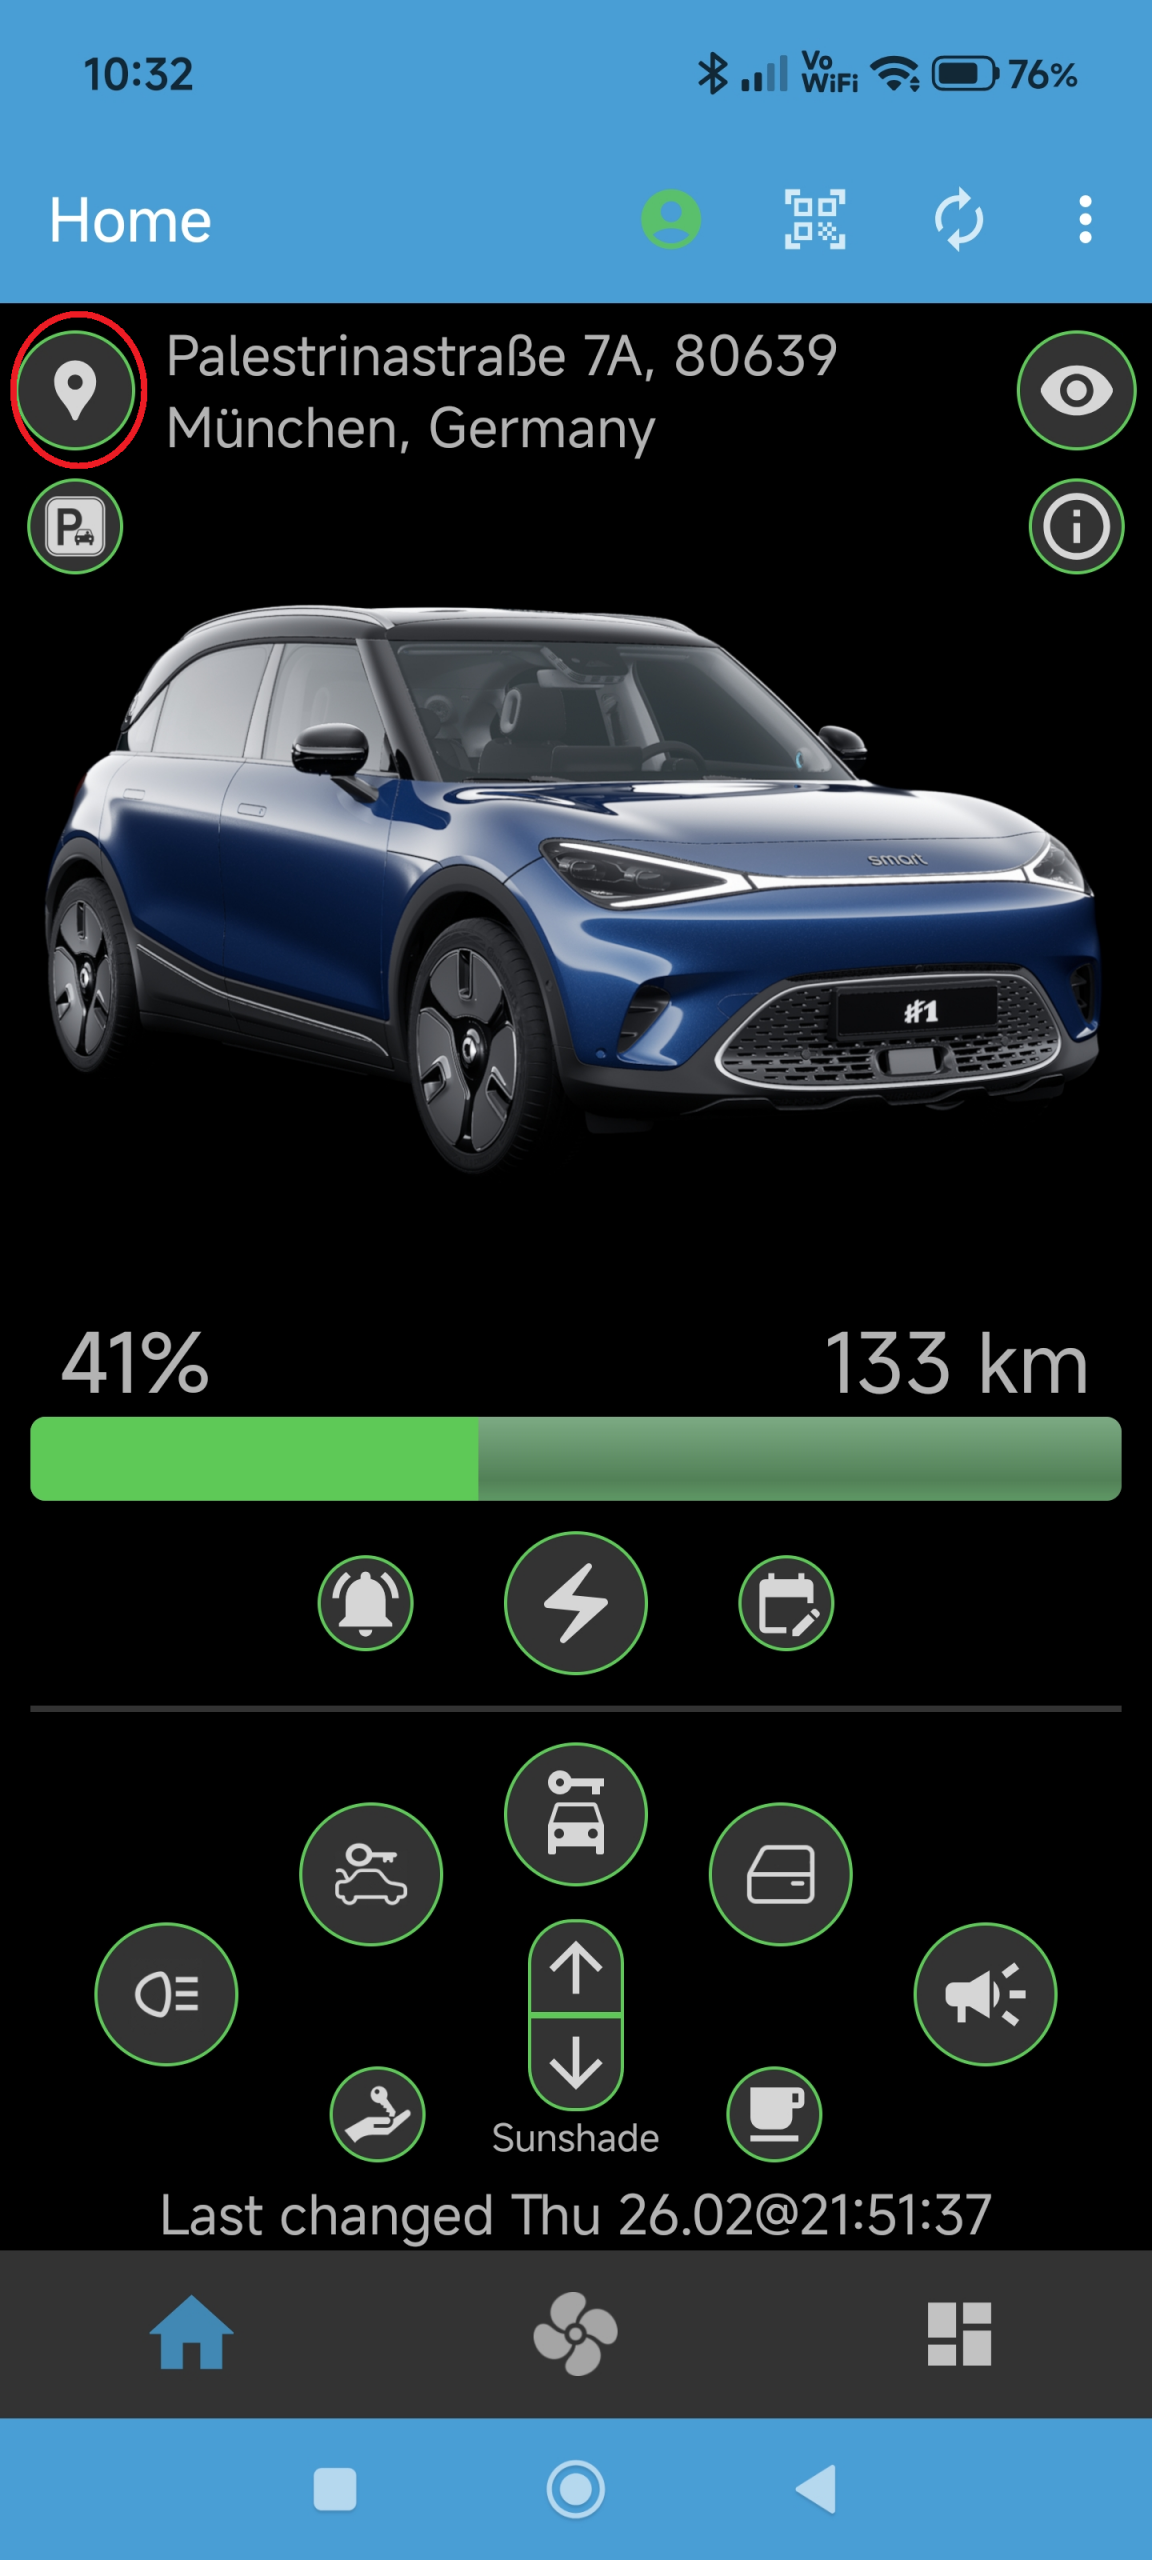
After clicking on the pin, the Google Maps app should open, showing the location of your car with the word “Smart” as annotation. You can now navigate to this location within Google Maps or share the location further to other apps.
Why: SMore# offers the possibility to directly show you a route to your car, e.g., when walking in the city and trying to find a good way back to the parked car.
How: Go to the main screen of the SMore# app and click on the address, showing the current location of your car, as shown below: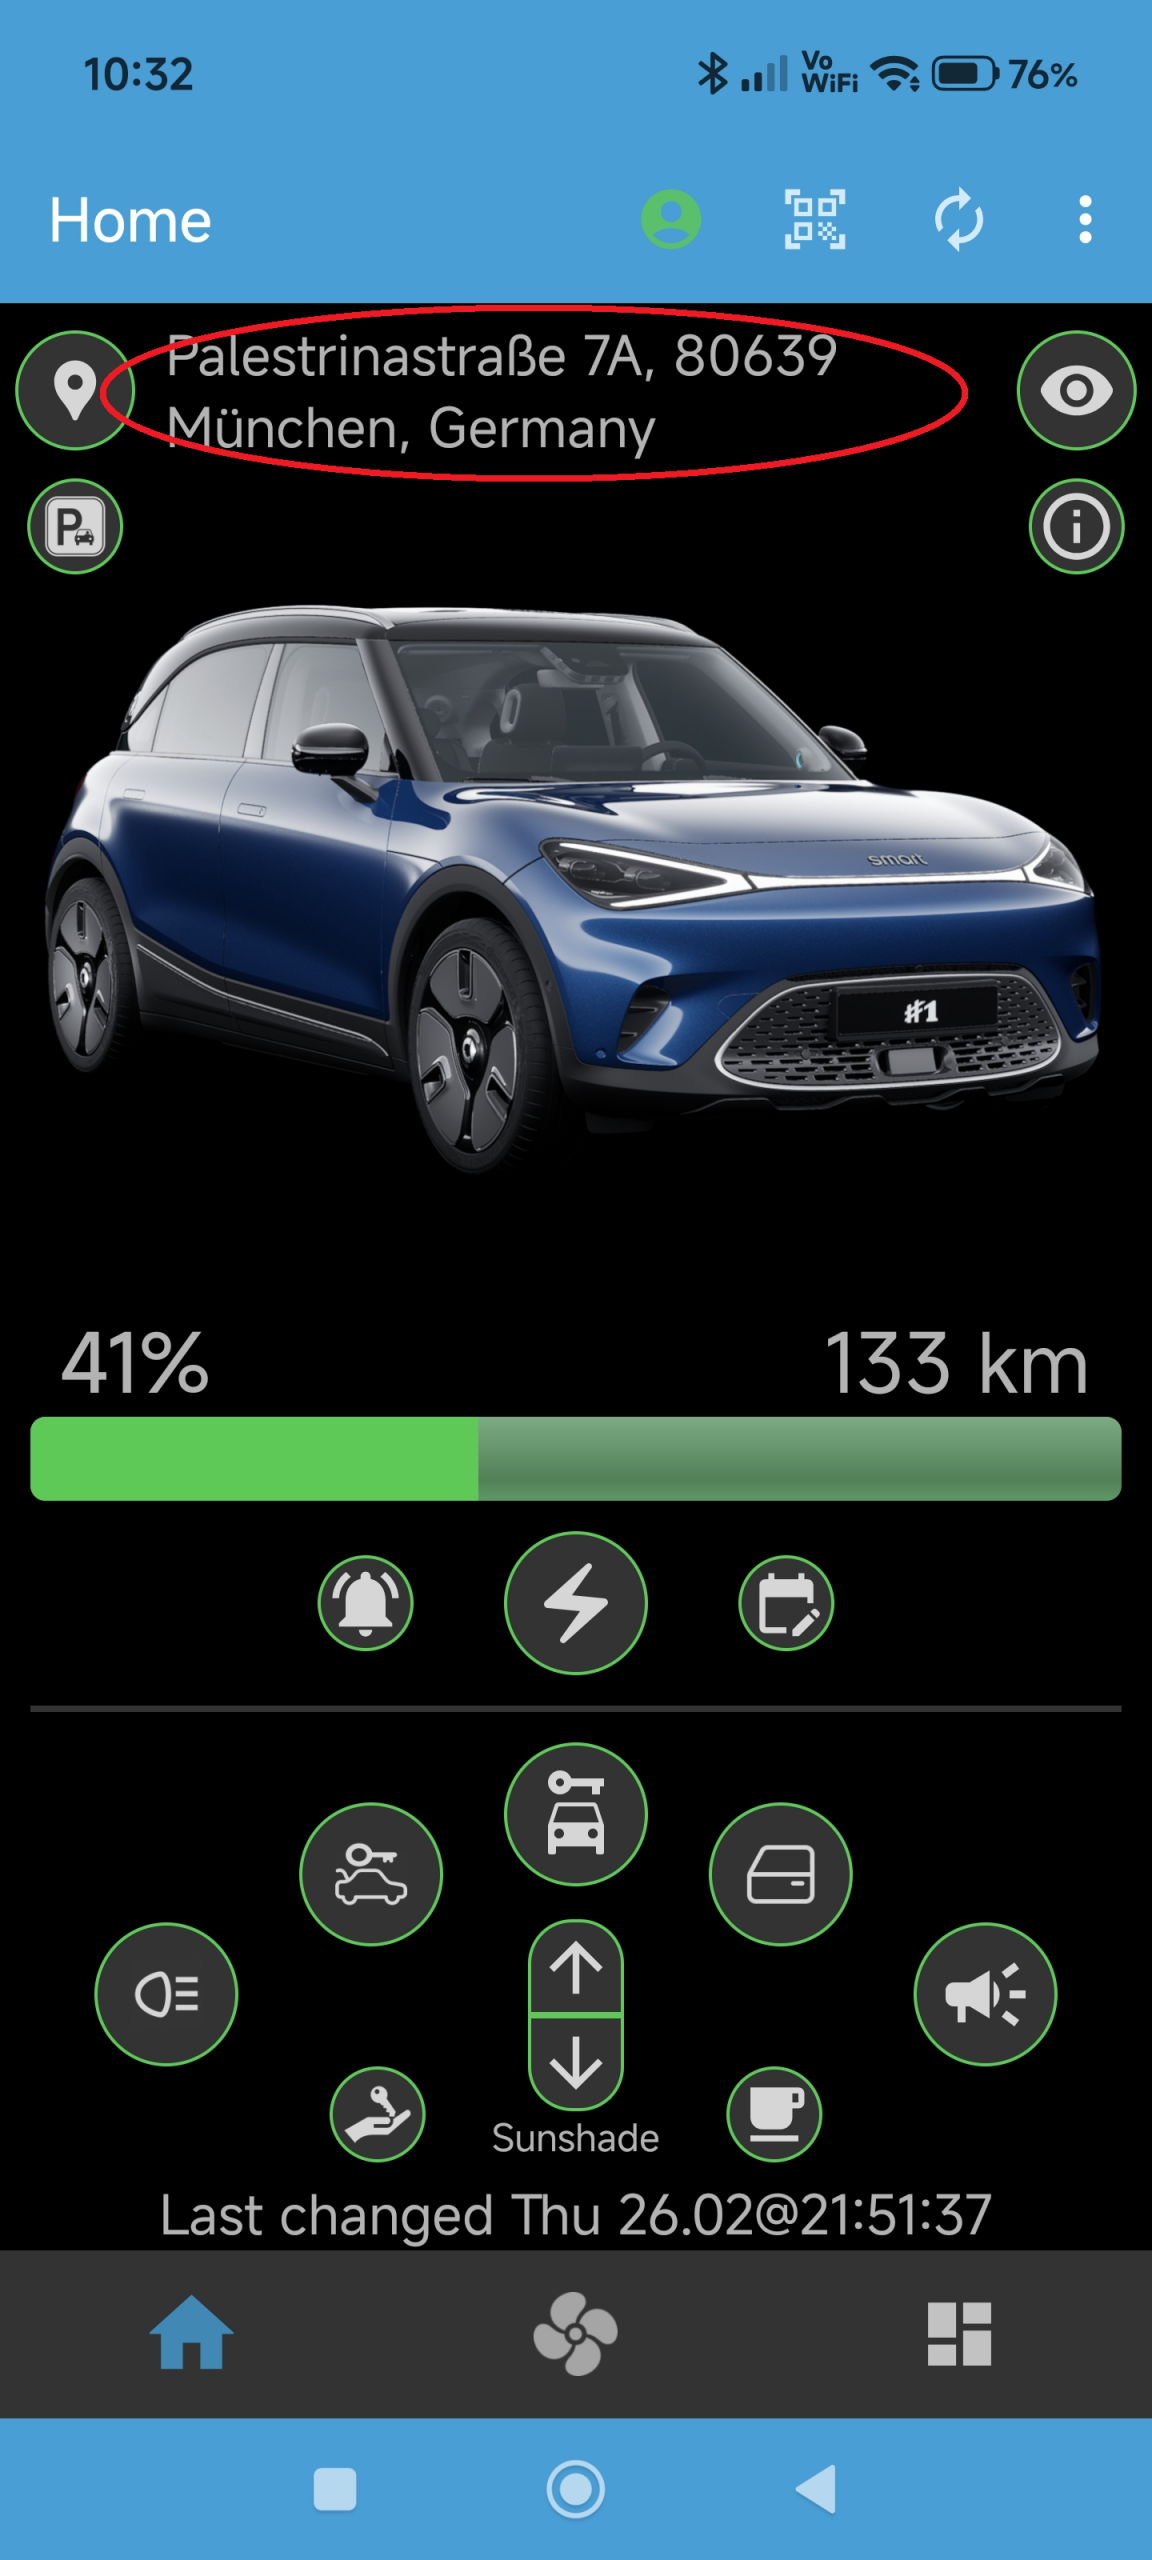
After the click, Google Maps will open and show a route to the car’s location. You can change the mode of navigation directly in Google Maps, e.g., to get pedestrian directions instead of car directions.
Why: SMore# offers the possibility to get regular updates of your car’s current location, e.g., when your partner is using the car and you would like to know where she/he is.
How: Go to the main screen of SMore# and press the eye button at the at the top right, as shown below: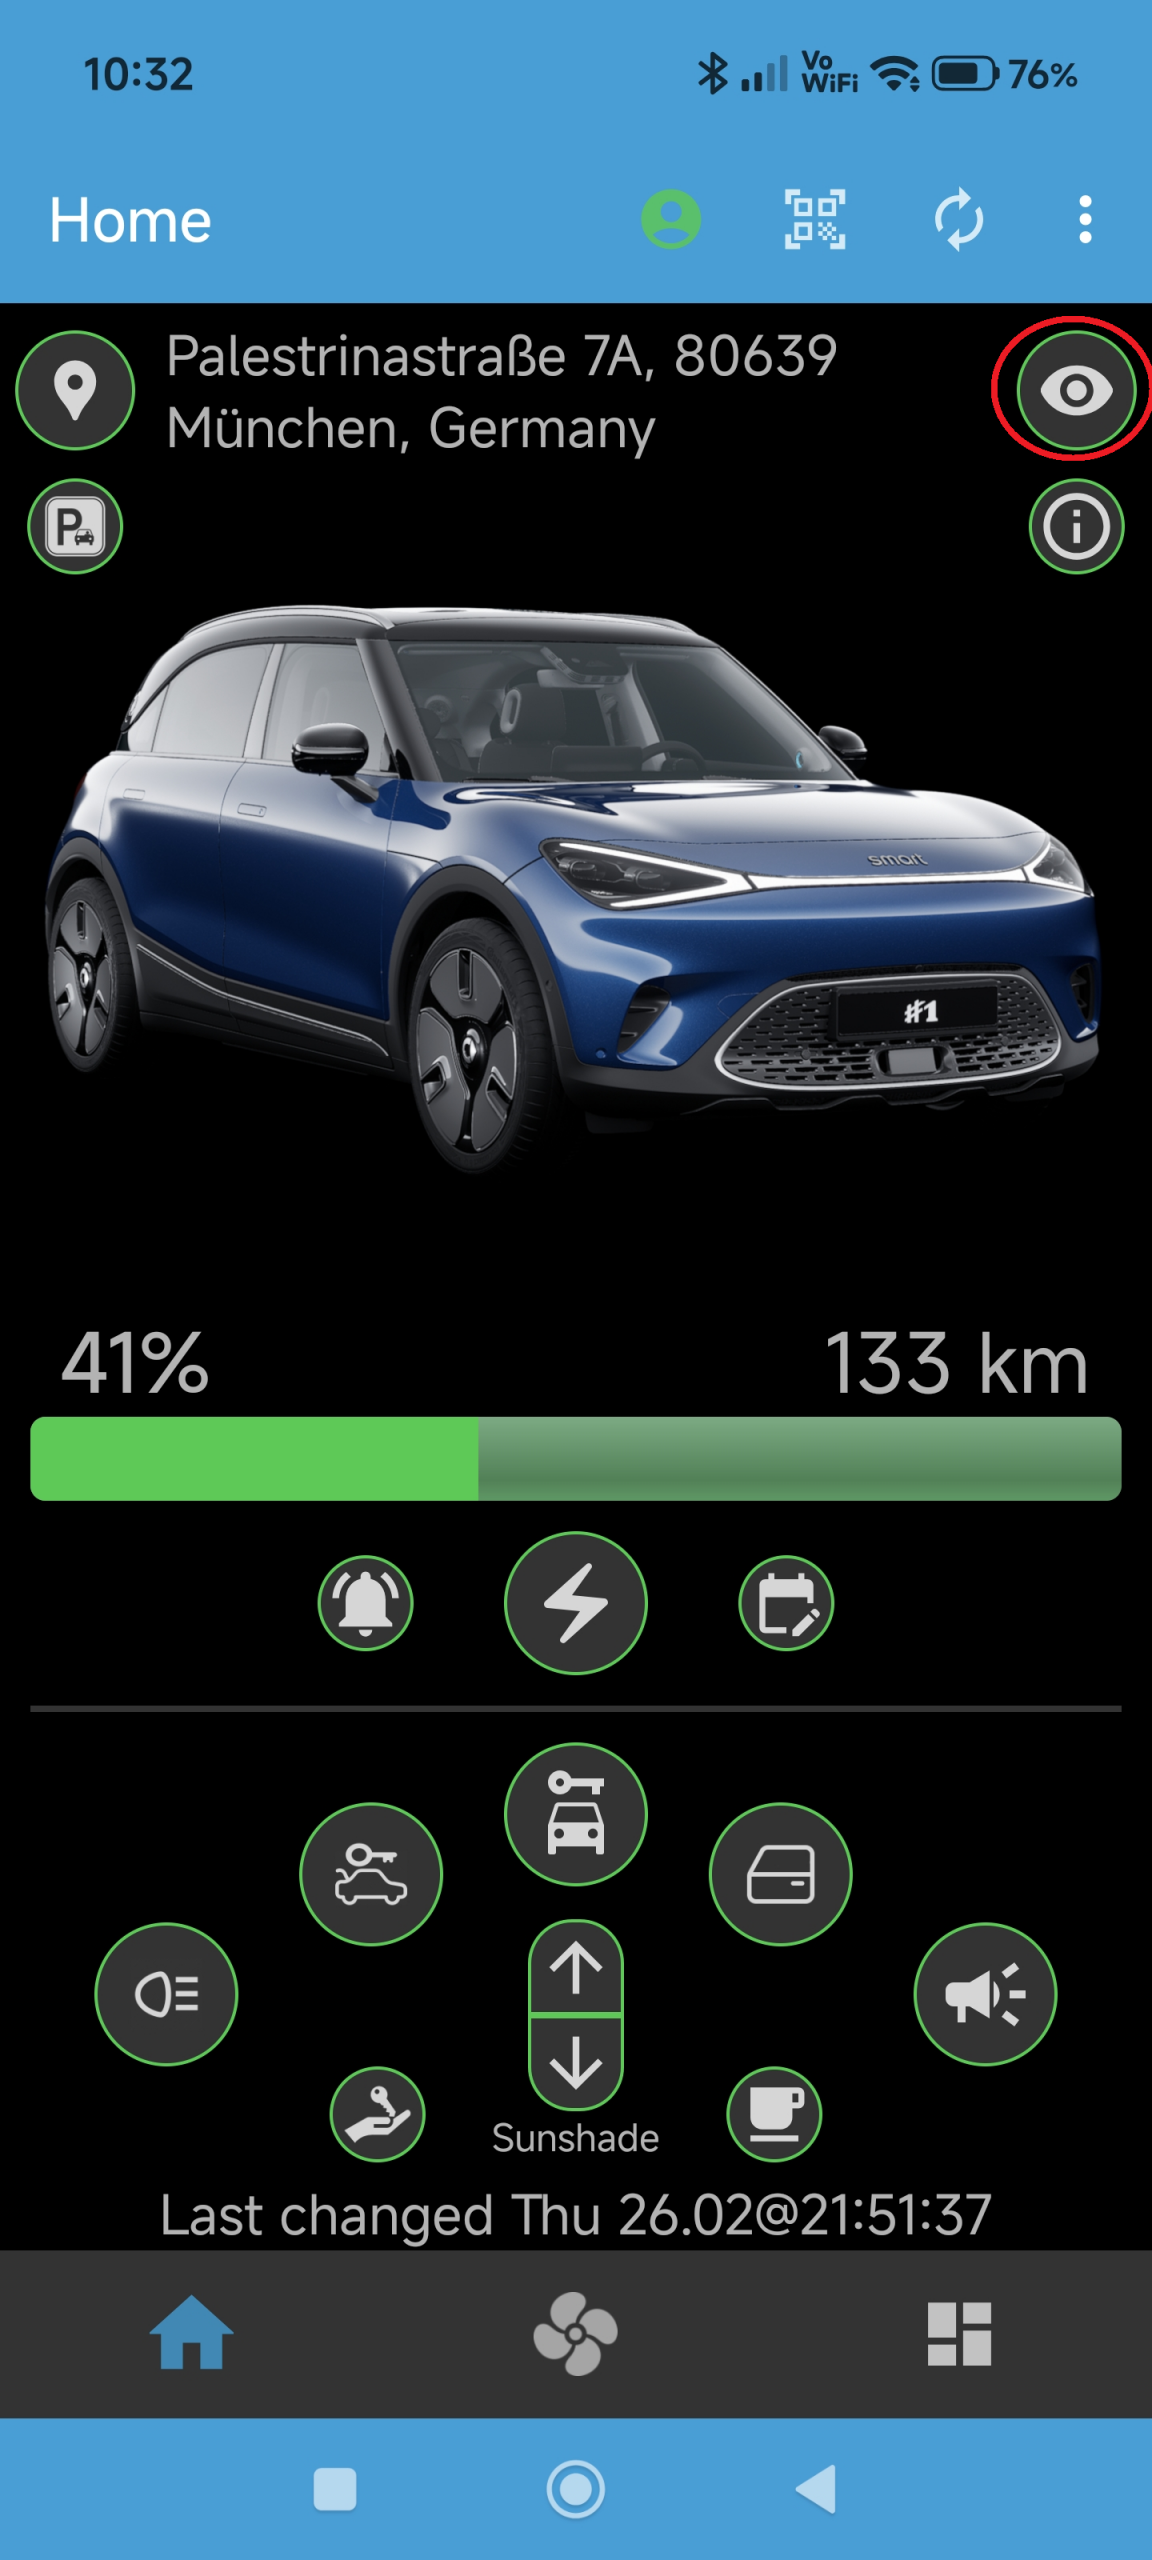
A dialog box will appear to request the geofence radius you would like to use: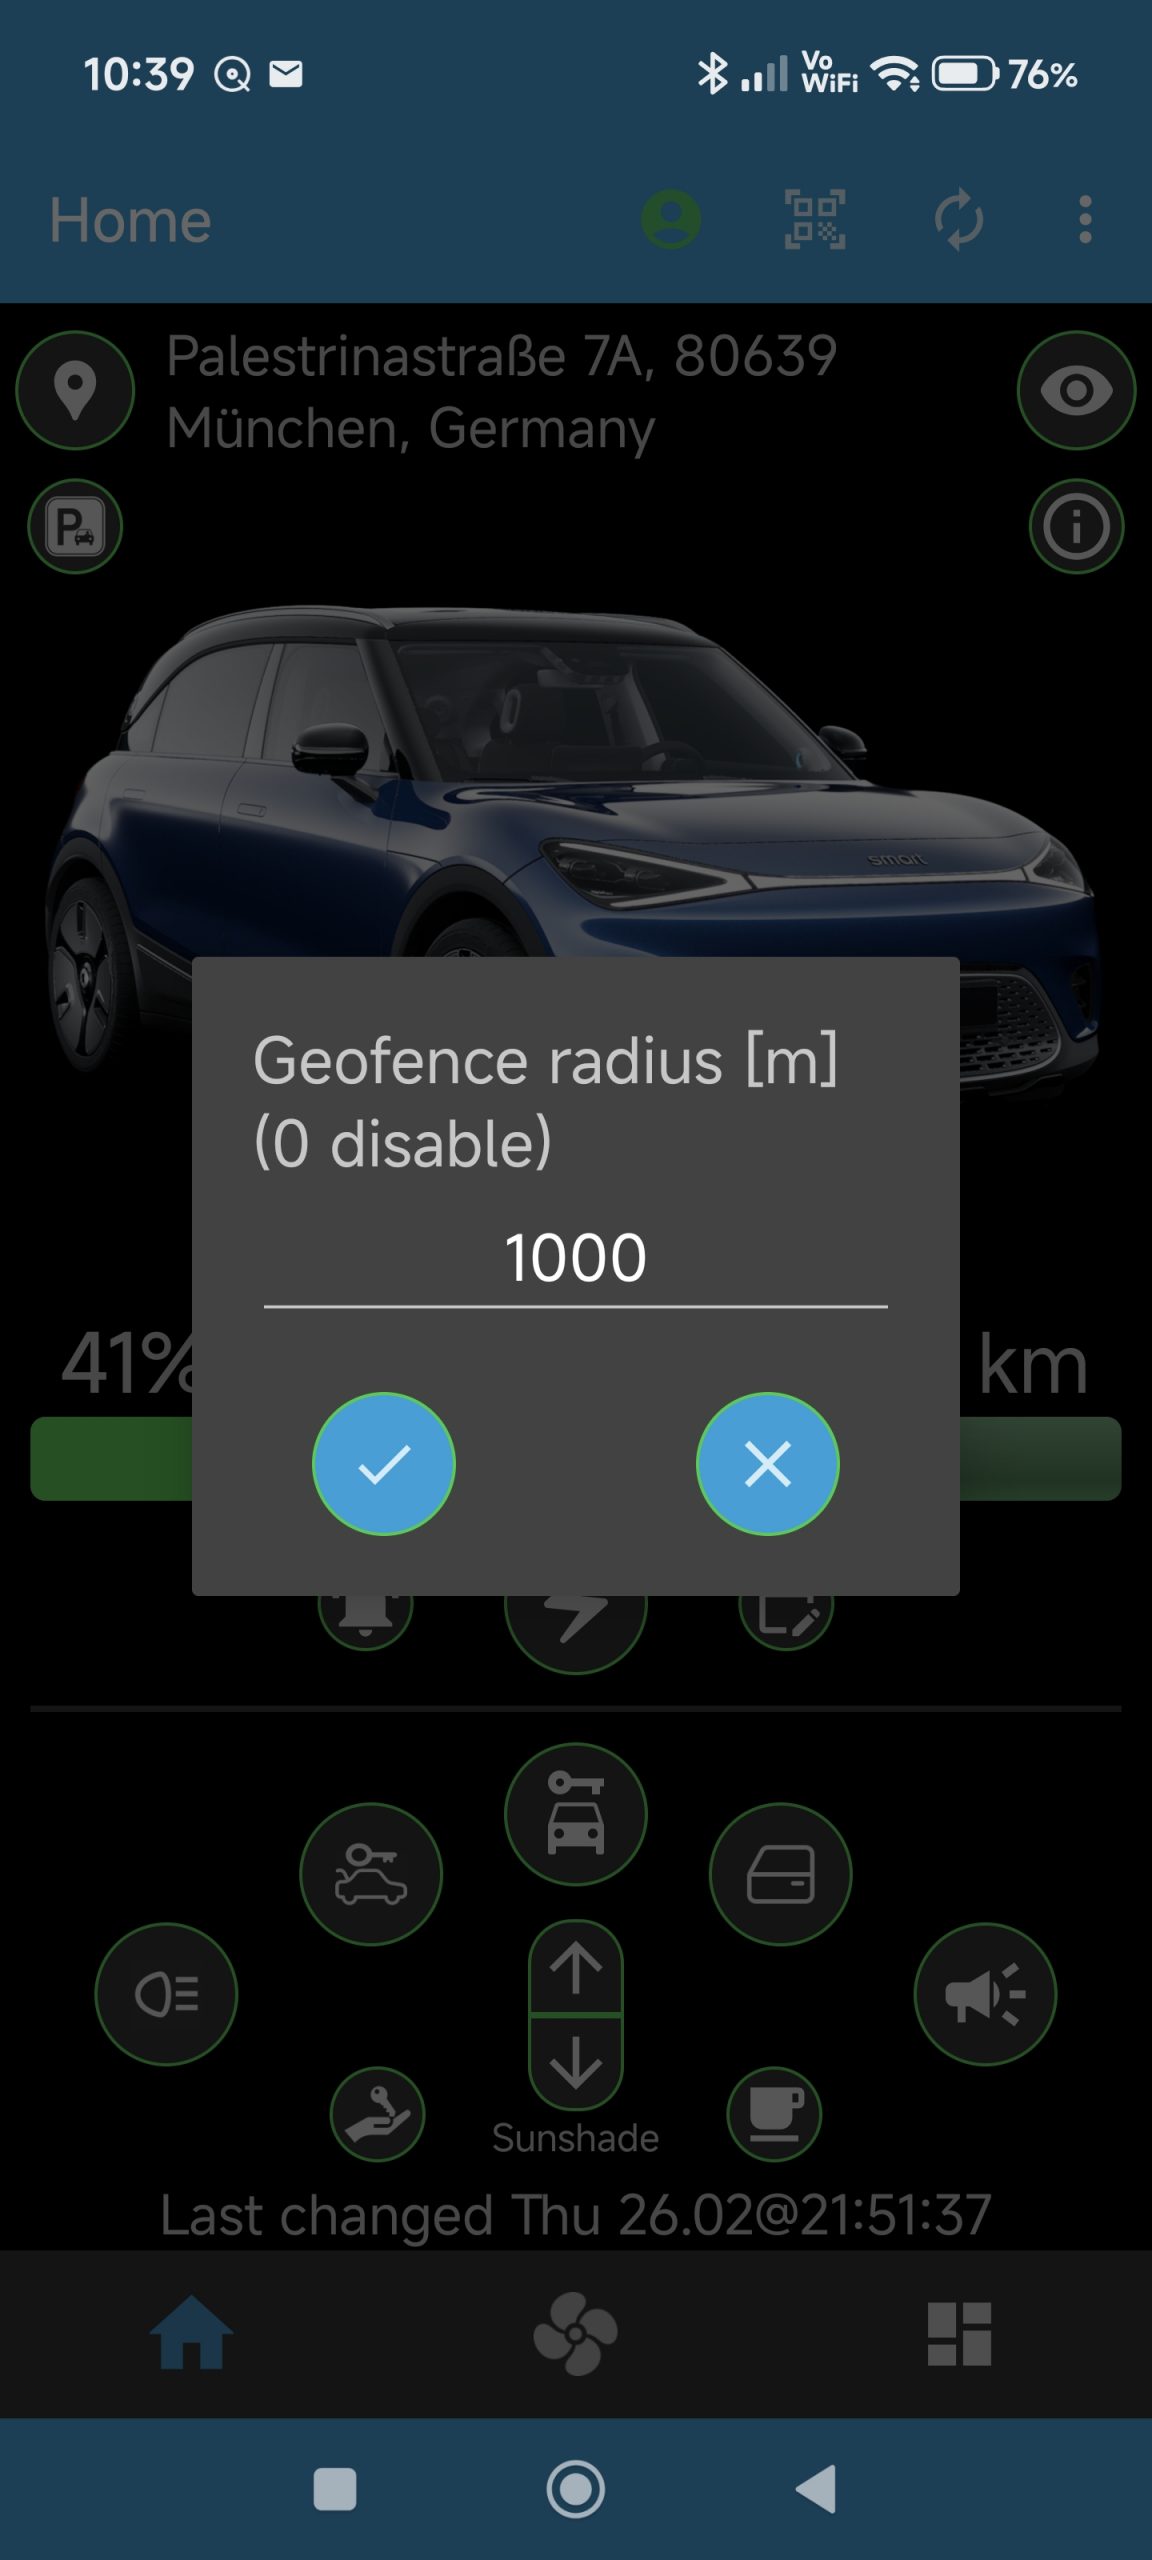
Select 0 to just watch the location without alerting for a geofence alarm.
A notification will appear that the location watcher has started and after about 10s, a notification will be shown in your notification shade, showing the location and status of your car (driving or parked) as well as the speed IF the car is driving. IF enabled in the preferences, an additional map of the location as a static image is shown. Clicking on that map will open Google Maps with the car location.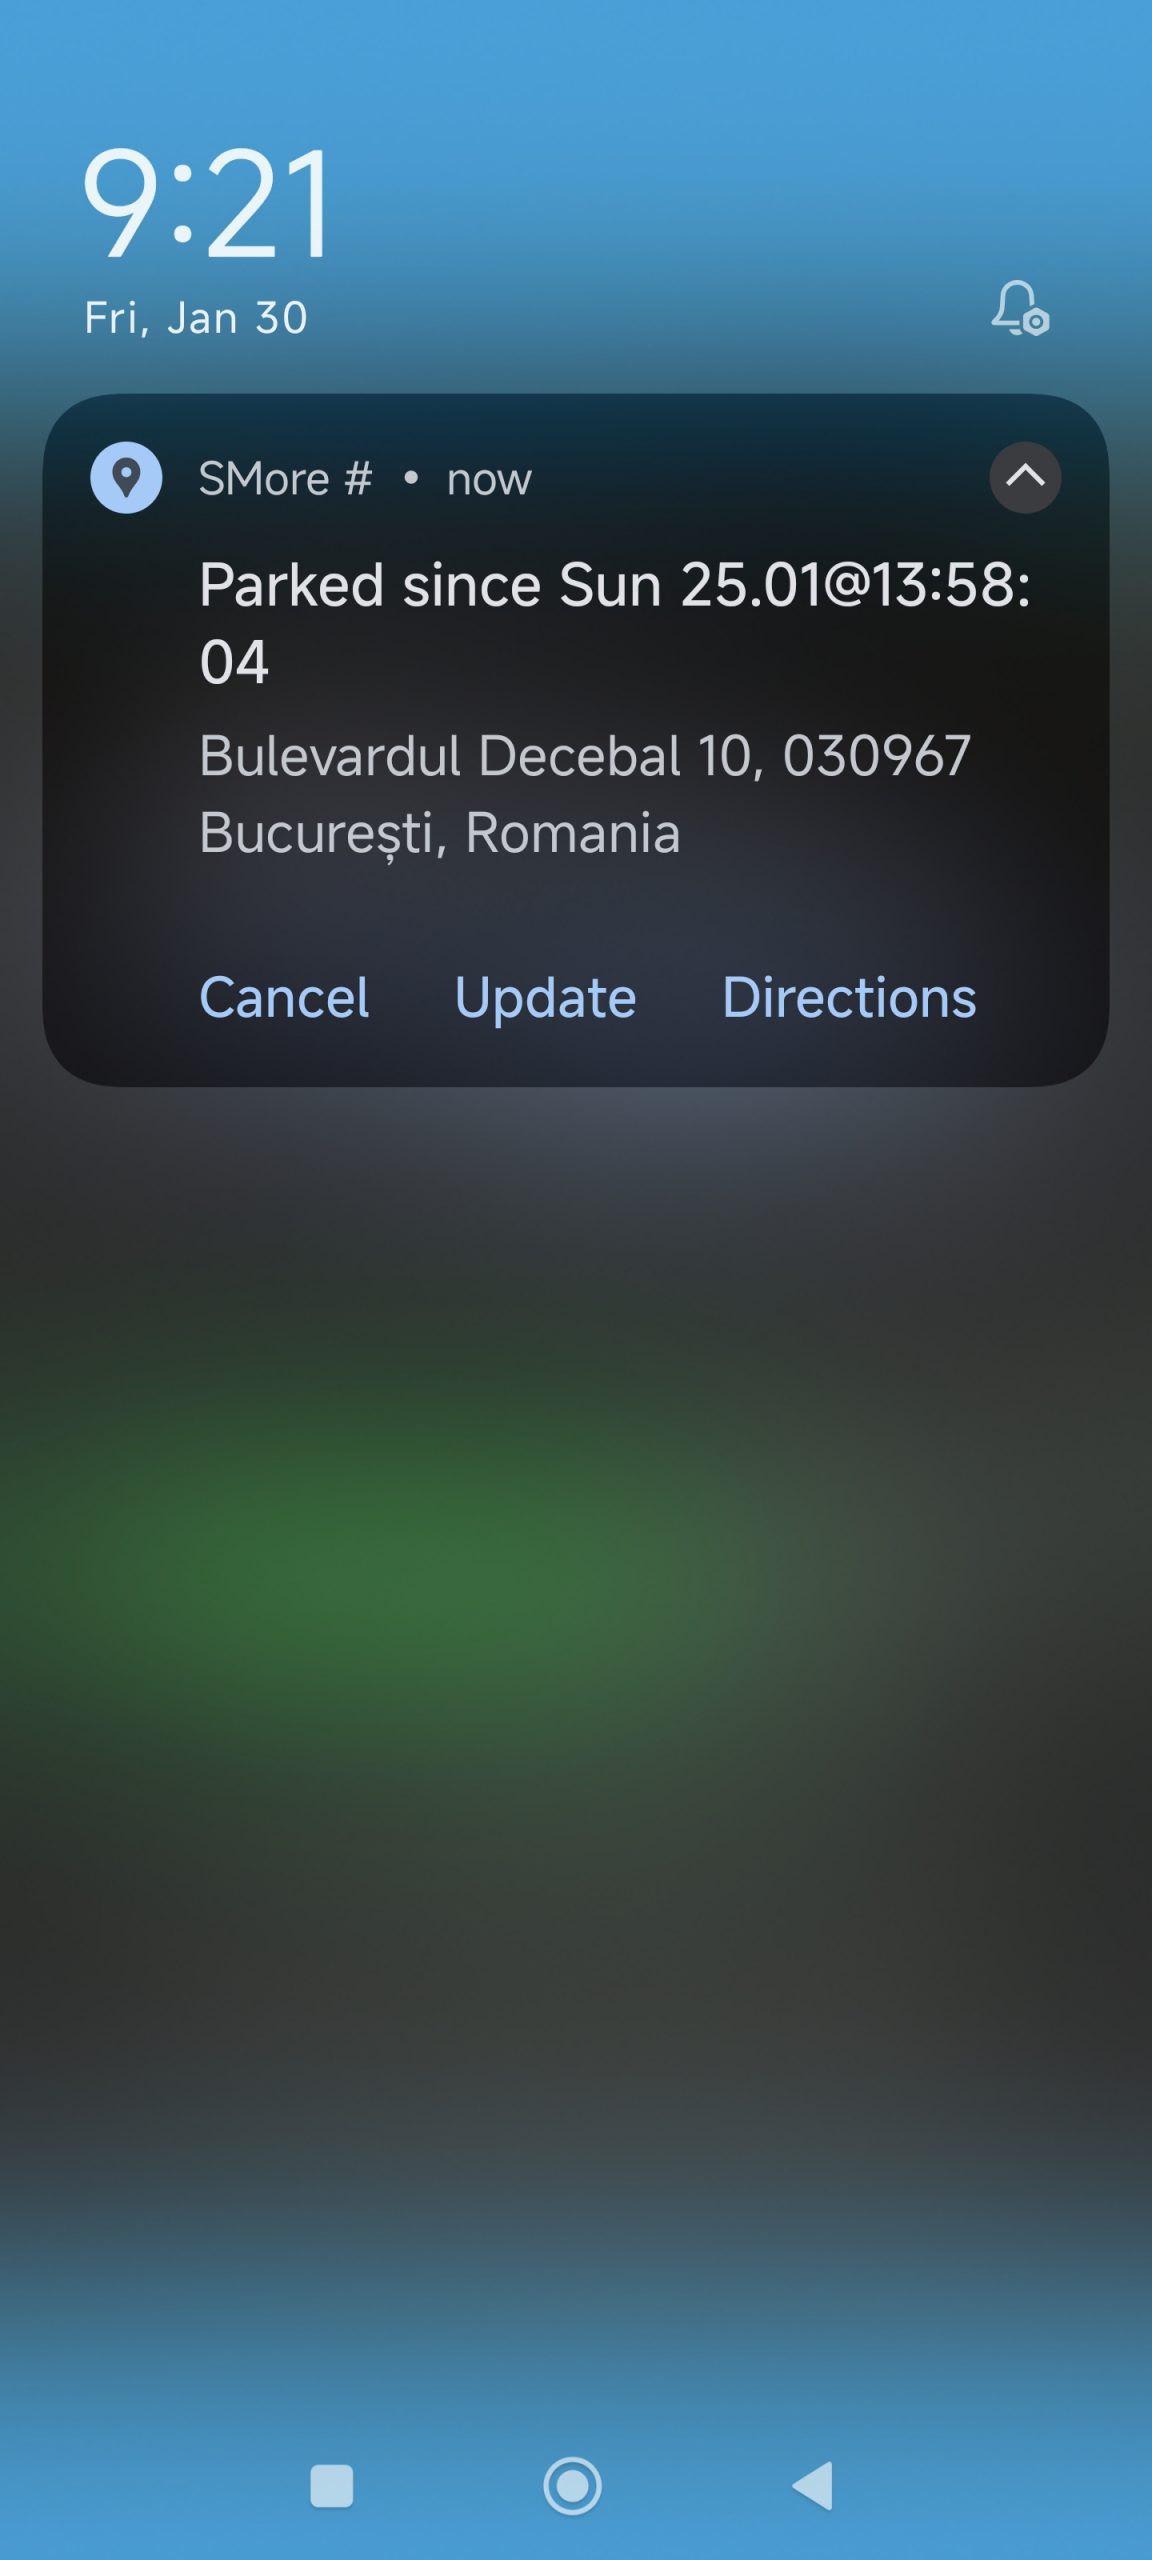
Three buttons will allow to cancel the watcher, to manually update the location, or to jump to Google Map for directions to the car location.
If a geofence radius > 0 was given, the location watcher checks regularly if the car moved out of the radius in relation to the location at which the car had been when the geofence was set. Once the geofence is breached, an alarm notification is shown, indicating the breach – you can easily switch off the geofence checking with the Switch Off button in the geofence notification.
You can also easily reset the geofence by starting the location watcher again through the eye button on the home tab – the geofence check will then use the location of the car when starting again.
Why: SMore# offers the possibility to share location information directly to your car to navigate to them, e.g., finding a charger location in a charger app and sending the desired charger to the car or sending a contact’s location to the car for an appointment or visit.
How: A detailed explanation for the different ways to send a location to the car can be found here.
Widgets
Why: SMore# offers the possibility to control key aspects and show information on a widget which can be placed on your launcher screen for easier visibility and control.
How: Go into the ‘Widgets’ selection of your home launcher (this depends on which launcher you are using) and find the SMore# app and its widget in the list. Select either the large (with large car photo) or the small widget (without any car photo) and place it on the launcher screen in the place and size you want, resulting in widgets similar to the ones below: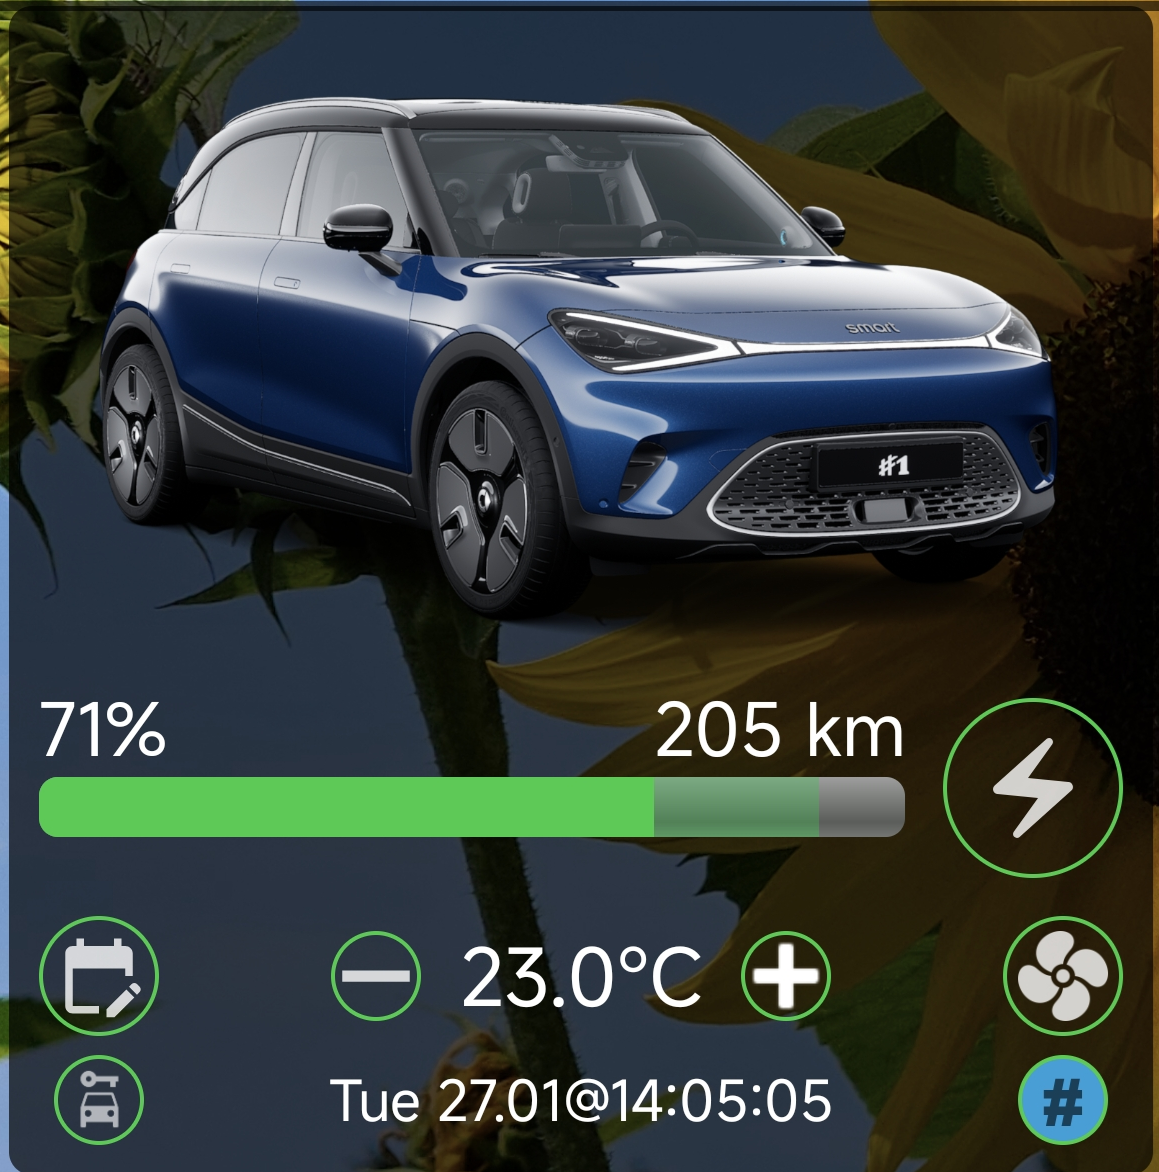 (large widget)
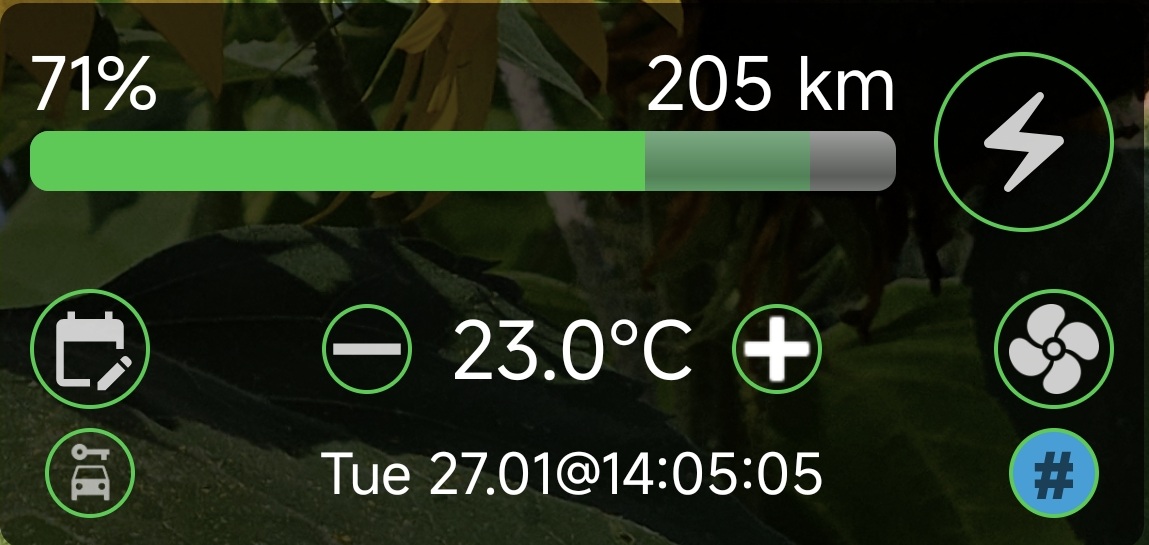 (small widget)
You can see that both widgets on differ in showing the your car photo at the top in the large widget; the control elements and information is the same.
You can see the current charging status and range, while the charging button on the top right works like the charging button in the app, i.e., you can start the charging or stop it. During charging, the same information on power and time to reach charging limit will be shown above the battery bar.
Below the charging control, you can control climate in setting the temperature you want and enabling or disabling the climate control by pressing on the fan button.
The calendar button the left allows for a quick timer-based control of the climate switch. This can be useful to quickly set a preclimate action when going to a concert that ends at a known time. A dialog box will appear, allowing to set a time ahead. After confirming, a notification will appear in the notification shade, as shown below: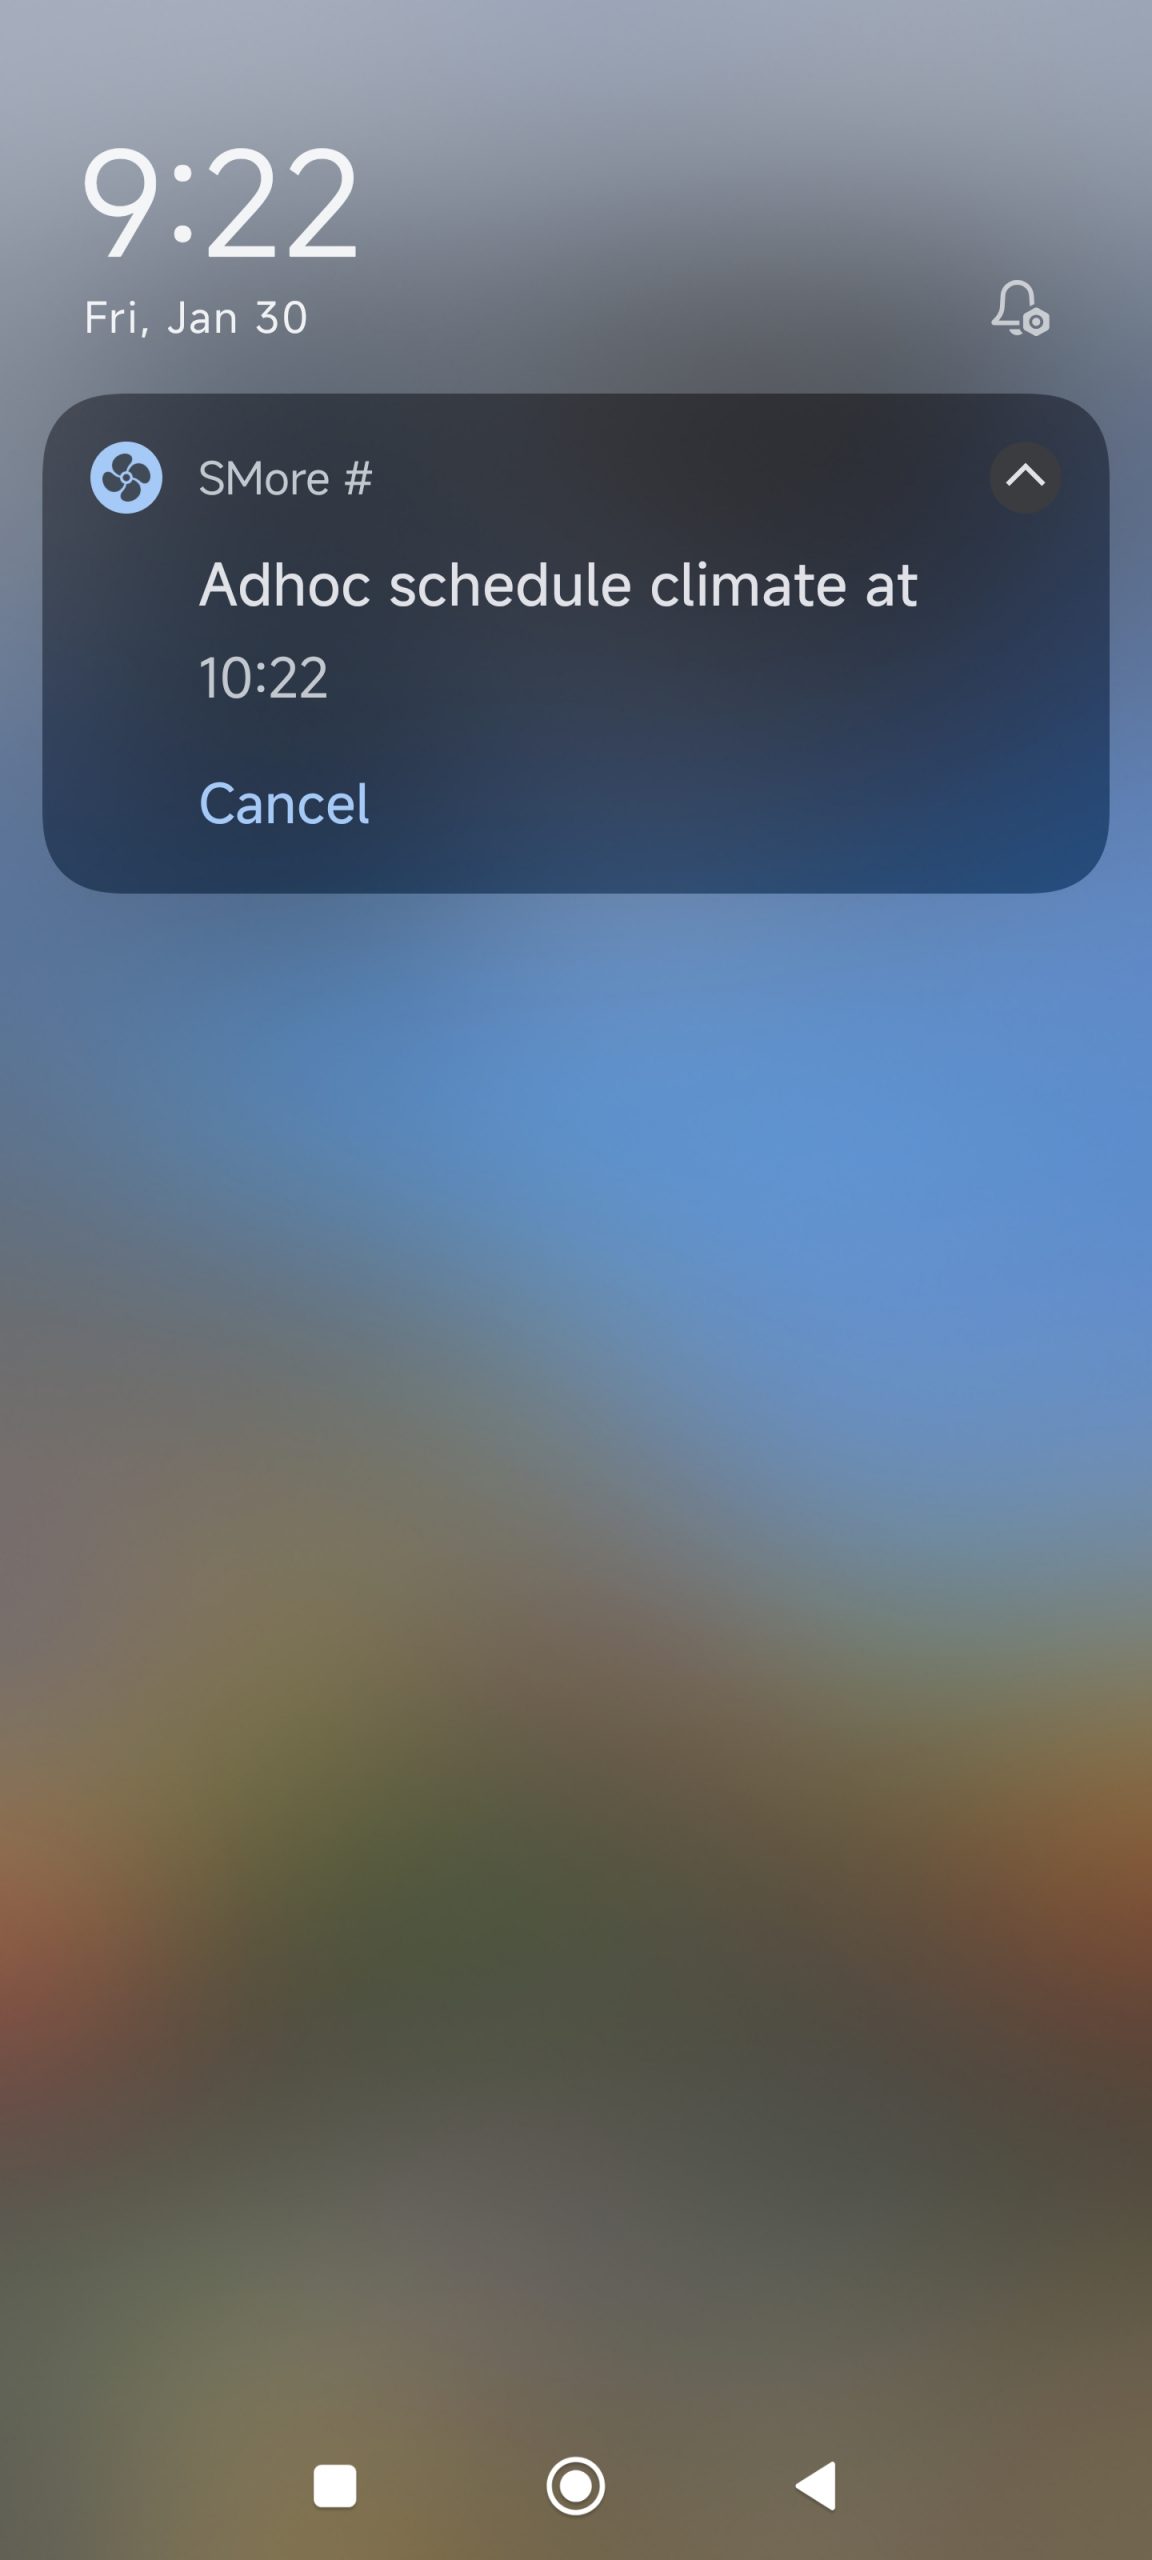
This notification show the time at which the climate will be switched on, with a button to cancel the timer.
In the widget, the lock button at the bottom left allows for locking or unlocking the car, while the bottom right blue button opens the SMore# app right from the launcher screen.
Lastly, you can force a manual value refresh by clicking on the timestamp at the bottom of the widget.
Note: the widget also shows status information, e.g., on ongoing charging or if the preclimate is on, by turning the respective buttons blue as it is done in the SMore# app itself.
Note: the widget is usually updated through SMore# actions, e.g., when leaving the app, the widget is updated with the last values or certain timer actions will lead to updating the widget with the last values.
Why: SMore# offers the possibility to show simple location and parking status info on your launcher screen.
How: Go into the ‘Widgets’ selection of your home launcher (this depends on which launcher you are using) and find the SMore# app and its widget in the list. Select either the large (with large car photo) or the small widget (without any car photo) and place it on the launcher screen in the place and size you want, resulting in widgets similar to the ones below: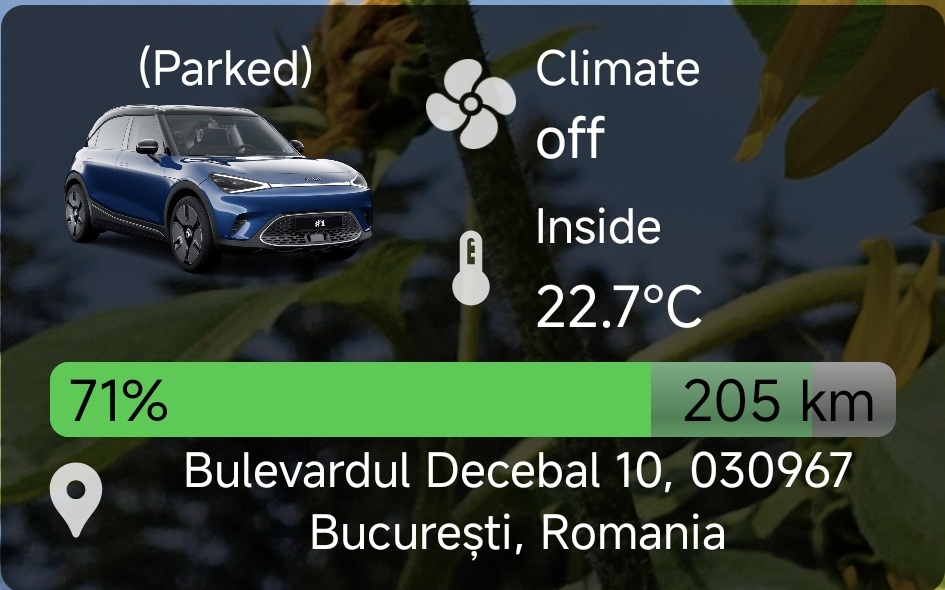
Thw widget shows info on pre-climate status, inside temperature of the car and the current location of the car as well as the charging information (range, battery level and charging info, if charging).
Clicking on the location or the pin will open Google Maps, showing the current location.
Clicking on the car image will force a manual refresh of the car data shown.
Notification Tiles and Shortcuts
Why: SMore# offers shortcut to operations via notification tiles, i.e., shortcut buttons you can add to your control panel in the notification shade. With this, you can quickly execute commands such as locking/unlocking the car, switching climate or starting ABRP upload, just by swiping down on the control center of your mobile and clicking the button – no need to go into the app.
How: The configuration of your control centre button depends on your specific phone manufacturer and may thus differ from, e.g., Xiaomi over Samsung to Google Pixel. You will therefore need to adjust the instructions below to possible differences in your device.
Pull down the control centre in your notification share and press the Edit button to adjust the tiles. This will show a similar screen as below where the tile buttons can now be edited: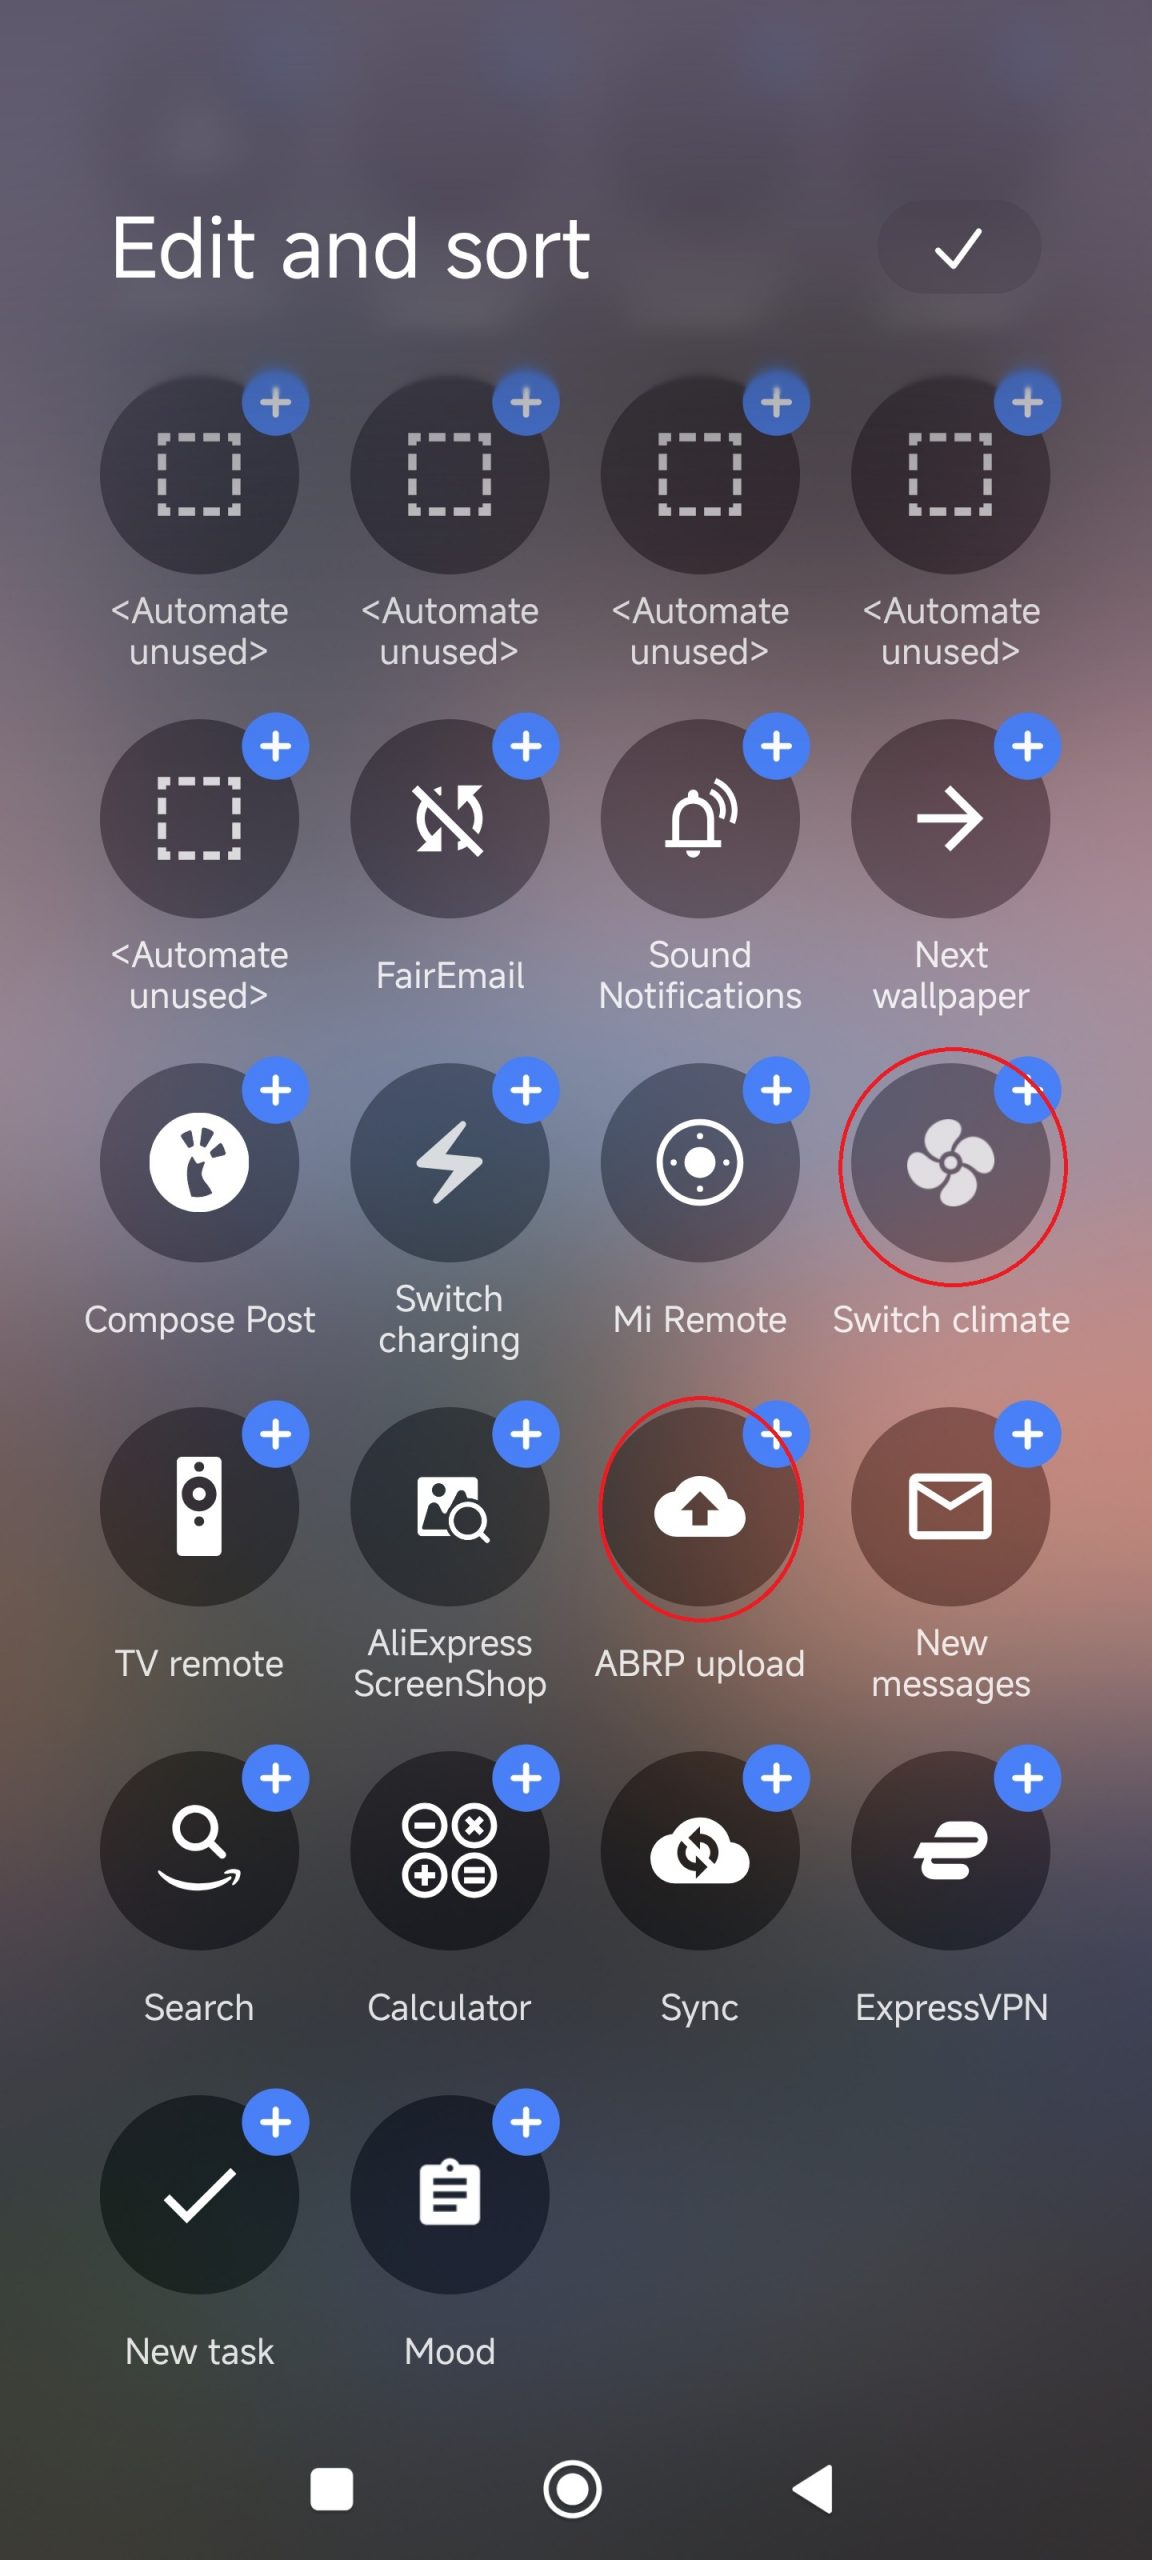
Find the relevant SMore# buttons, such as the shown ABRP upload, switch climate, switch charge (not shown) or Lock/unlock car (not shown).
Drag and place the desired tile in your control centre layout where you would like to place them. Finally, finish the placement when done.
For executing a tile, pull down the control centre, find the desired tile, and simply press the tile button. The command is now executed without requiring a confirmation.
Why: SMore# offers the possibility to place launcher shortcuts on your launcher screen to quickly execute a command directly from your launcher screen without needing to open SMore#.
How: Note that the exact operation will depend on the specific launcher you are using, which may be the one provided by your device vendor or a 3rd party launcher (like Nova).
Find the SMore# launcher icon, e.g., on your launcher screen or in your application drawer. Long press on the icon, after which the launcher shortcuts will appear: 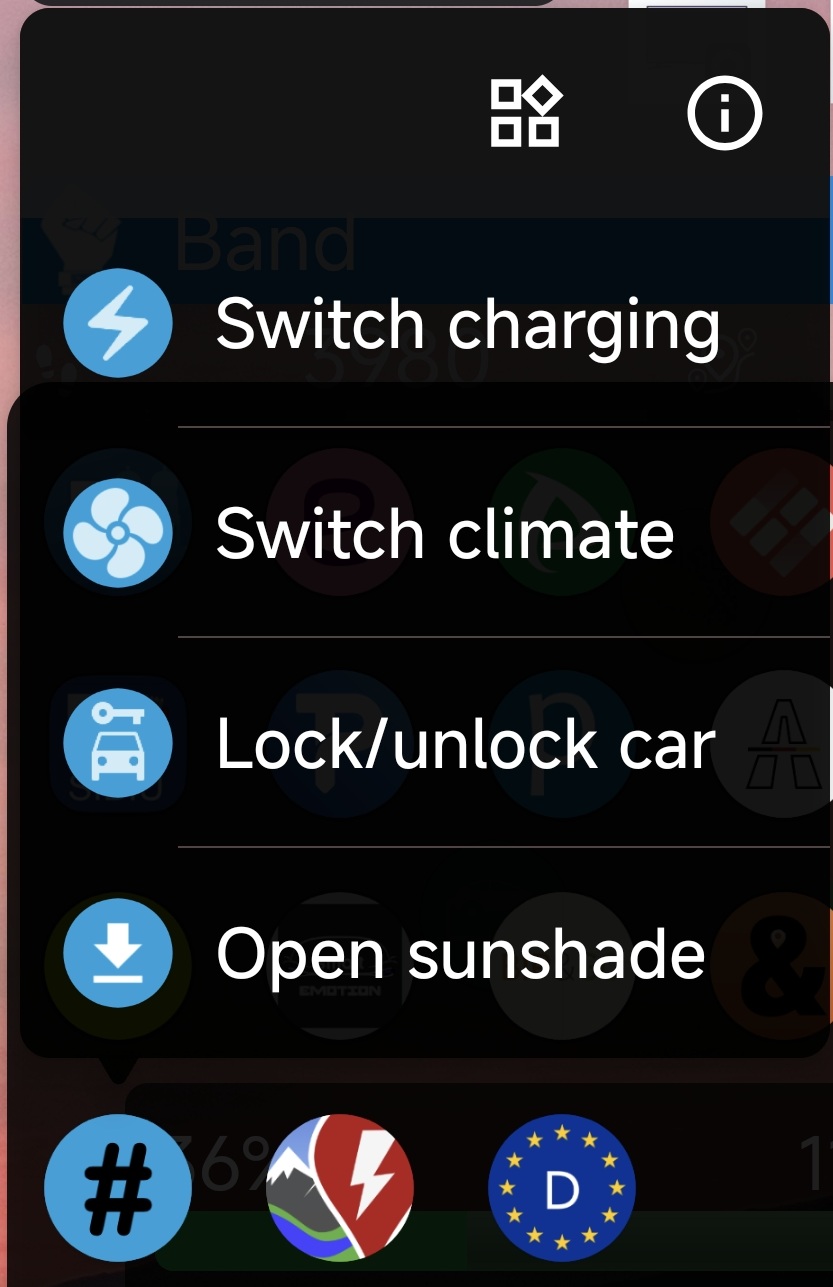
Most launchers limit those shortcuts to 4 being displayed (closing the sunshade is not shown since it is the 5th shortcut).
Press on any of the shortcuts to execute the command directly.
In most launchers, you should be able to long press a launcher shortcut and pull the shortcut for placing it on the launcher screen as a separate shortcut (showing the icon of the shortcut). If you press on such placed shortcut, the command will be executed.
Note: starting with SMore# version 1.7.3, you can define in the app settings, whether or not a confirmation will be shown before executing the command of a shortcut. By default, such confirmation is requested to avoid accidential execution from your launcher screen.
(Credits to RealUser101@Smart-emotion)
Why: Integration with Samsung routines allows for executing shortcuts directly from your Samsung smartwatch for faster control without needing to take out your phone or opening the app.
How: You will need a compatible Samsung smartphone with OneUI7+ and so-called Routines being supported.
Go into the Routines setting, located in the system settings of your Samsung device. Create a new routine that is started manually (as IF condition), executing an app action (here select SMore# as an app, and one of the shown actions of the app, such as switch climate, as the app action). Save the new routine.
On your Samsung smartwatch, you can access routines created on your Samsung device and execute them directly from your watch – although the phone needs to be in range, i.e., connected, for the command to be executed.
Notifications
Why: The original HelloSmart application receives notifications on starting and stopping the charging of your car – connecting SMore# to receive those notifications allows for automatically showing rich notifications for charging or automatically log the charging data in the SMore# charging log.
How: Open the Settings of the SMore# app in the main menu and scroll down to the relevant entries, as shown below: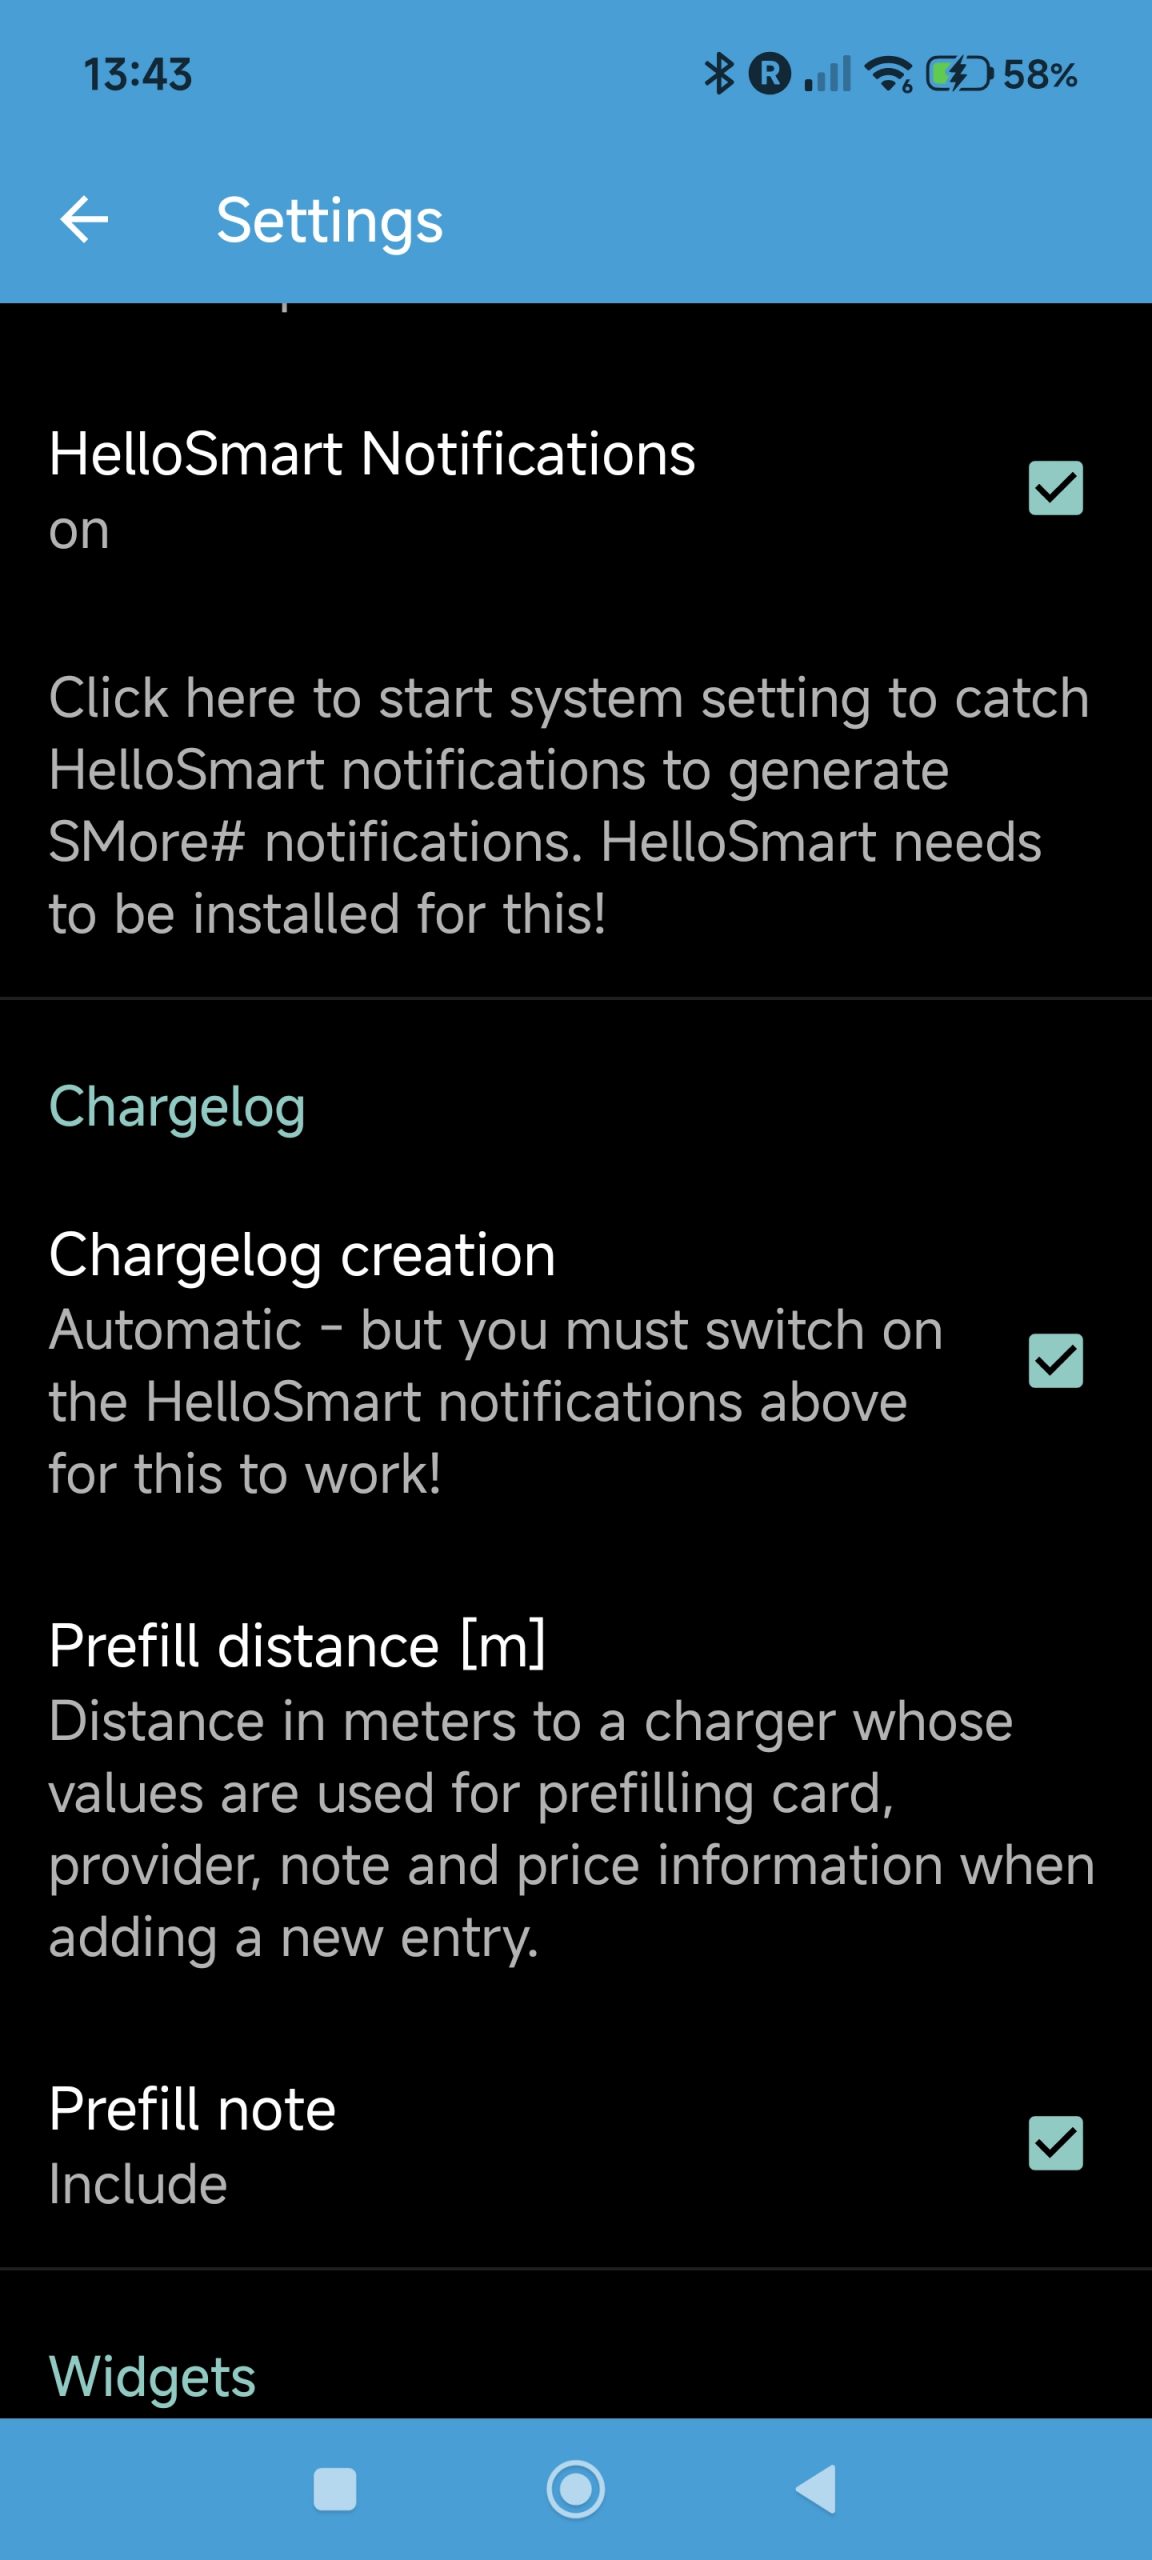
In case the HelloSmart app is installed on your device, the setting HelloSmart Notifications will be enabled. If it is, check the setting to show the value On.
Also click on the text that Click here…. This will open the system setting to allow SMore# access to the notifications as they arrive. Look for the entry that shows SMore# and enable the system setting.
Note: on some devices, like Xiaomi, additional confirmations will be requested when trying to enable this setting.
If you now start charging the car and the HelloSmart app notification will arrive, the charging notification will automatically start and any widgets on your launcher screen should update their status.
Why: SMore# allows to control your ongoing charging from a notification shown to quickly see the current status and switch charging off.
How: A charging ongoing notification, as shown below, is displayed on your device if the values delivered by car indicated an ongoing charging, either you switched this on yourself in the app or starting it at a charger or through a planned charging schedule:
You can see relevant values of your ongoing charging, similar to what is shown in the app, such as expected end time until reaching the charging limit, load values, and current battery level as well as range.
You can manually update the values shown by pressing the Update button in the notification or you can end your charging by pressing the Switch off button.
Why: SMore# allows to control your ongoing pre-climate operation from a notification shown to quickly see the current status and switch pre-climate off.
How: A climate ongoing notification, as shown below, is displayed on your device if the values delivered by car indicating an ongoing pre-climate operation, either you switched this on yourself in the app or started it through a climate planning operation: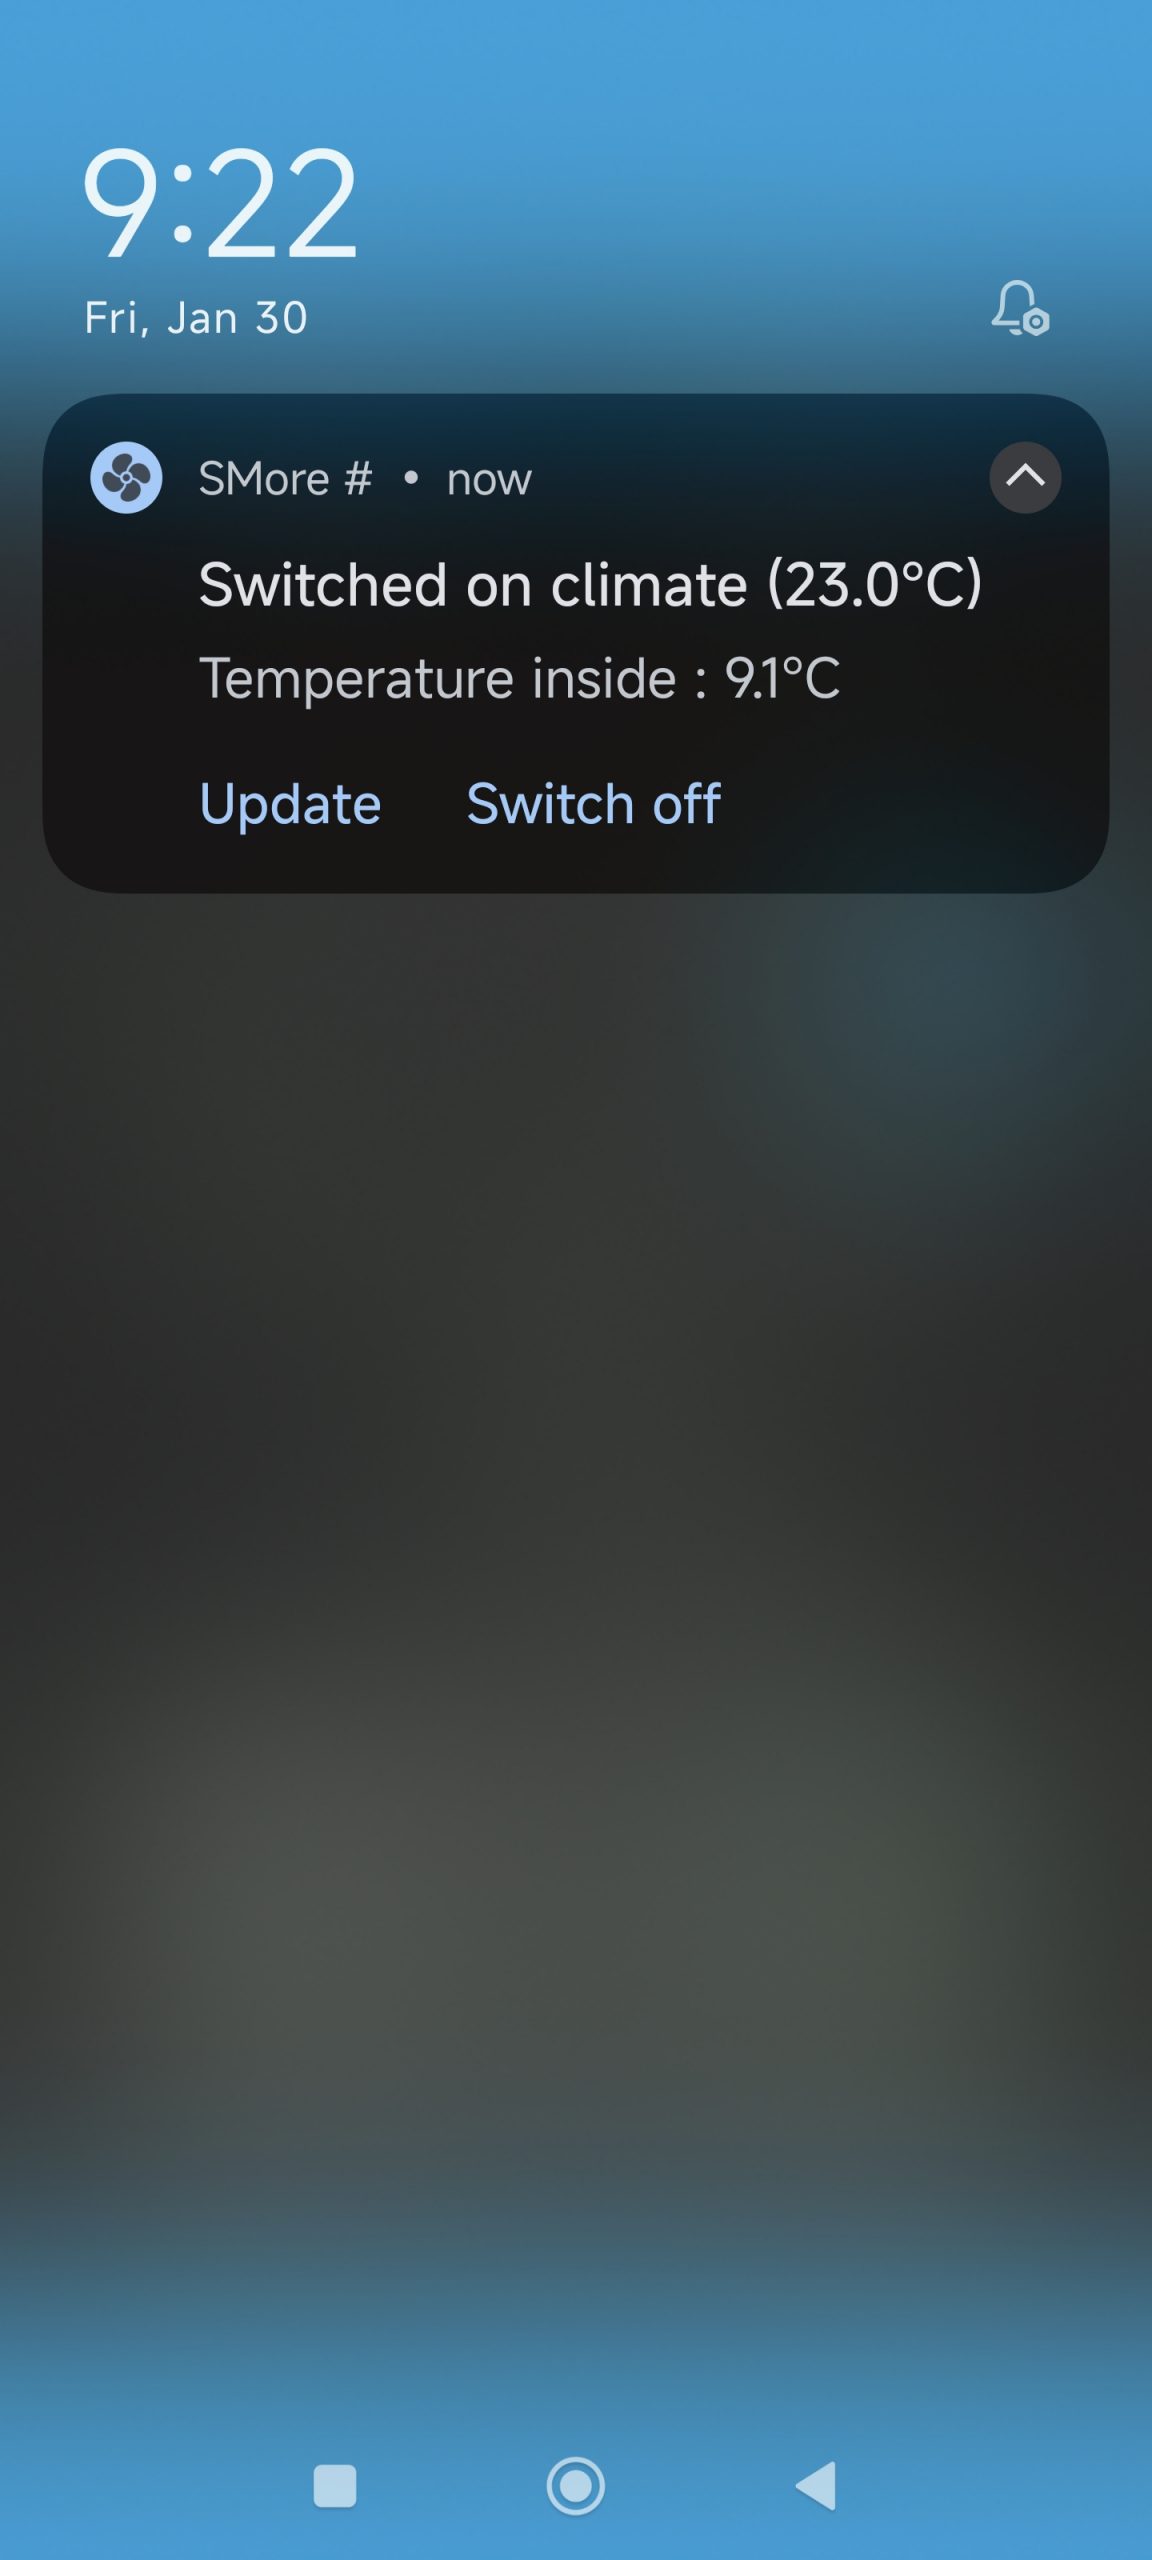
You can see the temperature set for the climate operation and the current inside temperature of your car.
You can manually update the values shown by pressing the update button in the notification or you can end your climate control by pressing the switch off button.
Charging Log
Why: SMore# provides the possibility to log your charging operation automatically when the charging starts.
How: For the automatic logging to work, you will need to connect the HelloSmart notifications to SMore#, as explained in a separate How-To.
In addition, you need to enable the automatic logging in the SMore# settings. For this, open the Settings from the main menu and scroll to the relevant entries, shown below:
Here, enable the Chargelog creation setting.
If you now start charging the car and the HelloSmart app notification will arrive, the charging notification will automatically start and any widgets on your launcher screen should update their status. Furthermore, you should see an additional SMore# notification that a charging log entry is currently pending, a result of the automatic logging, as shown below: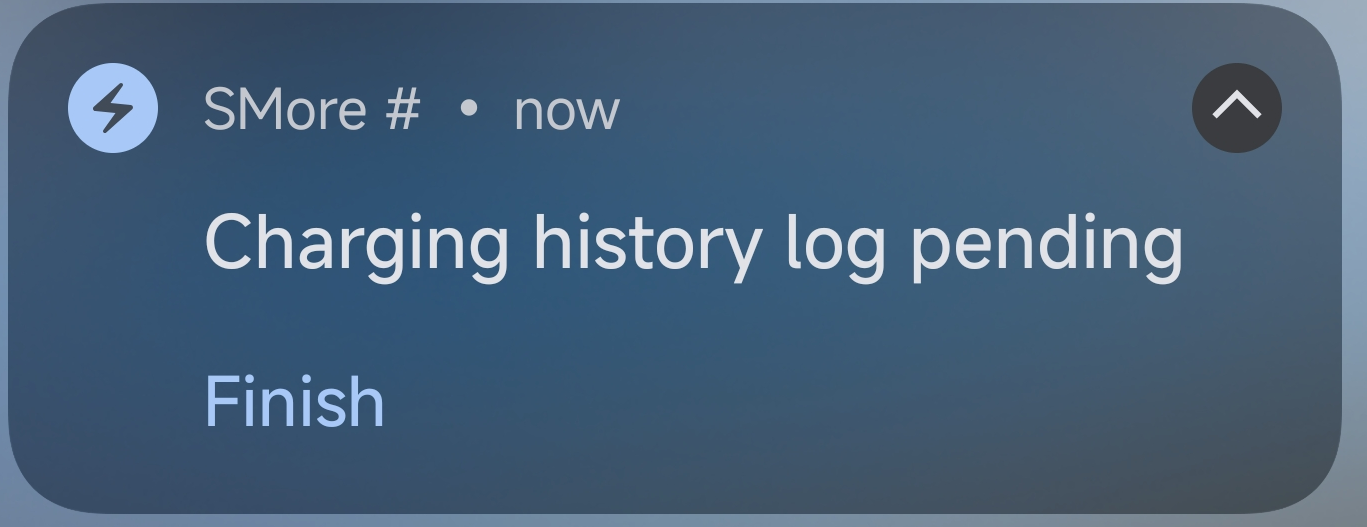
You will also see in your list of charging log entries that the floating + button is shown in blue rather than orange.
You can manually finish your charging log entry by either press Finish in the above shown notification and press the orange floating + button in your charging log list.
Note: for the automatic charging to happen, SMore# relies on the Smart server to send the notification to the HelloSmart application (which is the caught by SMore# which checks if the car charging). It can happen that those notifications do not arrive, in which case you will need to log the charging manually, as explained in the next How-To.
Why: SMore# offers the possibility to manually log charging operations. This may be useful if you do not have the original HelloSmart app installed on your device or if the Smart Server did not send the notification, which SMore# needs to automatically record the charging.
How: Check in the app if the charging is running. If so, SMore# should show a notification, as shown below:
In this notification, you see the charging information, and you can update the notification but also can manually add a charging log entry, if there is no pending charging entry so far. If the button is visible, manually log the charging by pressing this button.
Alternatively, you can also enter the charging log in the SMore# app and press the orange + button, as shown below: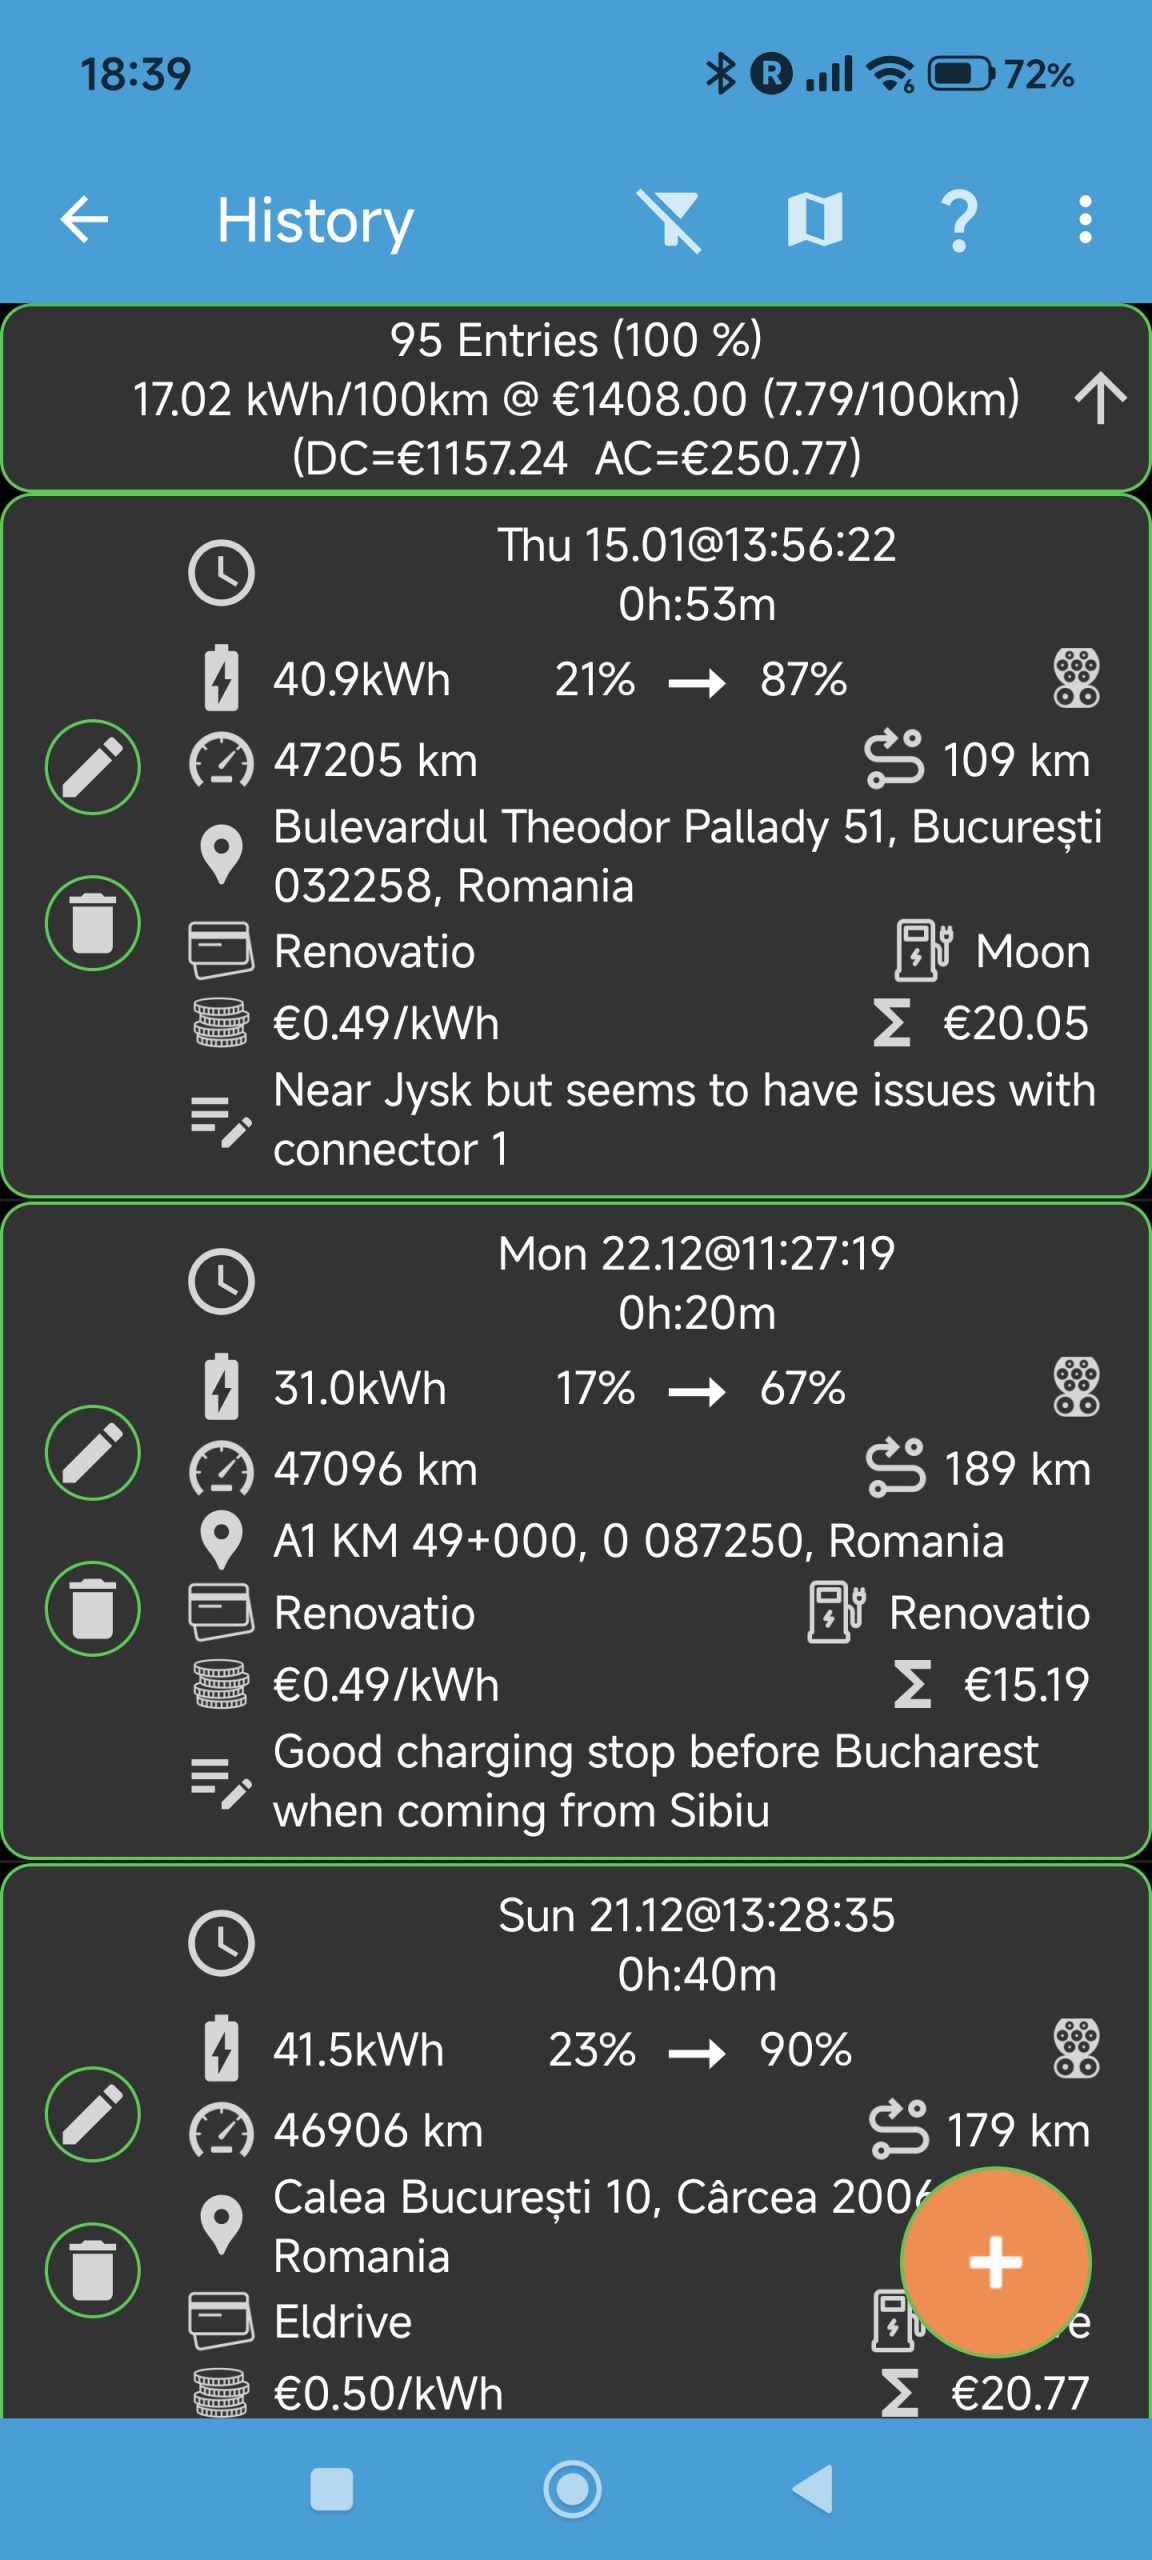
The button will then turn blue and a new entry is created with the current values as obtained from the car. Furthermore, the new entry is shown with a blue border to indicate that there is a pending entry.
A notification should now appear showing that the charging is currently logged, as shown below:
You can press Finish on this notification or press the blue floating + button in the charging log list.
Why: SMore# provides an overview of all your recorded charging entries, sorted by time and/or filtered against selection parameters.
How: Go to the dashboard tab in the SMore# app and press the log button, as shown below:
This will open the list of charging log entries, as shown below:
You can change the temporal order of entries through the arrow in the top entry where the summary of entries is shown. The list will be reordered accordingly. You can also define a filter, which is explained in a separate How-To – the image above shows that no filter is currently applied.
If you purchased the PRO version of SMore#, you will see a map button in the menu bar, opening a map view of your charging log entries, explained in a separate How-To.
Why: SMore# offers the possibility to easily navigate to a previously visited and recorded charging location. This may be useful to go back to specific chargers based on your notes and information.
How: Go into the charging log from the dashboard tab in SMore#. Then scroll to the desired charging entry and click on the address shown in that entry. A share dialog will appear to share the location to an application, such as Google Maps or SMore#. Select SMore# here to navigate to the location using the car navigation.
Why: the summary box in the charging log provides details on consumption, costs etc, which may be useful for informational purposes.
How: Open your charging log from the dashboard tab of the SMore# app. You will see the summary box at the top of the charging entries list, as shown below:![]()
The box shows the number of entries shown and the percentage of entries shown vs recorded (i.e., 100% if no filter is applied).
In the second row, you see the consumption in kWh/100km (or miles depending on your unit) and the total costs calculated over all shown entries, with the costs per 100km in brackets.
The third row splits the overall costs into charging types, i.e., AC or DC.
Why: SMore# stores a several pieces of information per charging entry.
How: Go to the dashboard tab of the SMore# app and scroll to the charging log entry, which will show the following information: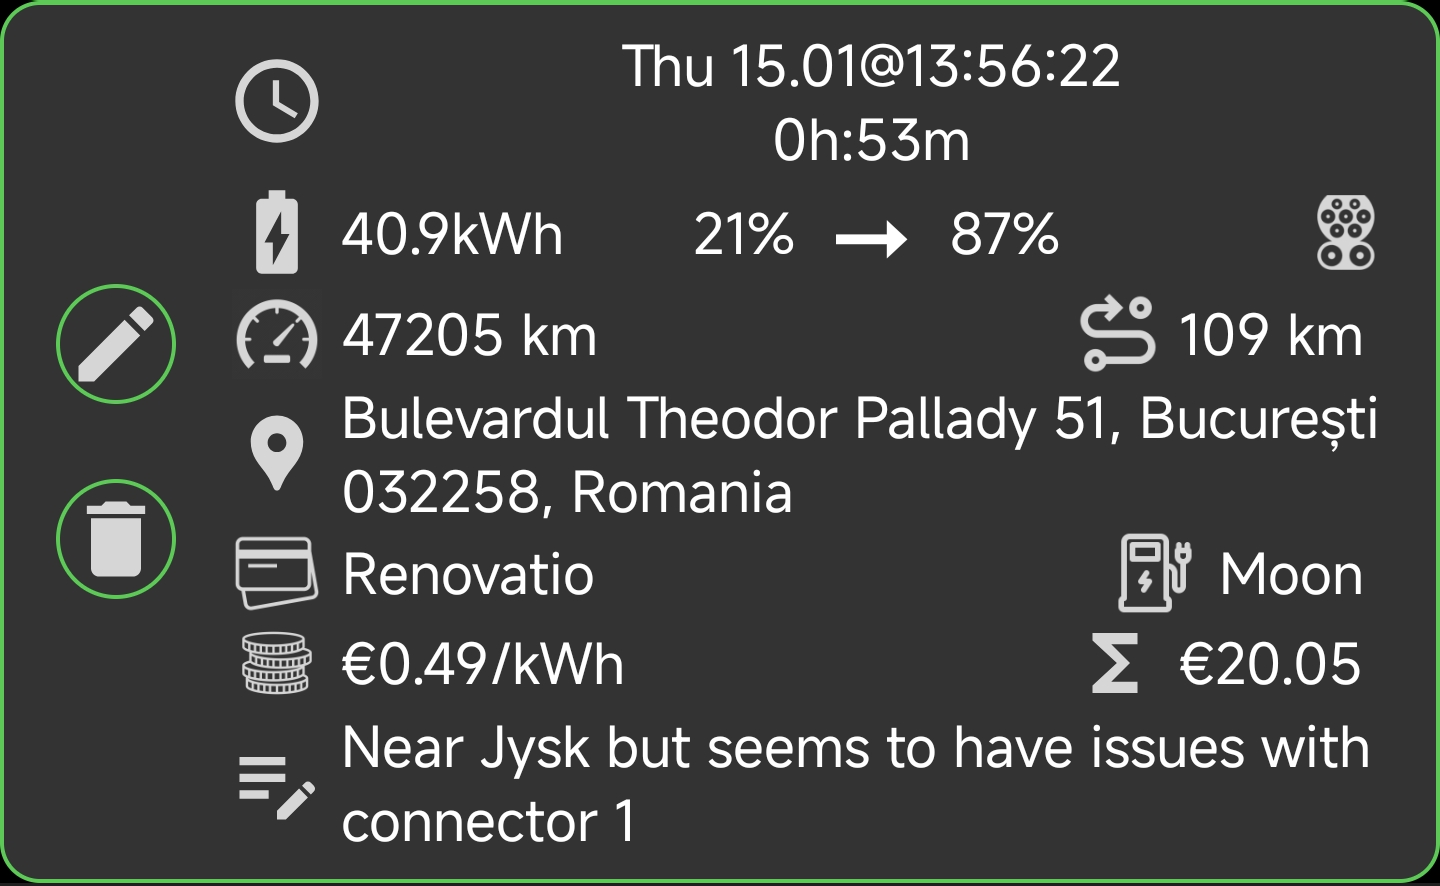
From the top down, you can see
1. the time and date of your charging
2. the duration of the charging
3. the amount charged, measured in battery percentage progress (Smart does not provide the actual kWh information so the shown kWh is purely estimated through the percentages)
4. Odometer reading of the charging
5. Distance travelled since last charging
6. Location of the charging
7. Charging card (on the left) and provider (on the right), as entered for this entry
8. Price per kWh, as entered for this entry (on the left) and the estimated costs (on the right)
9. A note, as entered for this entry
Items 1 through 6 are read from the car values and automatically entered, while items 7 through 9 are entered by the user.
Note: You can enable the prefilling of items 7 through 9, based on distance to previously recorded entries, in the preferences by selecting Prefill distance and setting the value larger 0, as shown below:
You can also include or exclude the prefilling of the note. This may be useful to exclude if you use the note to annotate every charging at the same charger (e.g., your home wallbox).
Why: SMore# offers the possibility to edit the individual entries of each charging log entry. This may be useful to add charging cards or provider information to an entry, or adjust the duration of the charging (e.g., if the HelloSmart notification arrived too late).
How: Got into the charging log in the SMore# app via the dashboard tab. Then scroll to the charging log entry you would like to edit and press the pen button on the left side: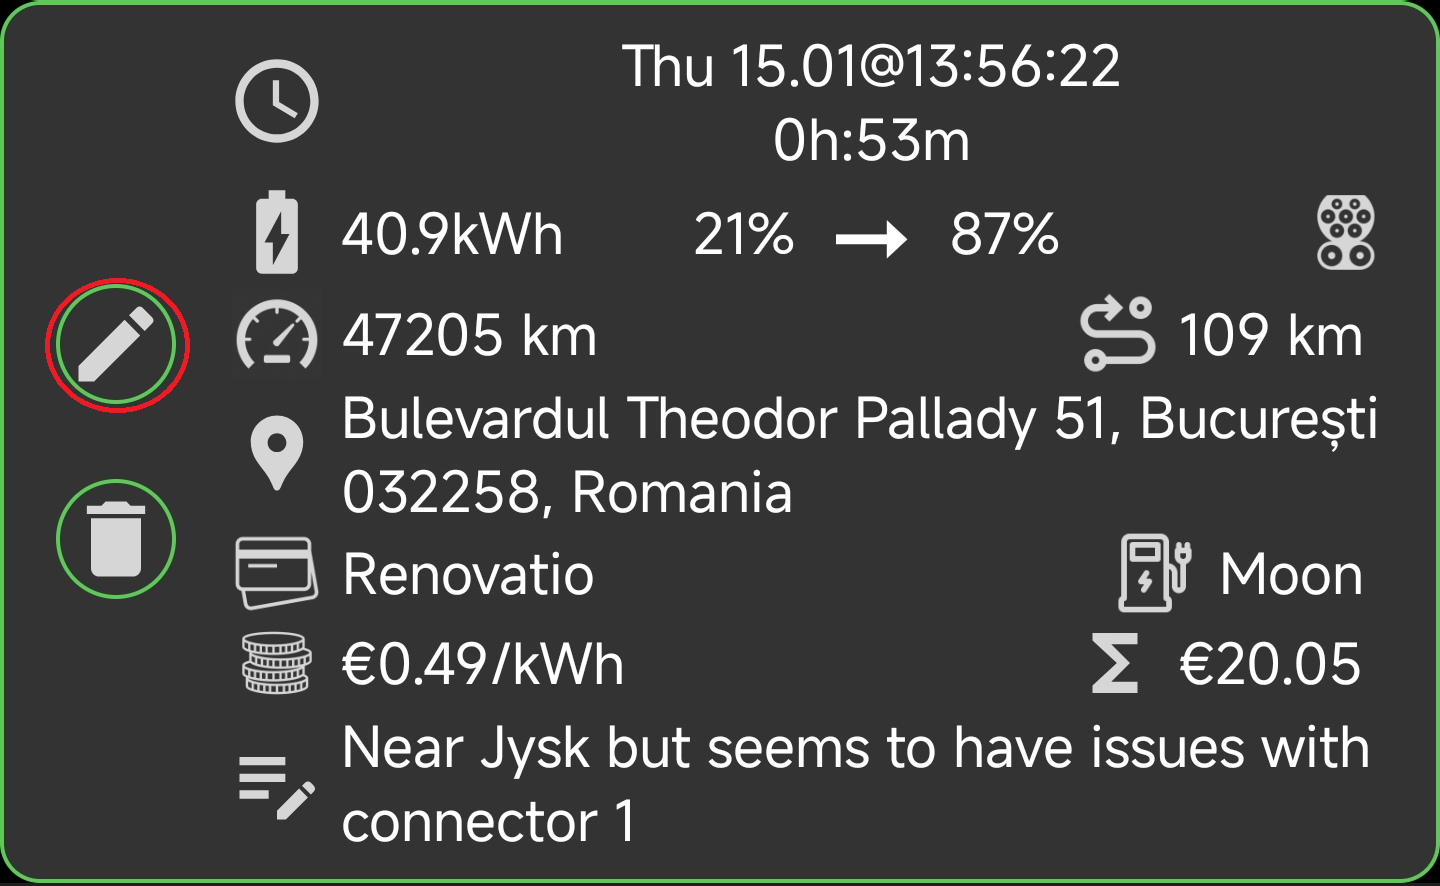
This will now open a dialog box, showing all current values of the charging log entry: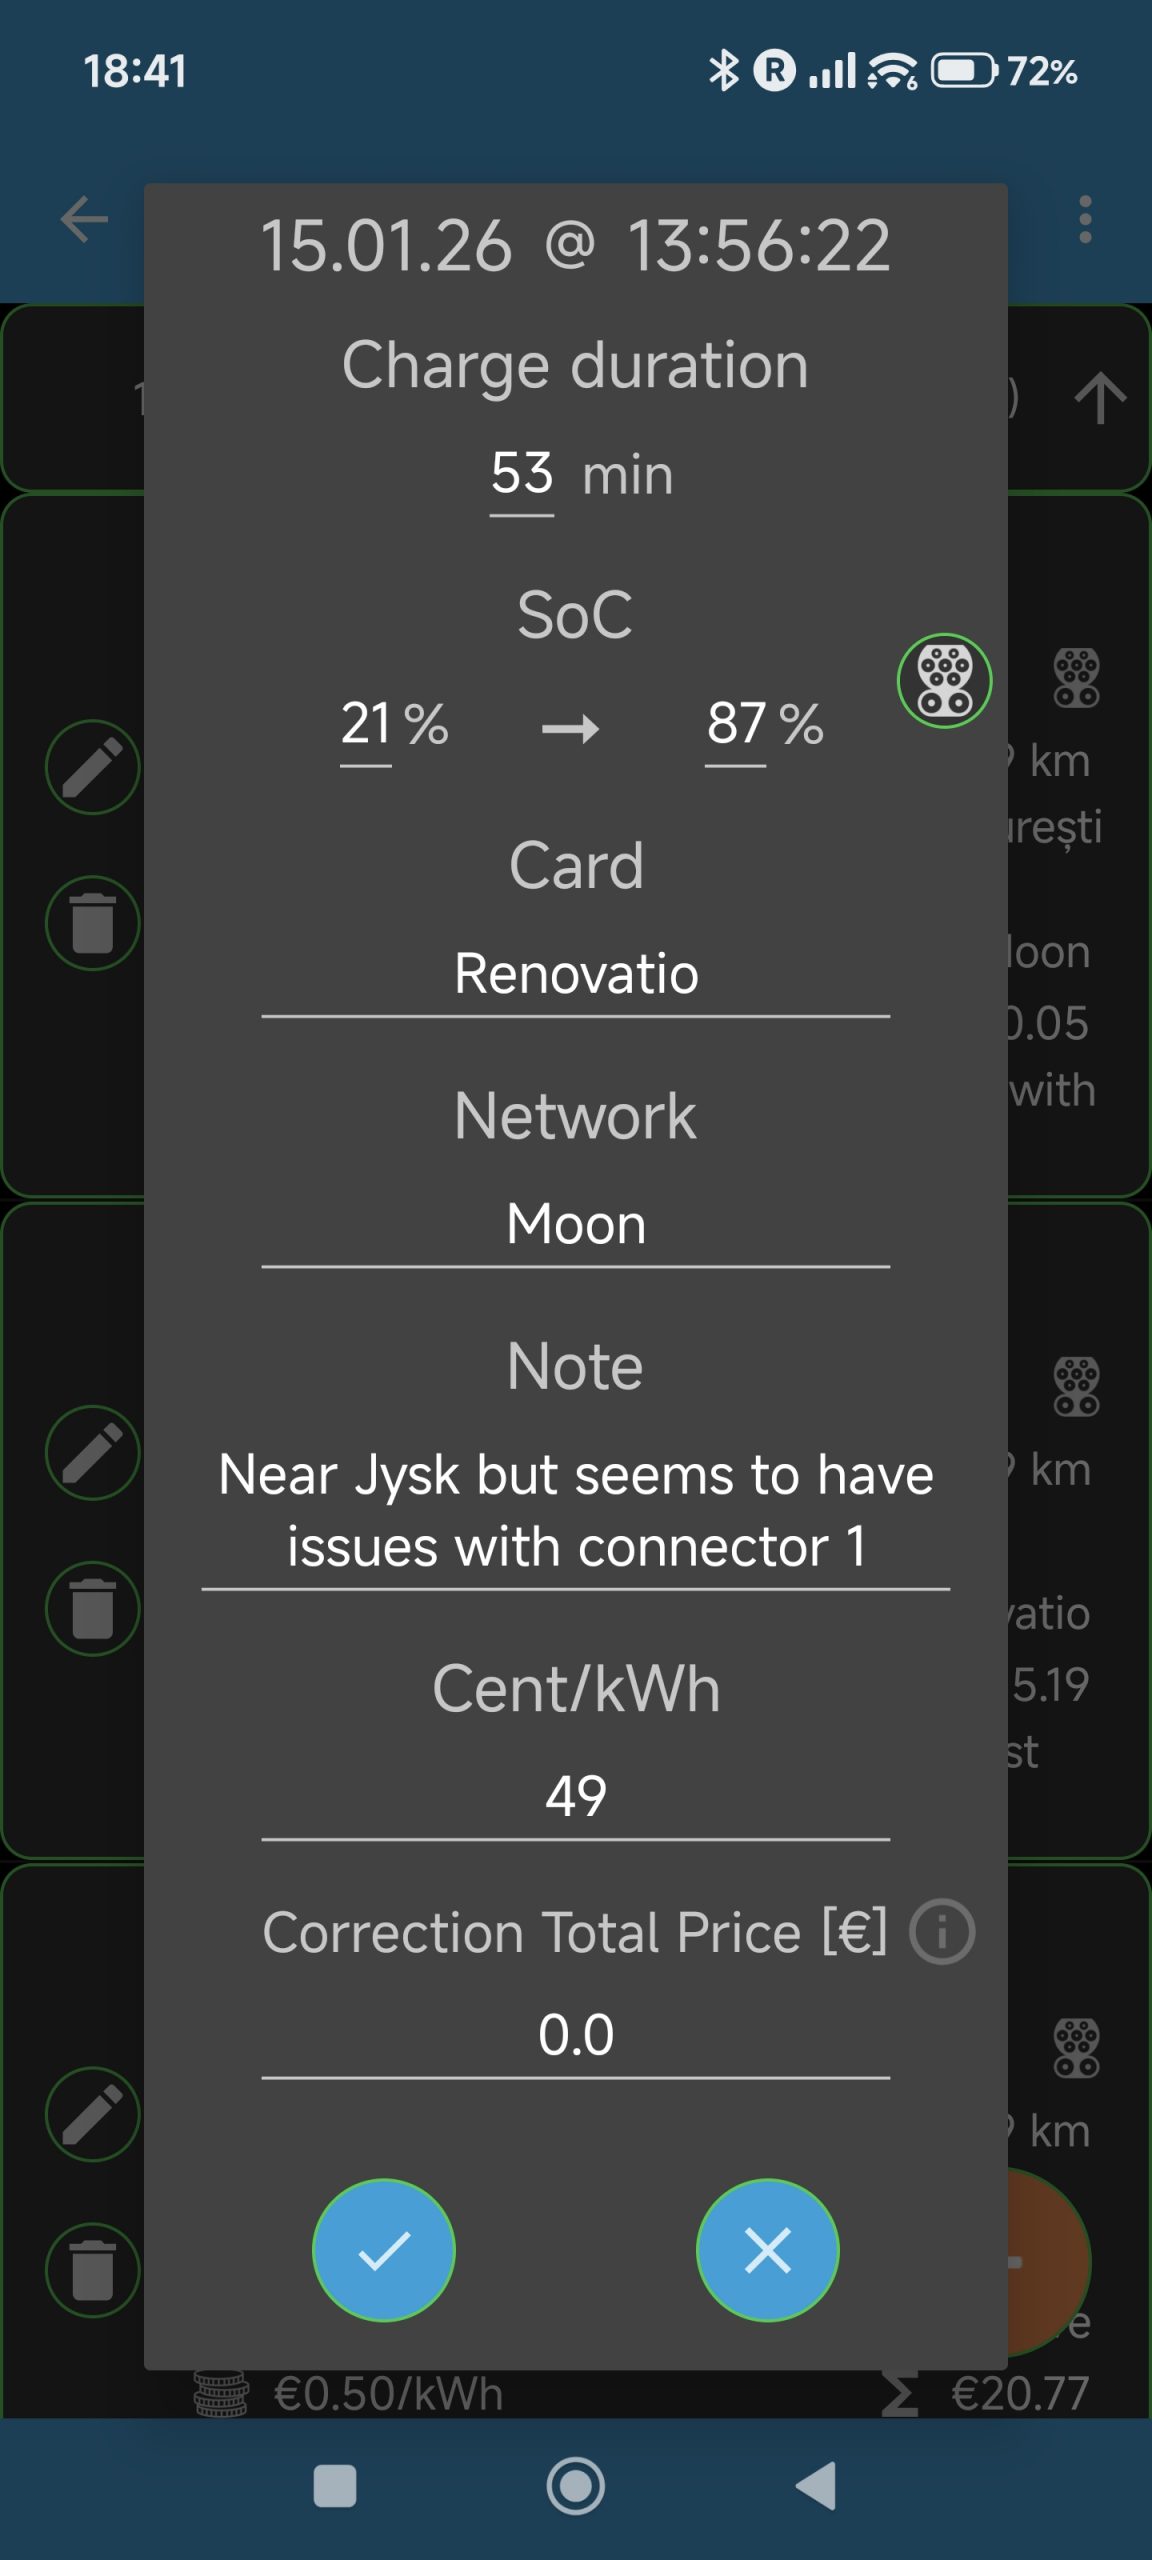
Select those entries you would like change and confirm all changes with the checkmark button.
Why: SMore# offers the possibility to filter your charging entries with a number of constraints. For instance, you can show charging entries during a specific date interval, e.g., for a specific trip or holiday period. Or you can filter all charging entries for a specific charging card or provider. Or you might want to see all charging entries for DC charging.
How: Go into your charging log through the dashboard tab of SMore# to see the list of charging entries, then select the filter symbol, as shown below:
This will open the filter screen, shown below: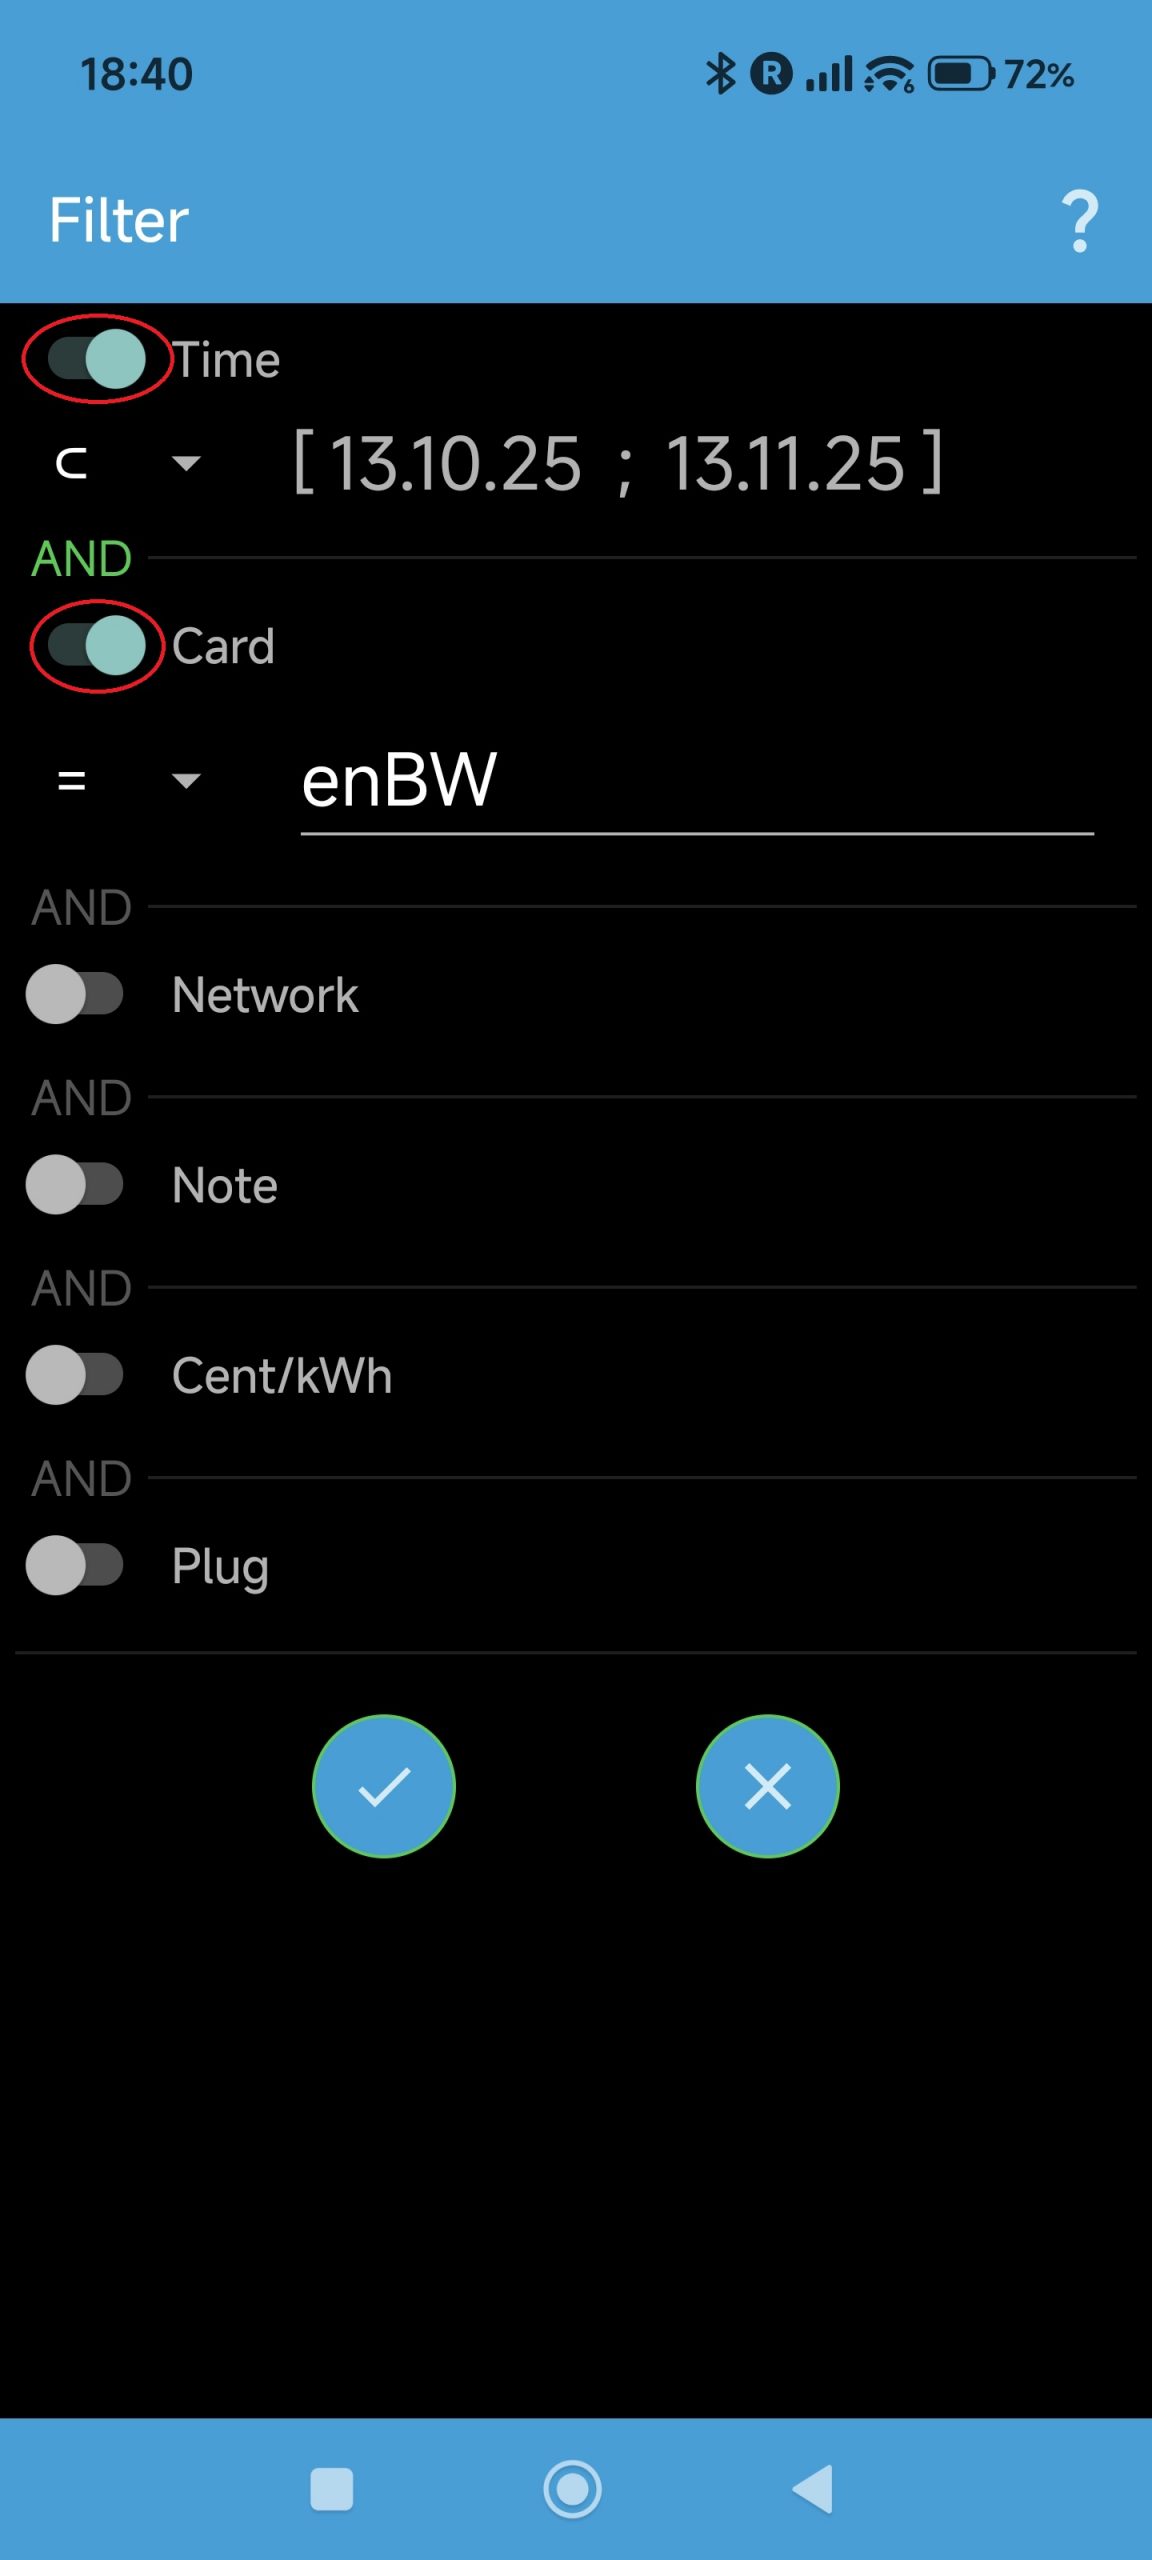
A filter expression is graphically composed by enabling the filter criteria (see circles) and select the filter values. You will see that enabling a criteria will let appear an AND text. The example above filters all entries between the given dates, where charging happened using the enBW card.
You can also filter charging types, as shown below for the same date period as the previous example: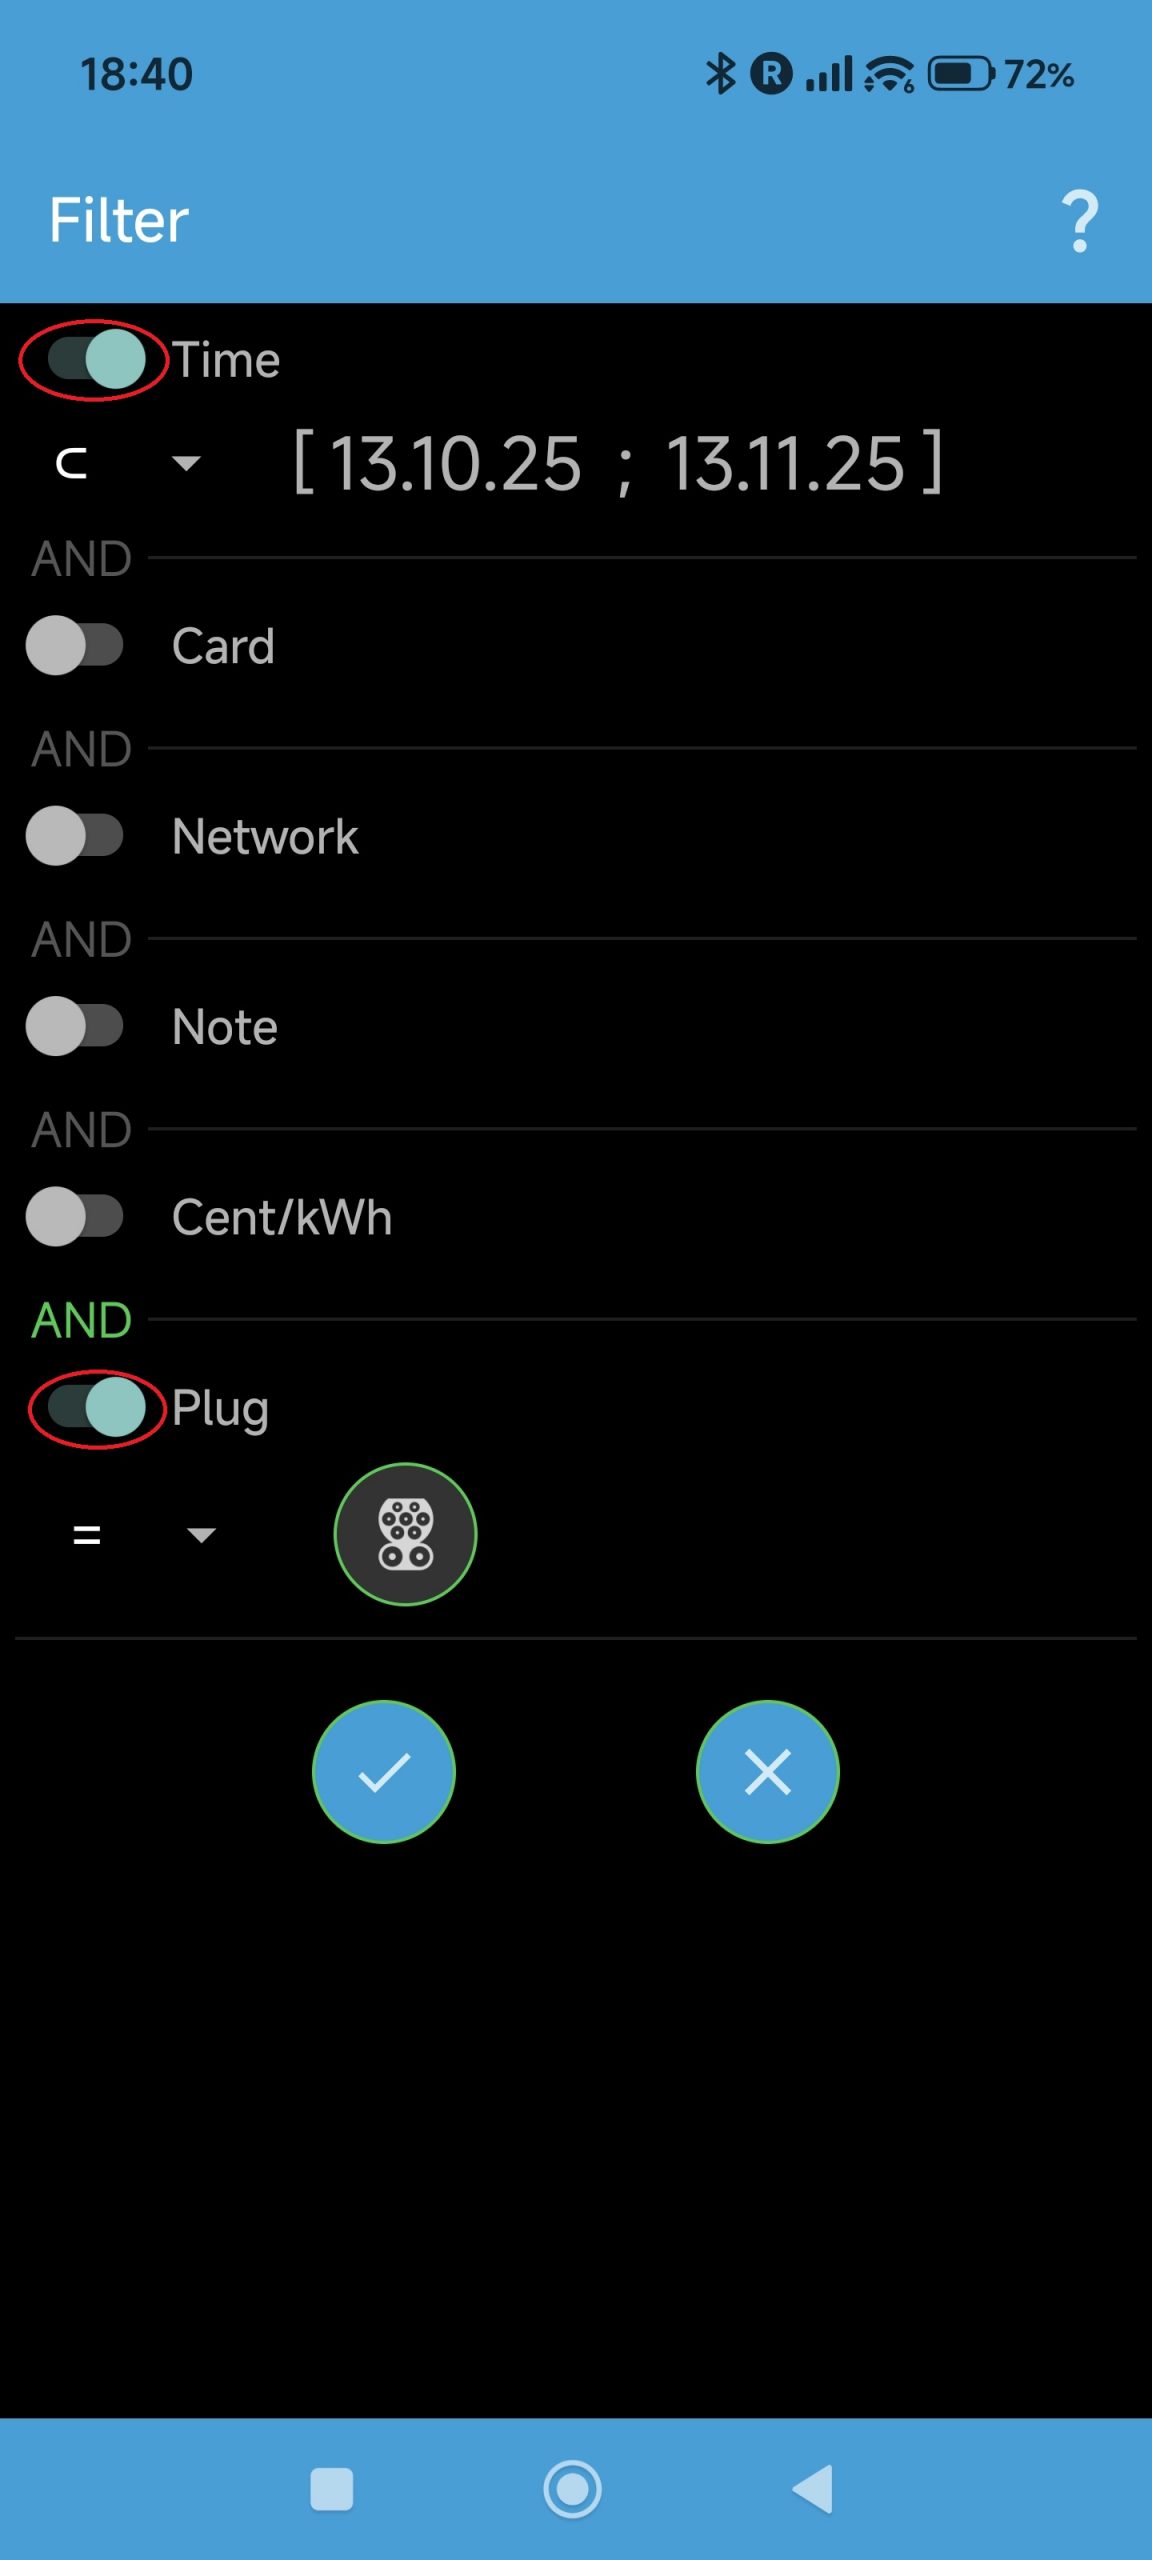
Note: to keep the UI simpler, only AND operations are supported right now as well as single filter values.
Why: SMore# offers the possibility to show your charging log entries in a map for easier navigating – this will require the PRO version!
How: Go to the charging log cia the dashboard tab. As a PRO version user, you should see the map button in the menu bar as shown below:
Press the map button, after which the mapview appears, as shown below: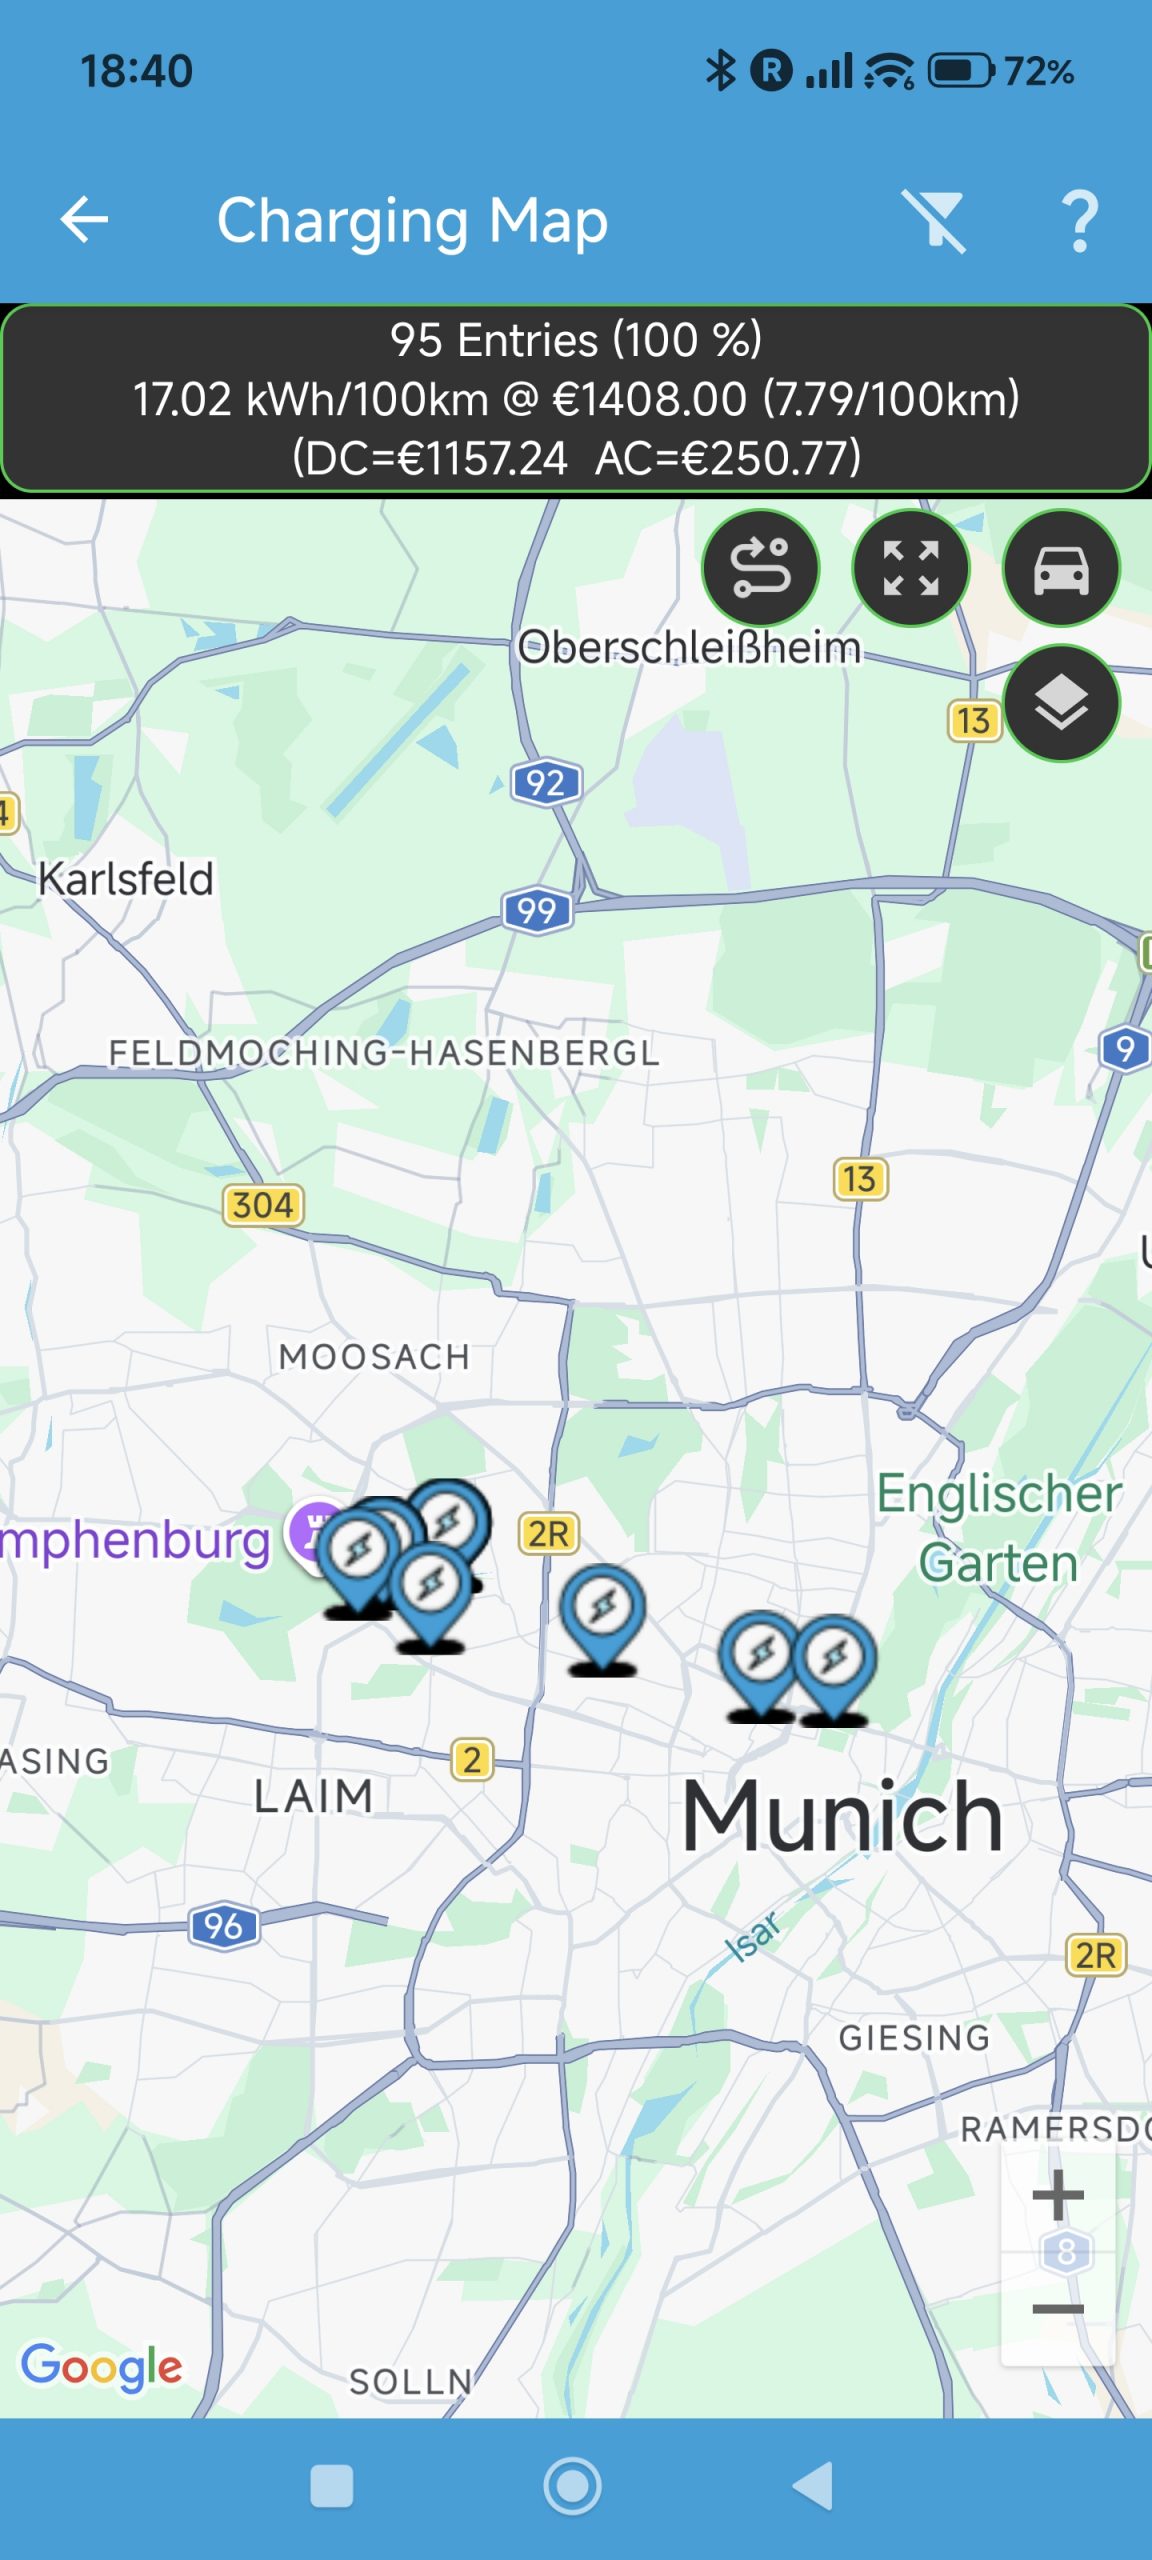
You will see the same summary box at the top of the map. Also, the same filter applied in the list of entries will be applied here – this allows for filtering and visualising based on the same information.
The main buttons are in the top row (from left to right):
1. Show path button, which toggles the drawing of a path between charging log entries
2. Zoom out button, which zooms out the map to show all charging log entries in the visible part of the map
3. Car button, which zooms into the last recorded location of the car itself.
The layer button in the second row allows for changing the map type, similar to Google Maps.
Pressing on any of the blue pins will open information on the charging log entries, explained in the next How-To.
Why: SMore#s provides the same individual charging log entry information as in the list, but visualised in the map for easier geographic browsing – this will require the PRO version!
How: Go into your charging log via the dashboard tab of SMore# and start the mapview through the map menu in the charging log list.
Now browse on the map to find the log entry you would like to view and press on its blue pin, opening an entry dialog as shown below: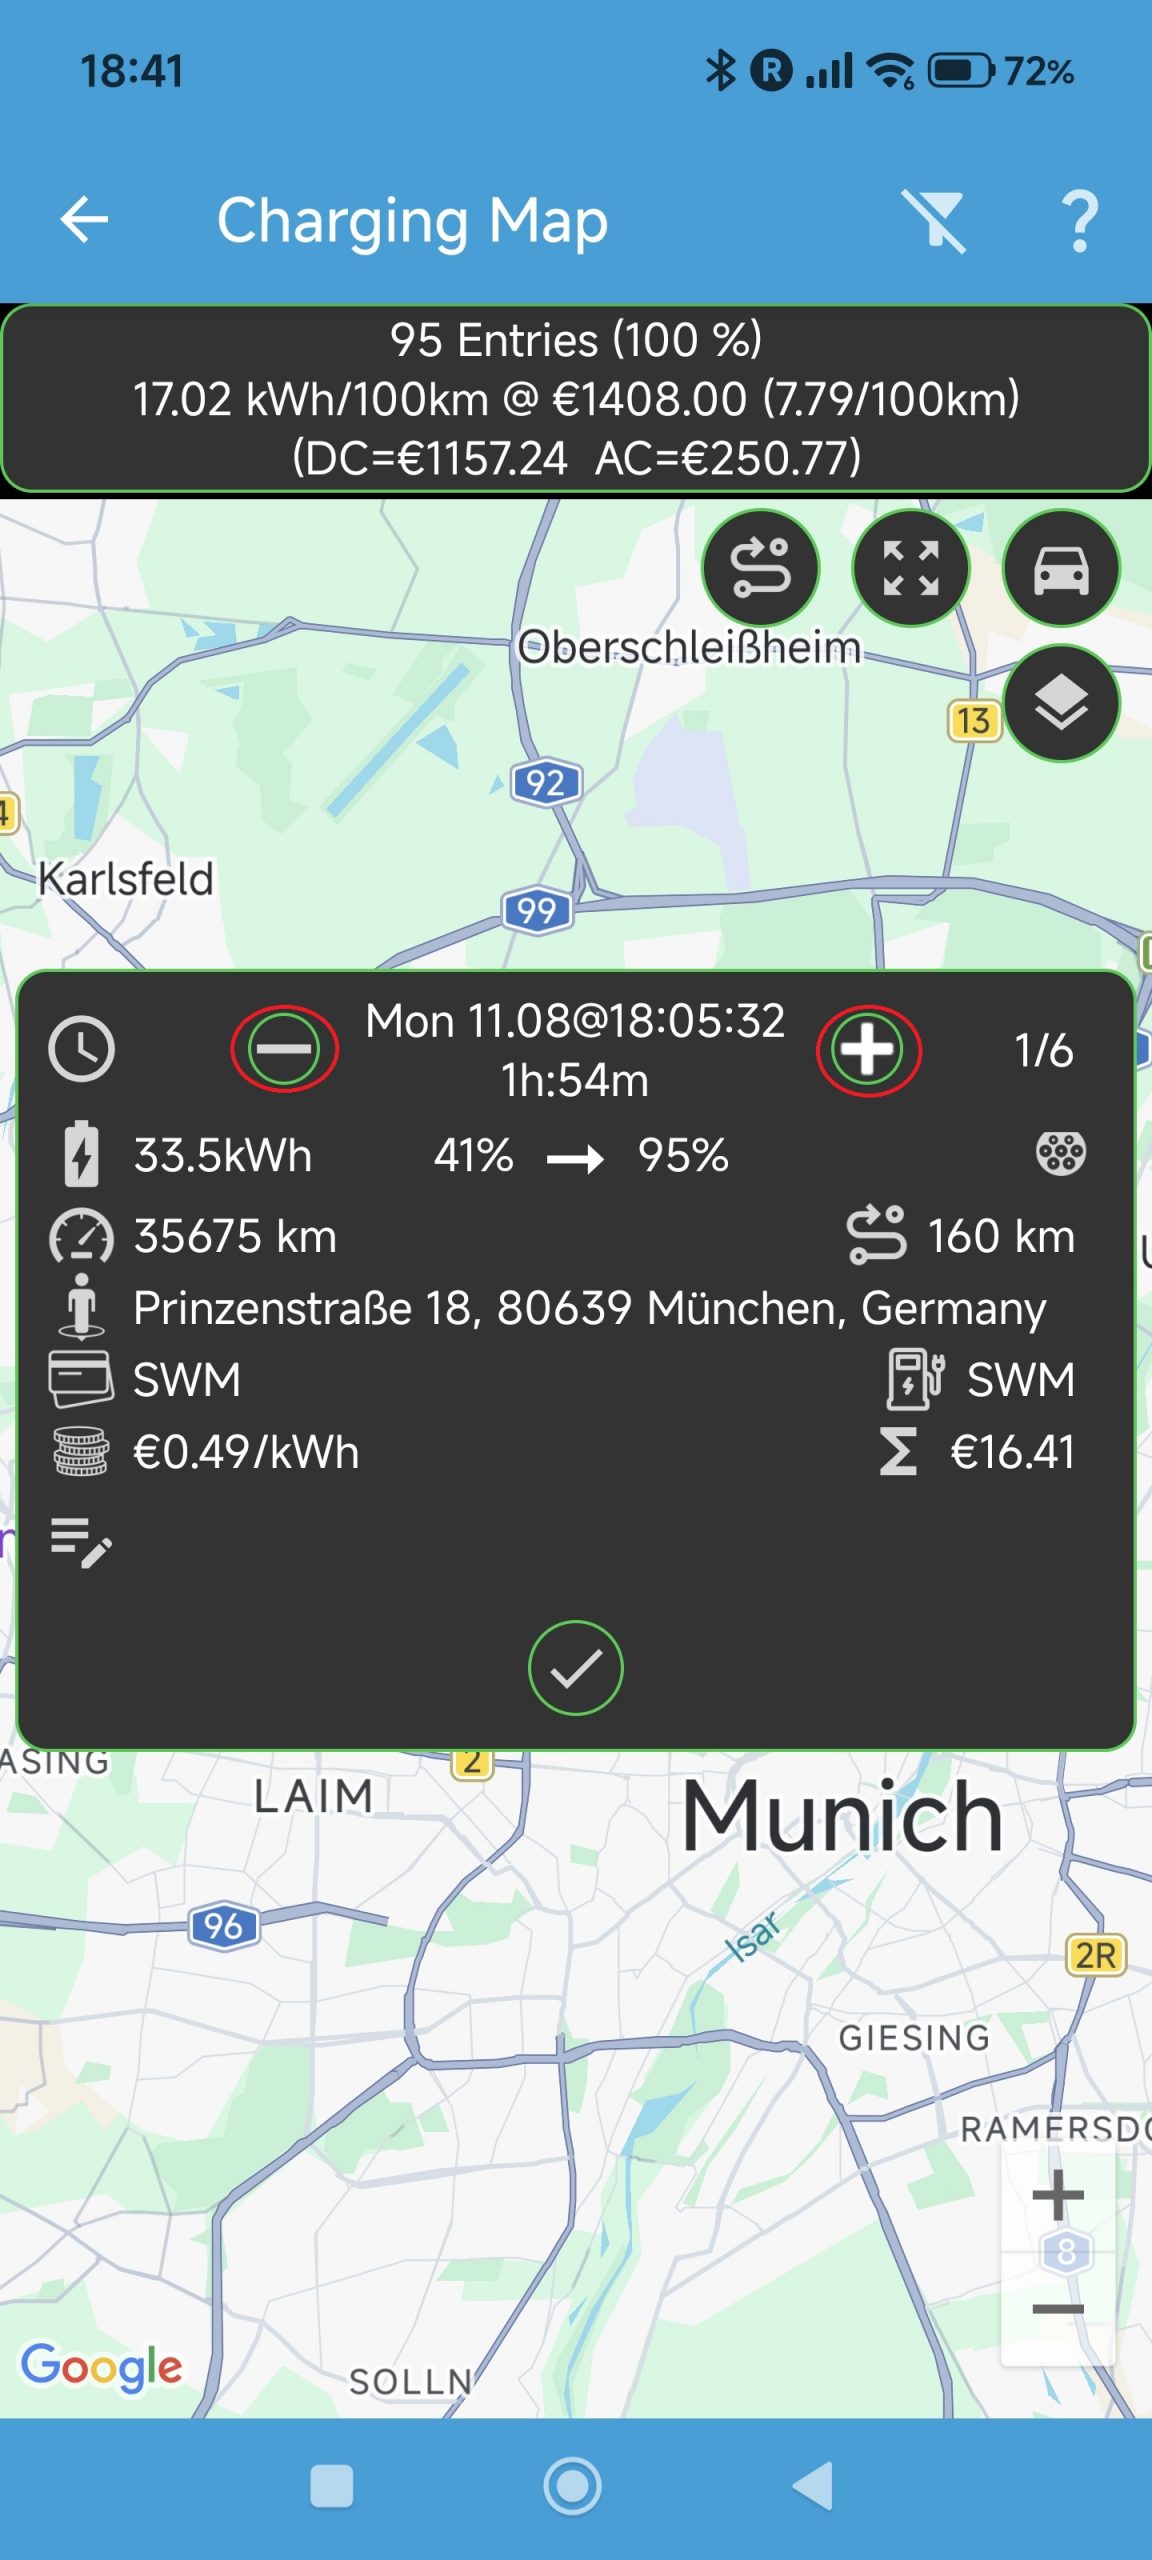
The dialog box is similar to the one in the list view of charging log entries. If there more than one log entry in the same vicinity, the dialog box will show the + and – buttons next to the timestamp, as shown above, which allows scrolling through all entries in that vicinity – the total number of entries in the vicinity are shown on the right, next to the + button.
Note: the vicinity here is defined by the prefill distance set in the SMore# preferences, as shown below:
ABRP
There is a separate, more detailed, explanatin on how to use ABRP for linking your car to this charge planning app available here.
Support SMore# Development
You can donate a coffee (or similar) through the About menu in the app, clicking on the Send a Coffee button in the bottom left of the dialogue box.
Thank you for your support!
Why: The PRO license supports the SMore# development and adds additional functionality to the app. At the moment, this is the ability to see your charge log on a map.
How: You will see a PRO item in the app menu. Press on this item and a dialog box will appear. Press on the button in that box, which jumps to the Google Playstore to purchase the separate SMore# license key.
After the license key app was installed, the PRO item in the app menu will disappear and you will have all functions available that come with the PRO license.
Thank you for your support!